Configuration Options
Most of these configuration options are available at the CDK Application level or through configuration JSON files and should be performed by your development team.
Customize Logos
Logos are in the public folder.
Be sure to customize the favicon.png (or change manifest.json, if using favicon.ico) and the top-logo.svg with logos the customer wants to use.
The easiest way to inject arbitrary content into the bucket is the aws-s3-deployment construct.
const stack = new ExtendedSoftphoneStack(...)
new BucketDeployment(stack, 'AdditionalAssets', {
  sources: [Source.asset(...)],
  destinationBucket: Bucket.fromBucketName(stack, 'HostingBucket', stack.hosting.bucketName),
  prune: false,
});
Recording Controls
Recording controls can be enabled or disabled on deployment.RecordingControls: "true" | "false"
They can also be disabled on a queue basis by setting the contact attribute callRecordingEnabled = "false"
CCPToken/API Authentication
The app uses custom JWT authentication for authenticating the agent to the API.
To obtain a valid JWT we need to set up a few things:
Contact Flows
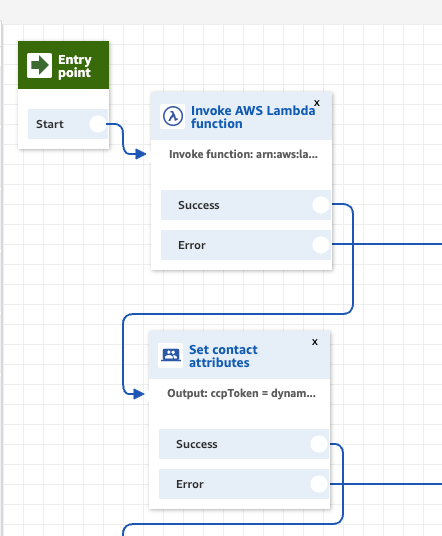
In inbound & outbound contact flow(s), we must call the ccpLogin function and then set the returned JWT - userDefined.ccpToken this is then used in the front end on connection to contact to validate calls to the api.
We can set it to load on a JWT on page load by making an outgoing call and activating the outbound contact flow. Set TokenAuthNumber usually to a number within the contact center. Once the token is received and stored locally the call ends.
Tab Display
The Tab Display is determined in the ScreenPopContainer component, using the screen-pop.json file from the configuration bucket.
If the screen-pop.json.enabled is set to false, then the default splash page will always be displayed with the logo in the middle.
If it is enabled, there are two different ways that tabs can be configured. The parameter that drives which data structure to look at for the configuration is the displaySource parameter:

SINGLE_URL will cause a single URL to be displayed for each incoming and outgoing contact.
If a single url is being configured, the data structure in screen-pop.json will look like this:
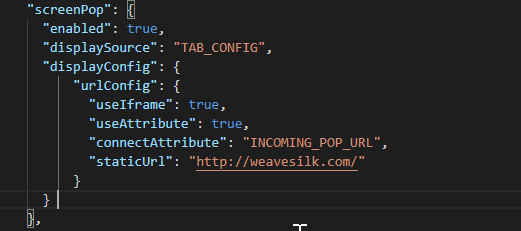
urlConfig makes parameters available to specify:
useIframe : describes whether the URL will open in an iframe within the application or if it will open a new window to display the URL.
useAttribute: describes if the URL is going to be set on an attribute from the Contact Flow or if it will be set from the
staticUrlproperty.connectAttribute: holds the name of the attribute that will be set to define the URL. If
useAttributeis set to true there is no attribute with the name specified, then the application will continue to display the default splash screen.staticUrl: if the URL is not going to be set on the attribute, this field holds the URL to be displayed.
If SINGLE_URL is specified, none of the components that support multiple tabs will load or be downloaded to the client browser.
TAB_CONFIG branches off to create configurable tabs based on call type.

tabConfig is a list of configurations for tabs that will be displayed.
Currently, these configs are only defined for ContactType = VOICE. To extend this functionality to configure displays for CHAT and TASK ContactTypes, this can be added to the getTabs() function in the ScreenPopContextProvider component.
For a VOICE contact, these are the values configured:
callType : different urls can be configured for OUTBOUND and INBOUND calls. Other, less useful, call types for Voice contacts are AGENT and MONITORING.
tabs: These are the tabs that will be opened for the
callTypespecified. Each tab can have four properties:label: required. This is the label that will appear on the tab. The label is also important when overriding the URL and Template values from the Contact Attributes
url: required. This is the default URL that will be displayed in the tab.
defaultUrlTemplate: optional. If a template is supplied, either in the config.json file or through the Contact Attributes, the variables surrounded by {{ }} in the template will be replaced with Contact Attributes of the same name. The
{{domain}}variable is an exception, though; it is always the start of the string and will be replaced with the URL string. If you’d like to add more values to be substituted, such as adding currentClientIdentifier, you can define them in theprocessTemplate()function of the ScreenPopContextProvider.isHidden: optional. Some URLs are used just to send data someplace else, but not to display to an agent. In this case, specify
isHidden: true.
The URL and Template parameters can be overwritten by attributes set in the contact flow. In order to overwrite the url, set an attribute with the same name as the label and add the suffix: _URL or _URL_TEMPLATE and supply the value.
So, to override the display labelled Incoming, the Contact Attribute called Incoming_URL will override the default url parameter specified in the config.json file. Similarly, Incoming_URL_TEMPLATE will override the parameter defaultUrlTemplate.
Call Details
The data source for Call Details is the Connect Attributes. The values of the attributes will be displayed here if they are configured in the call-details.json file.
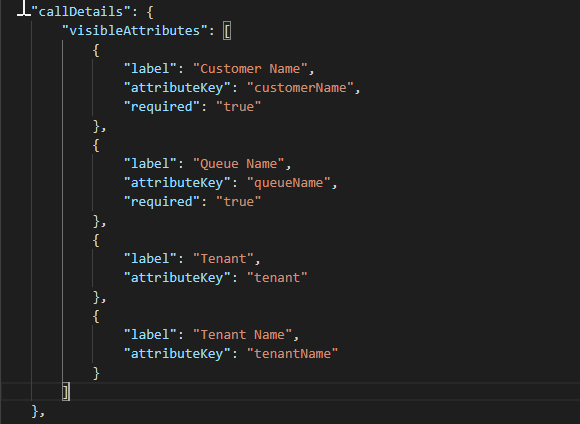
label: This is the name that will show up in the Call Details widget in the application
attributeKey: This is the name of the Connect Attribute that holds the value that will be displayed
required: This is an optional parameter that, if set to true, will force the label to display, even if the value is not set on the Connect Attribute. When this parameter is absent or set to false, the label will not be shown without a value.
Phone Directory
To enable, set the stack prop options.phoneDirectoryEnabled to true.
The data source for the phone directory is phone-directory.json file that's located in the Configuration Data S3 Bucket. That directory is wired into the websocket on the front end, so changes to the phone directory file are automatically propagated to the agents.
The is an example of the data structure that the Phone Directory component expects. Save this as a file, with the filename phone-directory.json in a directory like /assets/config, and pass that directory to the options.configFileDirectory stack prop.
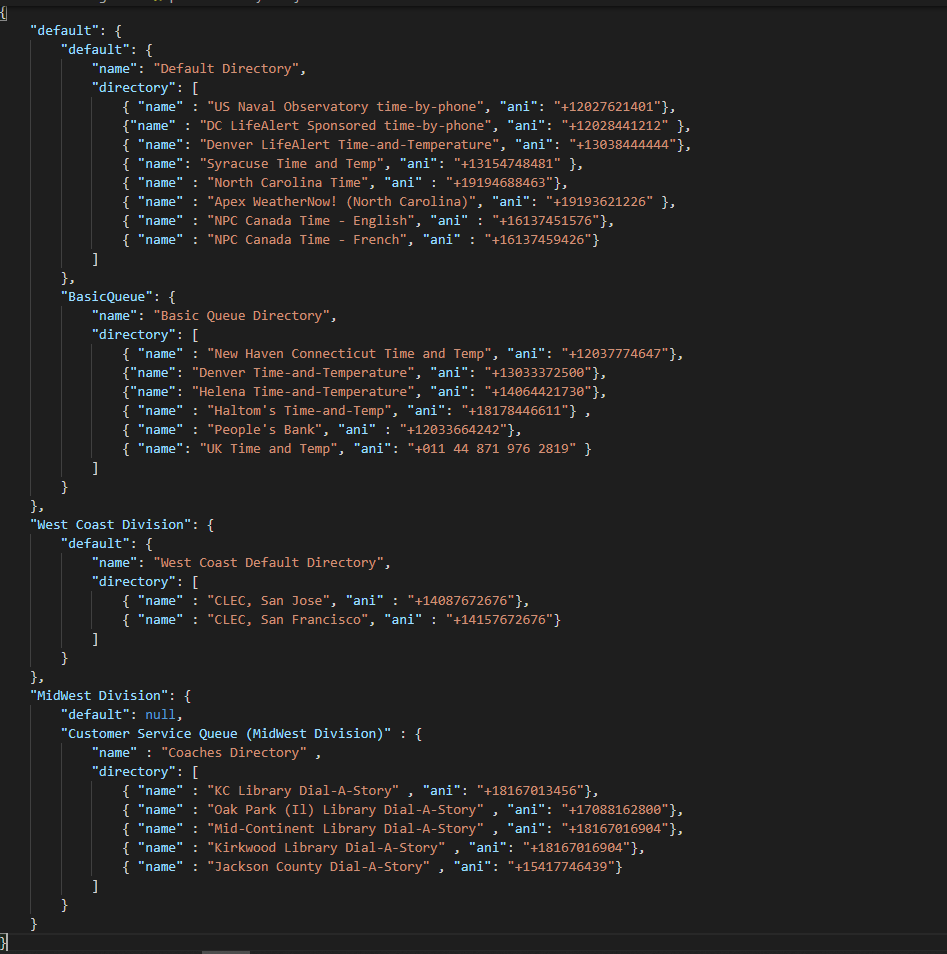
The structure is hierarchical. At the top of the structure is the currentClientIdentifier.
In the above sample, the Client Identifiers are default, West Coast Division, and MidWest Division .
What Is currentClientIdentifier?
For multi-tenant implementations, this is the value that will determine which client / division / subsidiary is currently active.
What if I don’t want to use this multi-tenant configuration?
If you set the string to “default”, it’ll just use default settings. Multi-tenant definitions are not required, but please still pay attention to the data structures that use them and be sure default values are configured.
How can I customize this value?
Currently, this value is set in the CallContext component for each new contact, and the logic to determine what the currentClientIdentifier is can be customized in the getClientIdentifier() function. The current logic looks for the name of the client in parentheses, in the string passed into it. If it sees no match, then it returns the string “default”.
The string being passed into getClientIdentifier() is the Queue Name coming from each new contact, so it’s looking for that client Identifier in the name of the active queue. This can be changed to look at the Agent’s routing profile, or a Contact Attribute, if the logic comes from outside of Connect.
Note: There is only one currentClientIdentifier active at a time, so this will need to be refactored, or determined by Agent only, if the CCP wrapper is used to handle multiple connections.
The next level is the Queue name. Under each of the Clients, there are directory values defined for named Queues; those are the phone options that will show up in this component when a customer calls in on the queue specified. If the queue name can’t be found, then the “default” directory will be passed back.
The directory list is retrieved through an API call to the backend, passing the clientIdentifier and queueName. The backend lambda reads from the Phone Directory .json file using Amazon S3 Select, which is an Athena-like service that allows S3 files to be queried using SQL expressions.

Once the directory is returned, the agent can place calls by clicking on the numbers in the Phone Directory list.
Manual Outbound Calls
Manual Outbound calls allow agents to type in a phone number , and select one of the queues allowed by their Routing Profile, and place a call.
This is similar to the dialpad on the Amazon CCP, but this allows the agent to set the Queue that they’ll be using.
Agent Transfer
The data source for this Component is the Kinesis stream that captures Agent events.
Data comes in from the Kinesis stream and is loaded into the WebSocket Data table.
The data schema on the back end is found at src/services/dataSchema/AgentEventSchema.ts, which wraps the DynamoDB CRUD operations for the Agent Events. Updates to the DynamoDb records trigger the DynamoDb stream to call the WebsocketUpdate lambda, which sends the data back to all the active connections recorded in WebsocketAdmin table.
In the front end, the DataContextProvider uses the data to set up the values displayed. The agent data are filtered through the isRelevantAgent() function in the DataContextProvider. Currently, this is filtering the view only to agents that share the same Heirarchy1 and Hierarchy2 ( Agent Hierarchy in Connect ).
Linking Agent Quick Connects to a logged in Agents Available Transfer options
There are 3 requirements for Agent Transfer to work correctly.
The agent list is filtered by agents in the first level hierarchy (this can be customized if necessary)
The Agent must have an Agent Quick Connect setup
The Agent Quick Connect must use the agent username as the Quick Connect name.
Queue Metrics
The Queue Metrics data is collected in a lambda by calling GetCurrentMetricData for each queue and saving the CONTACTS_IN_QUEUE and OLDEST_CONTACT_NAME in the WebSocket Data DynamoDb table.
The getQueueMetrics lambda function gets metrics for every queue in the system by creating groups of up to 98 queues and querying the api for metrics on all of those queues in a single api call. That data is sent to the dynamo table asynchronously. It typically take < 5 seconds to query and update this data for a system with just over 400 queues. The function then waits until the total execution time equals the QUEUE_METRICS_REFRESH_SECONDS variable and then kicks itself off again. The functionaly outcome is that metrics are retrieved every 15 seconds (by default) and the function runs constantly for billing purposes. Metrics will be significantly delayed if the function runs longer than QUEUE_METRICS_REFRESH_SECONDS.
The data is then sent to the front end as an array of queue metrics and displayed for the queues allowed in the agent’s Routing Profile. The websocketUpdate lambda function sends this data as an array to all of the connected users. Metrics can be delayed if this functions runs long or fails. The environment has been tested in a system with over 400 queues and 1900 connections You may need to increase the memory on the websocketUpdate function if it runs long.
The data can also be queried in a Contact Flow to get position in line for a queue. Be sure to use the QueueMetricSchema in the services/dataSchema directory to query the data in the correct format.
Call History
The data source for this component is a list kept in browser local storage. The component simply adds calls to the list as they go out and come in.
Call Log
The data source for this Component is the Kinesis stream that captures the CTR events.
Data comes in from the Kinesis stream and is loaded into the WebSocket Data table.
The data schema on the back end is found at src/services/dataSchema/CallLogSchema.ts, which wraps the DynamoDB CRUD operations for the CTR Events. Updates to the DynamoDb records trigger the DynamoDb stream to call the WebsocketUpdate lambda, which sends the data back to all the active connections recorded in WebsocketAdmin table. Call Log records are only sent to the agentUsername that handled the call.
On the front end, the DataContextProvider adds the information from the CTR record to the Call Log list for the CallLog component to display.
Disposition
Distribution appear after the call ends, when the agent is on After Call Work.
The values displayed can be configured to use multi-tenant definitions from a separate dispositions.json config file stored on S3.
The data format of the file is:
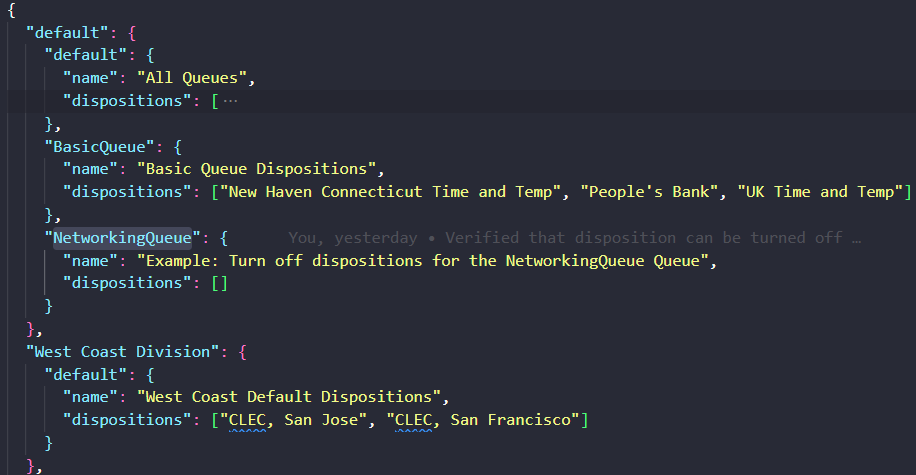
Note: pass an empty array to disable dispositions for a queue
This data structure matches the one described for the Phone Directory.
The top level is the clientIdentifier , and the next level is the QueueName.
Any of the values not defined will use the default value.
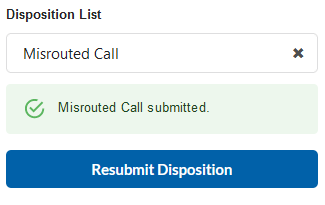
When a disposition is saved, it is added to the CTR record through the updateContactAttributes api.
