v1.0 - Zones and Zonesets
Concept Introduction
The third “gate” in the record dialling assessment process is zones, and zone groups. Zones and zone groups form a very important part of the decision making process the dialler undertakes to determine whether or not a particular record can be dialler. These items work in concert with each other, and are configured at the instance level along with Dispositions, Schemas, Operating Hours, and Event Closures, the dialler assesses zones at the record level.
The reason zones and zone groups exist is to maintain dialling time control over records, at the record level. Applying these concepts allows granular control over records, ensuring you only dial certain zones (generally, the state that the customer lives in) at the right times, ensuring that you conform to your legal responsibilities as outlined in the Telecommunications (Telemarketing and Research Calls) Industry Standard 20171 (Part 2, Section 8).
To ensure compliance to this standard, OCM looks for a value which you must set against every record you import into a campaign. This value is assigned to the ZONE field, which is a mandatory input parameter for every record. Your zones can be completely customized (ie, you can include any set of values for this field). You would then map the zones at the instance level in the dialler, and then map these zones to zone groups, which apply a schedule to each zone. You would then apply the zone groups to your campaign on a one-many basis, which gives you the flexibility to easily change zone groups (ie, Daylight Savings time changes, or mass campaign changes) at the instance level.
It is important to understand that zone groups schedules outside of operating hours will not allow records to be dialled.
Zones and zone groups are easy to configure, and allow for greater flexibility in dialling times at the record level. Lets go into some more detail now around the pre-requisite steps needed to configure zones and zone groups, before we dive deeper into the configuration aspects of zones and zone groups.
Pre-Requisites
To configure zones and zone groups, there are four very important pre-requisites which must be catered for. These are described as follows:
Understand the dialling gates
It is important to understand how zones and zone groups dialling times work in conjunction with the other gates in your system. These gates, in order of execution, are as follows:
Gate 1 - Event Closures
Gate 2 - Operating Hours
Gate 3 - Zone Group Hours
Gate 4 - Filter Conditions
In other words, records will not dial in a campaign unless there are no active event closures, the campaign is within operating hours, the record is within zone group’s hours, and the record passes filter conditions. These separate gates are described elsewhere in this training guide, however it is important to understand that zone group hours (Gate 3) is considered only if Gate 2, and Gate 1 are passed before zone group’s hours are assessed.
Record Payload Preparation
You must prepare your records at the lead generation stage so that the “ZONE” value accompanies each record, for it to be uploaded into any campaign. ZONE is a mandatory input field for all records, when uploading to OCM.
Understand your potential zone values
You must capture all possible ZONE values which you may send through as part of the record payload. For example, after analysis of your CRM, you may find that your records may contain one of the following zones:
VIC
NSW
VIC/NSW
ACT
NSW/ACT
QLD
SA
EDST
EST
The reason that you need to understand all potential values is due to the issue of zone orphaned records being inserted into the dialler. The dialler will not validate the ZONE field against zones configured at the instance level (ie, as long as your record has something in the ZONE field, the record will be imported). However, if you import a record with a ZONE that you have not mapped at the instance level, the record will not dial.
These zones need to be identified, in preparation for the next step
Assign acceptable dialling times (by campaign)
For each zone, you should assign acceptable dialling times. These are assigned as a day/time schedule. If these need to differ by campaign, you will need to cater for this, however if zone dialling times remain static across all campaigns, assignment of dialling times can be completed once. All dialling times should be in reference to local time.
Note: your local time changes for Daylight Savings automatically for your own state.
An example of different dialling times per campaign may be:
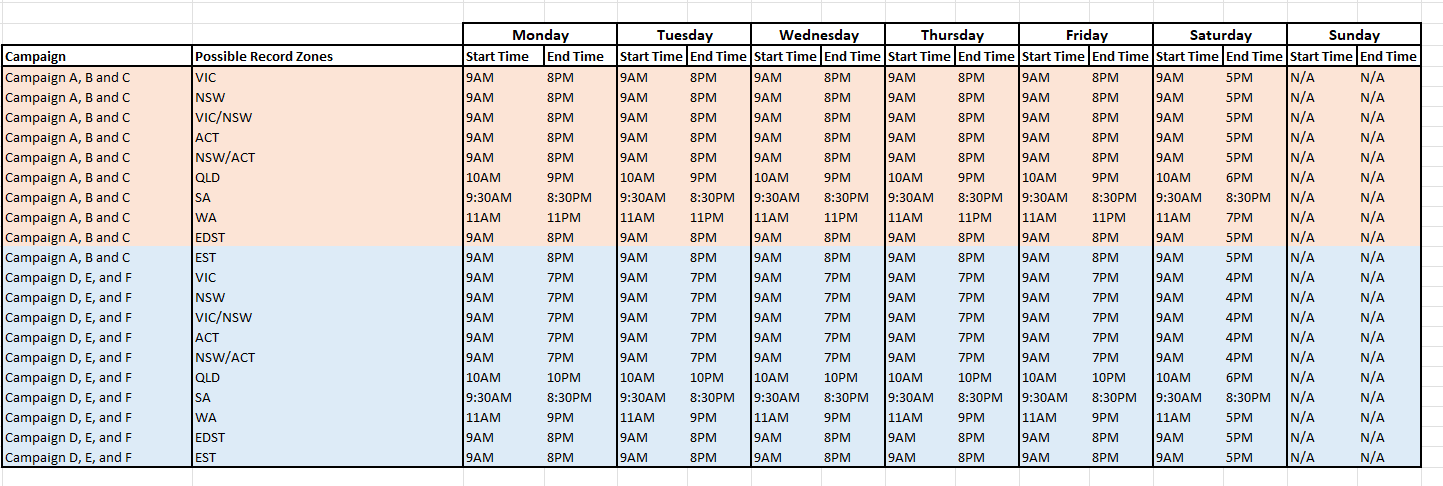
An example of the same dialling times for all campaigns may be:

As mentioned, all dialling times relate are set in local time, which automatically updates for Daylight Savings. It is worth noting that these times will likely need to be changed when Daylight Savings kicks in and out (ie, 11AM in Sydney is 9AM in WA during EST, however it is 8AM in WA during EDST). We will cater for this a little later in the guide.
Now that we have a good understanding of the pre-requisites, lets look at the actual configuration of OCM at the instance level, so that we can prepare for the application of these configuration items at the campaign level.
Configuration
The first steps to configuring your zones and zone groups in the OCM Administration Portal is to add your list of individual zones (which you prepared above), then assign these zones to zone group schedules. You will name your schedule/s, and then assign these schedules to your campaigns. Let’s begin:
Step 1 - Navigate to “Zones”
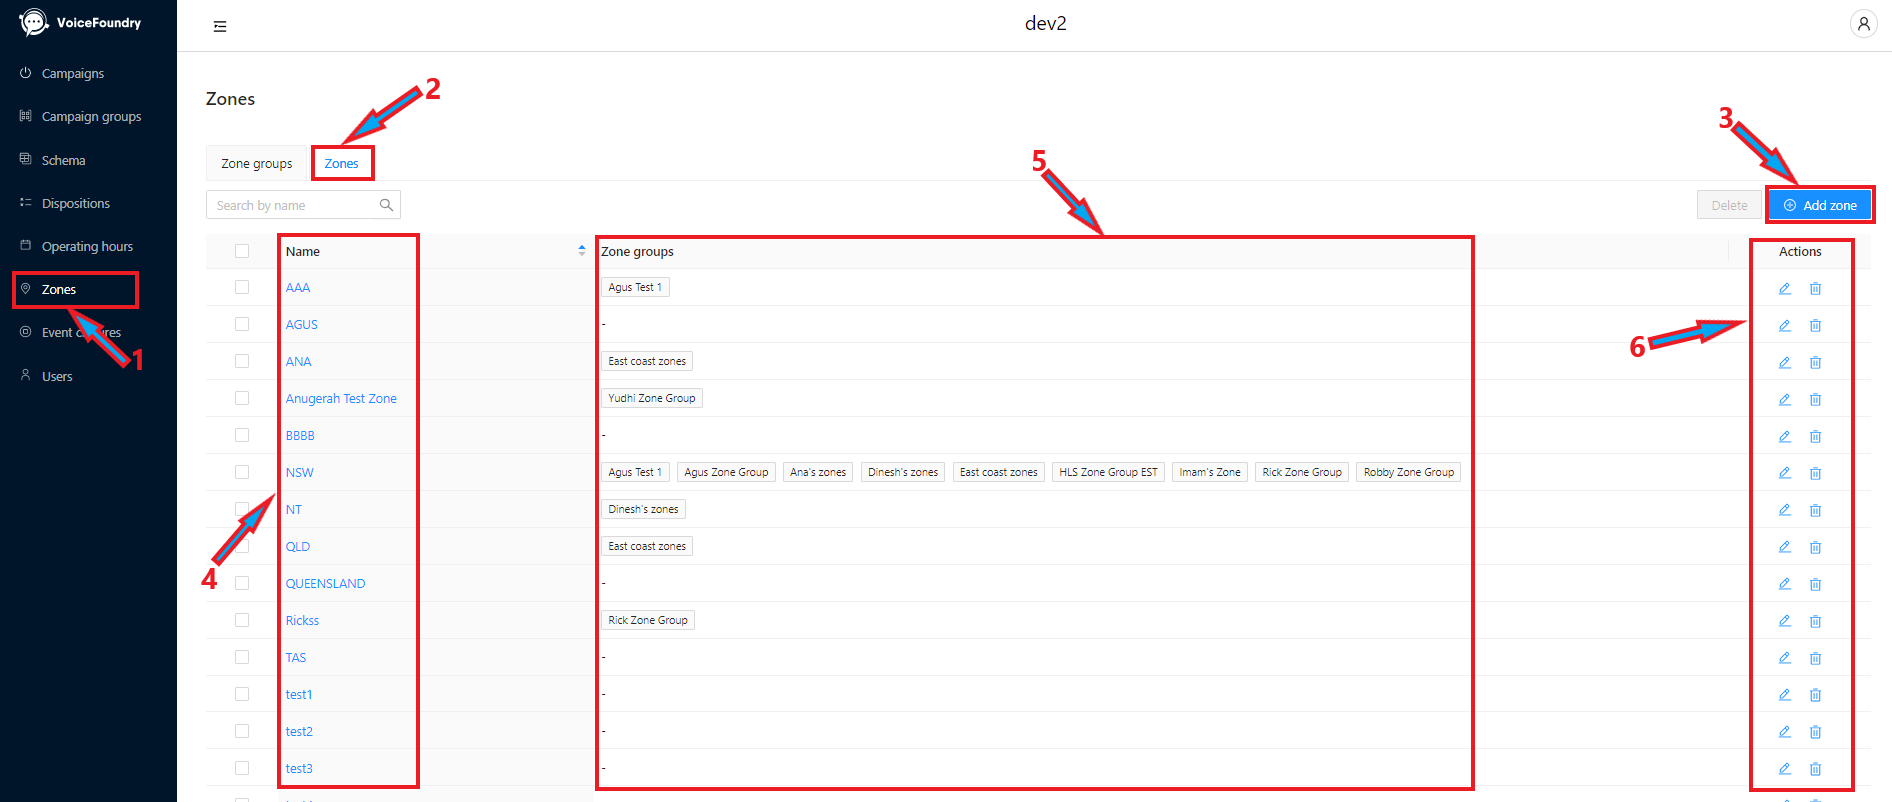
In the Dialler Management Application, navigate to “Zones” (1), then select the “Zones” sub-tab (2). You will be presented with the below interface, which includes an option to add a new zone (3), configured zone names (4), zone groups that the zone is assigned to (5), and some actions you can perform on the zones (6):
Step 2 - Add your zones
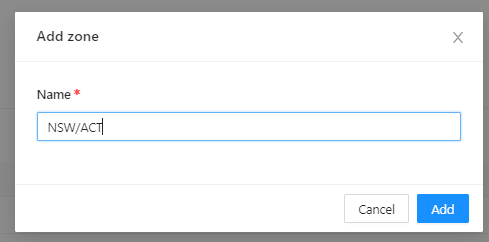
Click the “Add Zone” button. You will be presented with the below, where you will be able to configure a zone. Manually type in the zone names (as per your configuration in the pre-requisite step) and click “Add”. Your newly create zone will appear in the list above. Continue to create all of your zones:
Step 3 - Navigate to Zone Groups
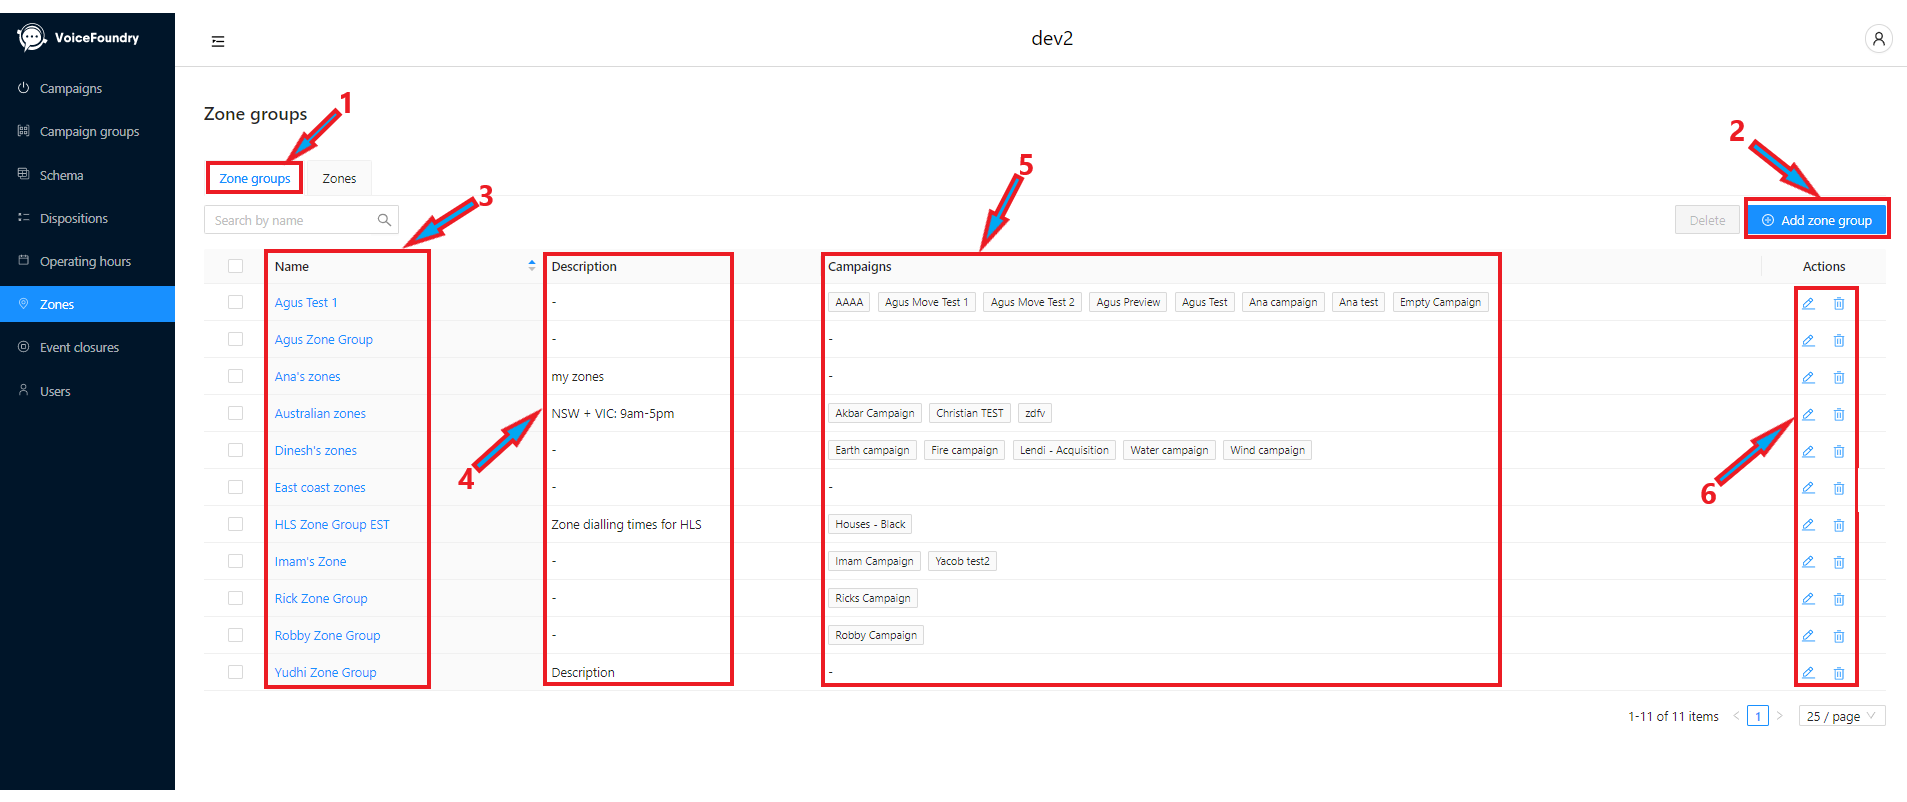
Now that we have created our zones, navigate to the “Zone Groups” sub-tab in the “Zones” configuration section (1). You will be presented with the following interface, with a button to add a new zone group (2), your list of zone groups (3), a zone group description (4), the campaigns assigned to each zone group (5), and some edit/action buttons (6). Click the “Add Zone Group” button (2) to proceed:
Step 4 - Configure your zone group
Clicking “Add Zone Group” will take you to the below page, containing a section to add your Zone Group name (1), Description (2), and a section to import your zones, and set your schedules against the zone. Name your zone group, add a description if required, and click on the “Add Zone” button (3) to expose the following modal:
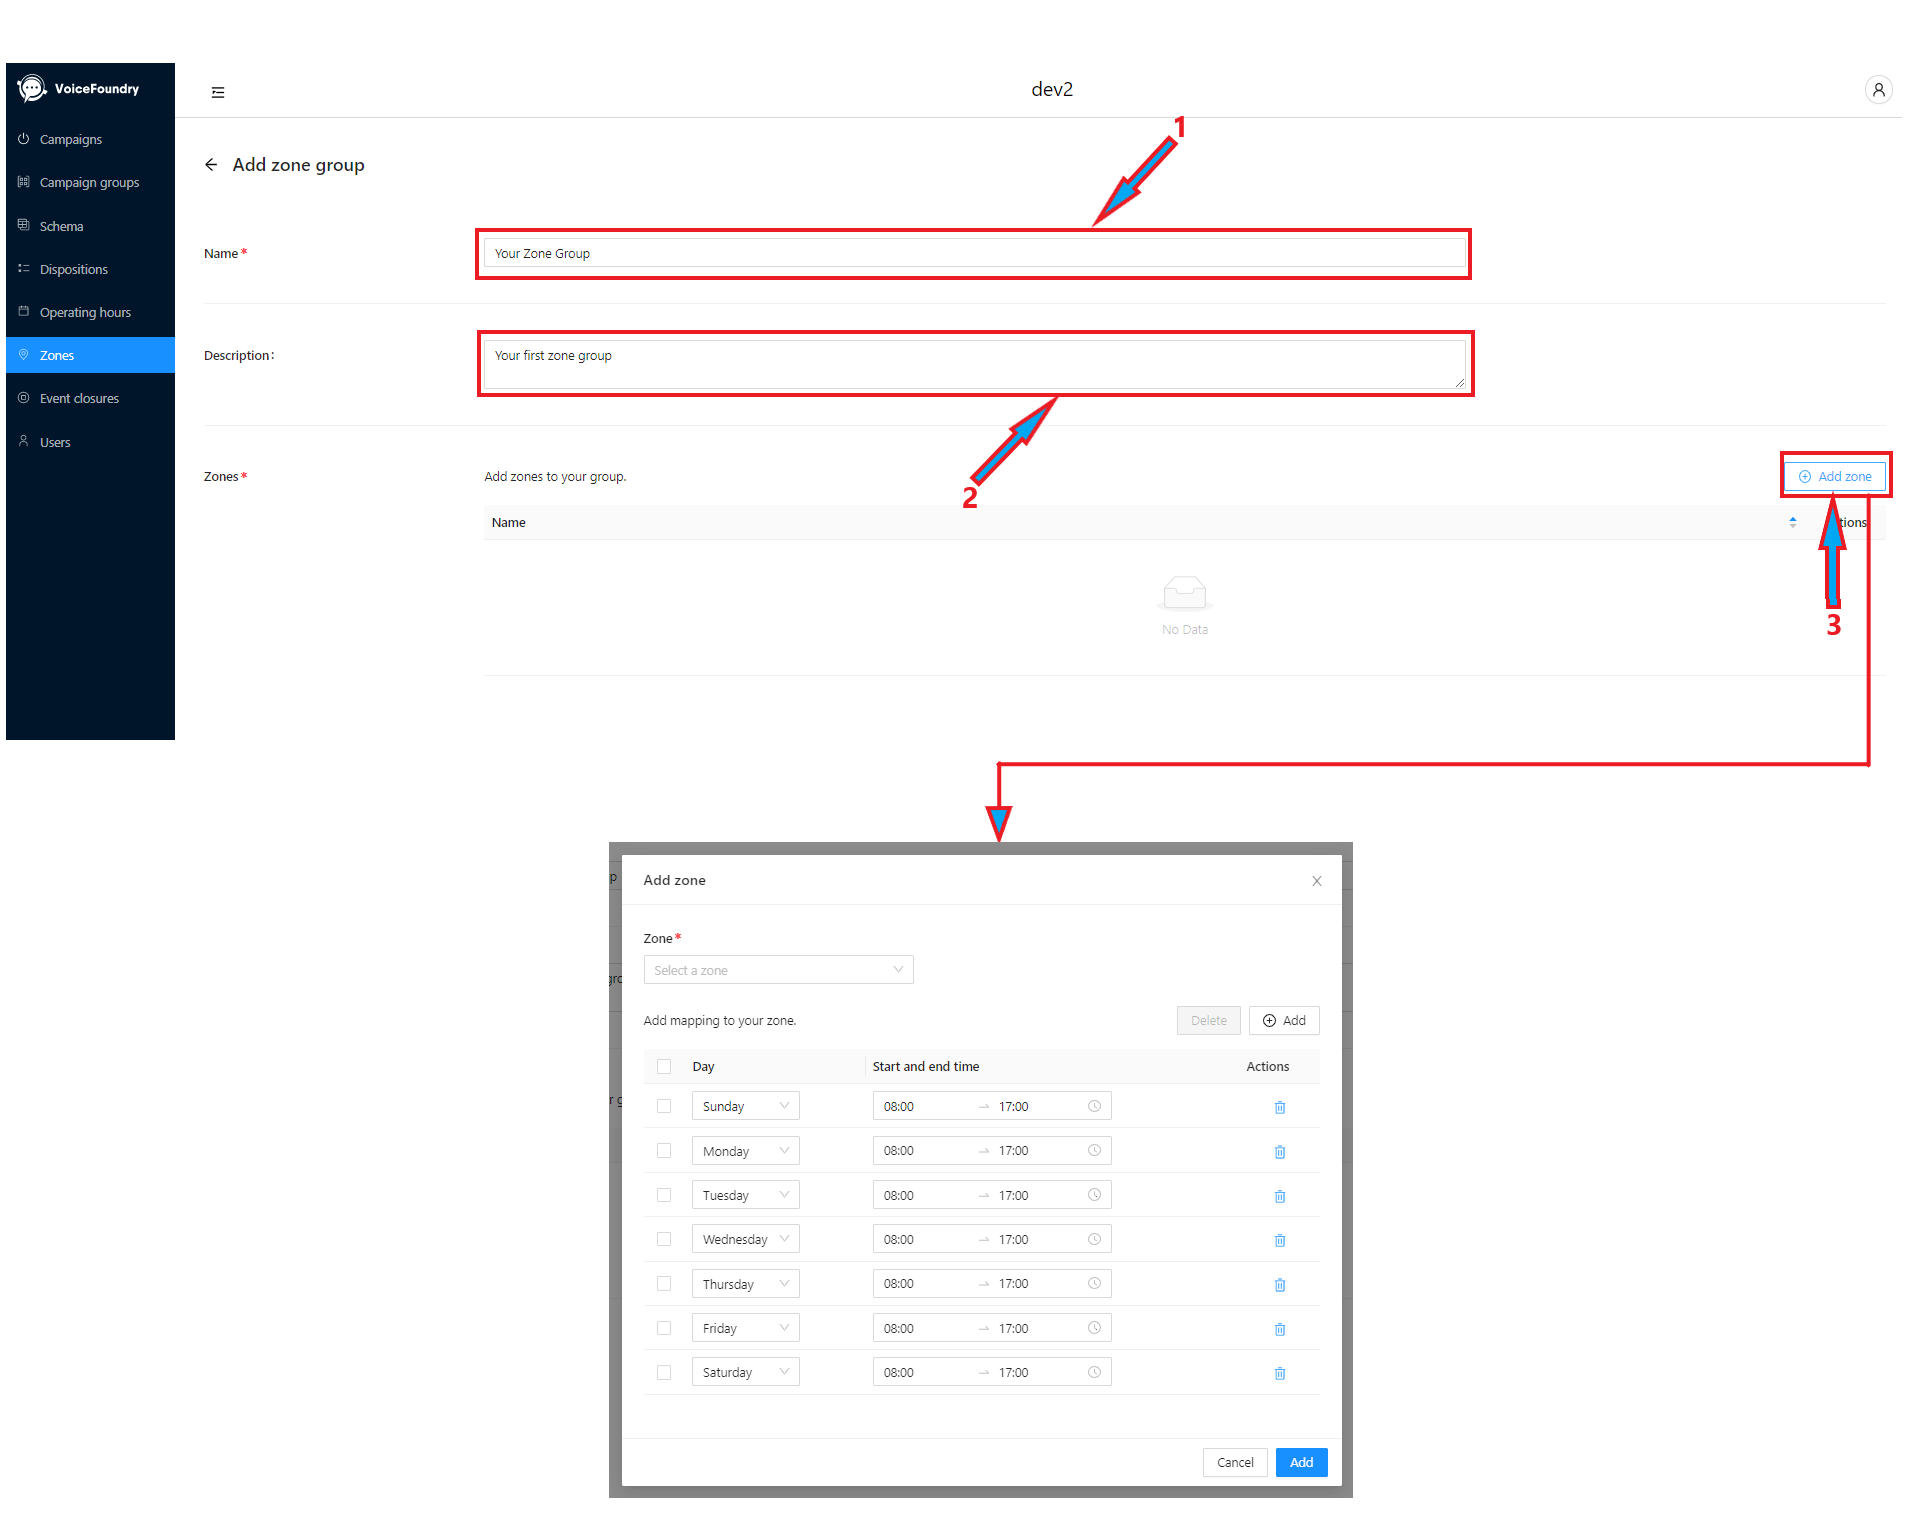
Step 5 - Add your zones and zone schedules
Click the “Zone” button (1) to list the zones you configured in step 2. Select your first zone (as per the pre-requisite steps), and assign times to that zone (2). Click “Add” (3) when done:
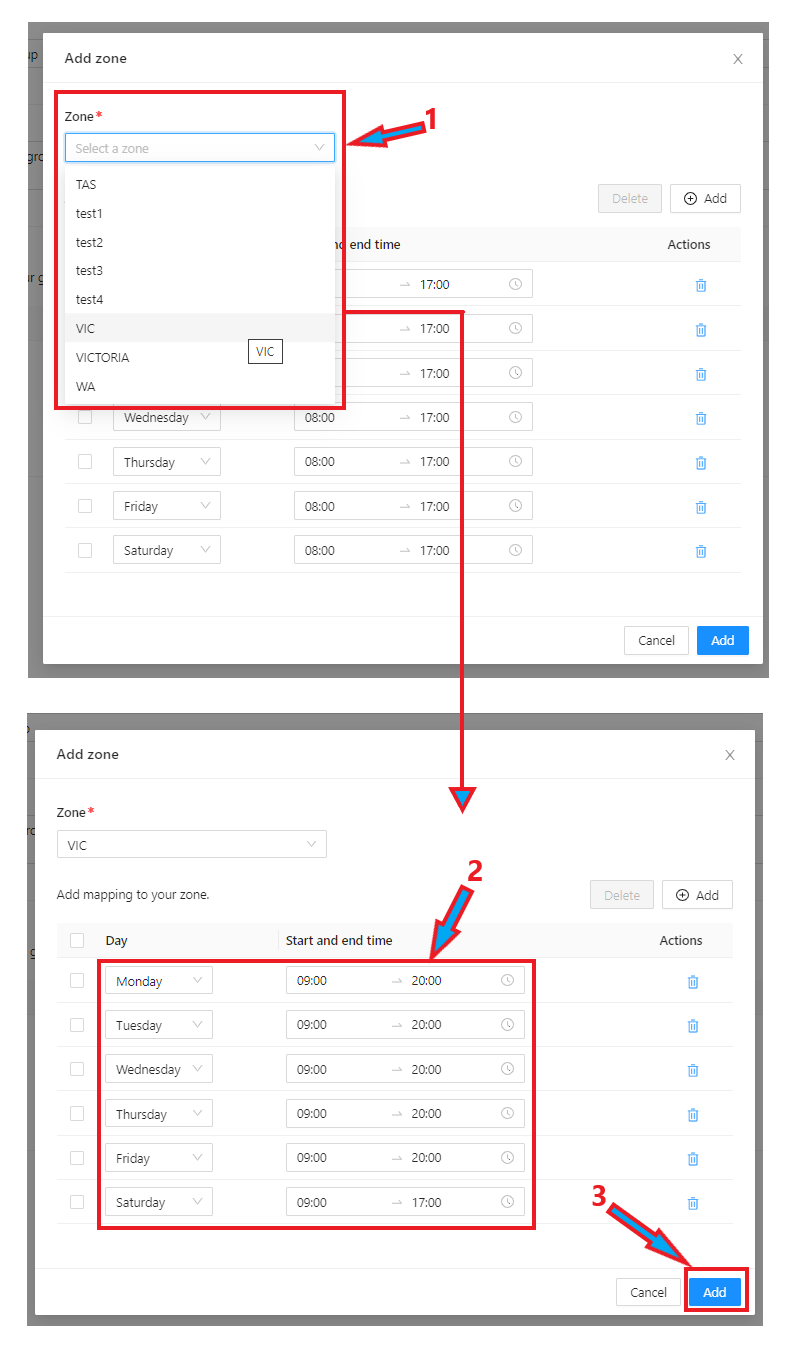
Step 6 - Repeat for all required zones in your group
Repeat the above step by clicking “Add Zone” and configuring each zone, one by one, until all of your required zones are configured.
Step 7 - Save your Zone Group
When complete, click the “Save” button on the bottom right corner of the zone group.
Step 8 - Add more Zone Groups (if required)
If, during the pre-requisite steps, you discovered that you needed more than one zone group to cater for your campaigns, repeat this process from step 3 onwards, until all of your zone groups have been created.
Step 9 - Add Zone Group to campaign
The next step will be covered in more detail in the “Campaigns” section of this training guide.
Reporting/Dialling Considerations
There are some items to be aware of when it comes to zone dialling times. These are split across reporting, and dialling:
Reporting
The “Records Available Now” statistic does consider zone dialling times when displaying this statistic
If a record is outside of the zone dialling time applied to your campaign, it will not appear in this statistic
The “Total Active Records” statistic does not consider zone dialling times
All active records therefore will be included in this statistic
Dialling
Fresh records, group callbacks, and recalls are all subject to Zone dialling times, however agent callbacks are not, and will dial outside of the zone dialling times
