v1.0 - Tour of the solution
Lets take a little tour of the VoiceFoundry OCM user interface. There are many different elements which make up the dialler interface. Each module will contain further options than we will cover below, and we will go into more detail for each module in it’s assigned section in this guide. At a high level, let's go through these one by one below.
Home Screen
When you open the dialler administration portal via the URL provided to your organization, you will initially land on the Campaigns screen. We will go through this in more detail below, however lets talk in this section about the different UI elements that you will see on this screen, apart from the campaign configuration:

Module Selection Ribbon: the module selection ribbon provides navigation options for the dialler admin portal, allowing the user to navigate between the different setup and configuration sections, such as Campaigns, Schemas, Dispositions etc. Some of these items will open a separate tabbed module with more options in the main screen (section 4 as indicated in the above screengrab)
Menu Collapse Button: this button will collapse the module selection ribbon, to give you more room to view your items in the main screen (section 4 as indicated in the above screengrab)
User Options Button: this button allows the user to sign out of the dialler administration portal
Main Screen: this section will be populated with information pertaining to your selected module
Every screen will also have page advance and items per page buttons to allow you to navigate between the multiple page results you may have in section 4 (as indicated in the above screengrab)

Campaigns
The Campaigns section will populate a list of your currently created outbound campaigns, with important metrics and controls for each campaign.
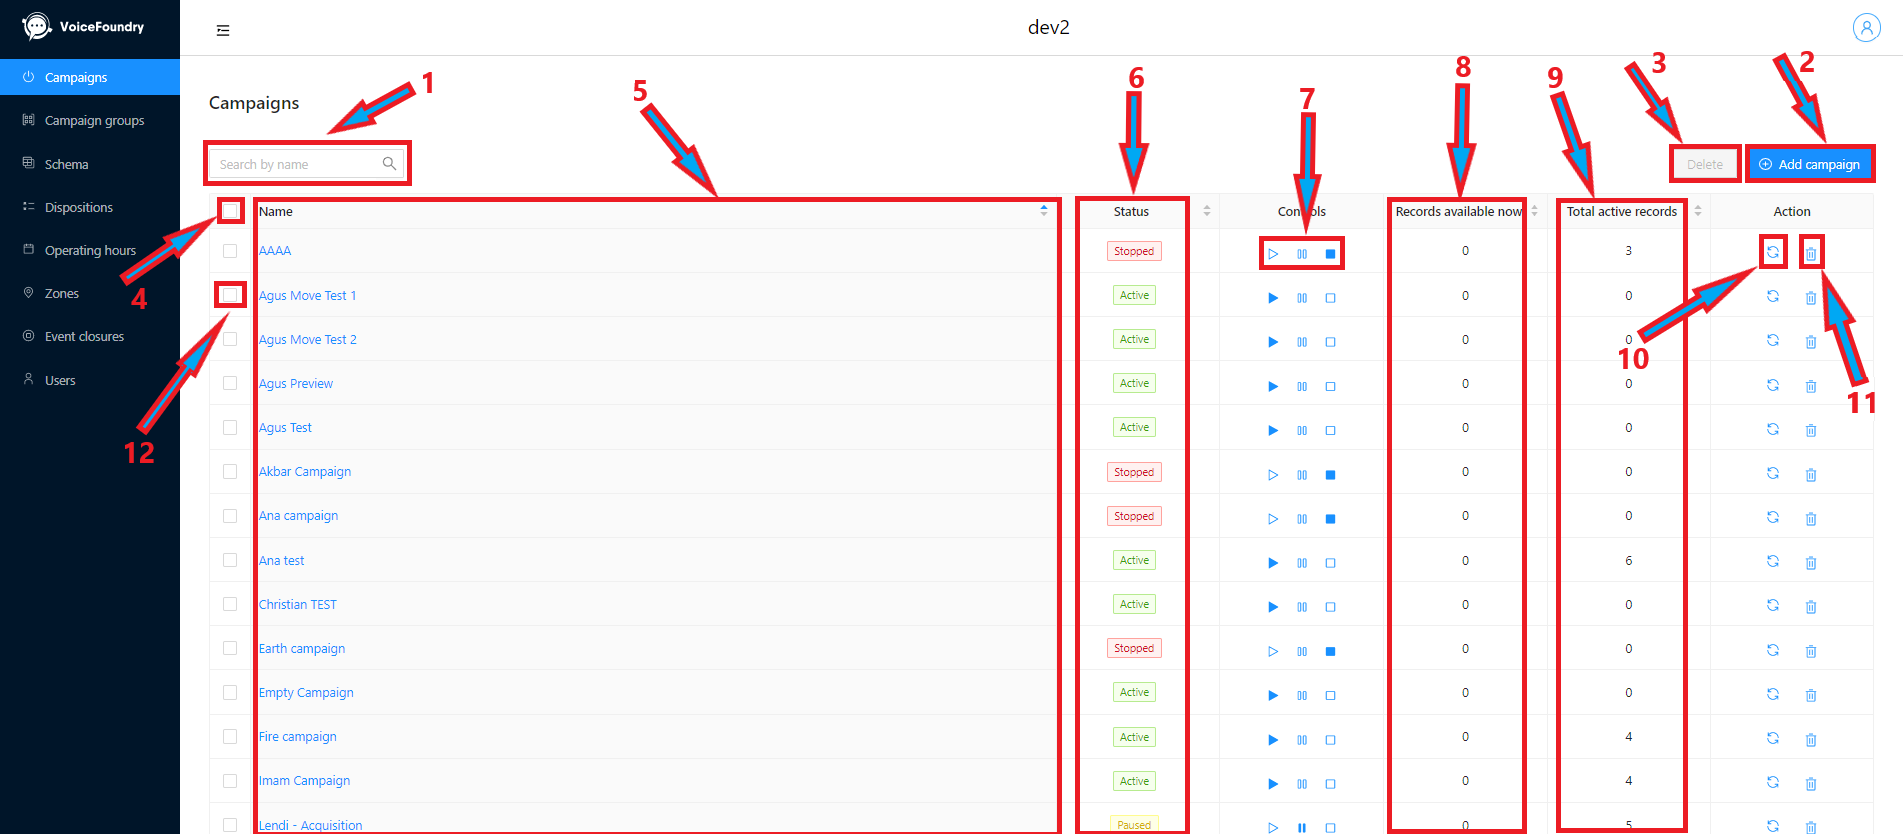
Search Campaign: allows you to fuzzy search for a campaign in your list of campaigns
Note, this is a common field in all applicable modules
Add Campaign: allows you to setup a brand new campaign via our campaign creation wizard
Delete Campaign: deletes campaigns selected via the “Select Campaign” button (button #12)
Select All Campaigns: allows you to select all campaigns in your campaign list
Note, this is a common field in all applicable modules
Campaign List: all of your campaigns are here. You can click on any campaign link to edit the campaign
Campaign Status: the current active status of your campaign (Stopped, Paused, or Active). Statuses are colour coded
Campaign Controls: allows you to set the active status of your campaign. Options are Active (play button), Paused (pause button), and Stopped (stop button)
Records Available Now: metric displaying all records available right now to dial. Records included in this metric conform to the following logic
If a campaign is subject to an event closure, this metric will show 0 records
Operating hours will not affect the number of records available now
Records excluded by zoneset dialling times will not appear in this metric
Any record available right now (ie, the recall or callback time has passed), whilst conforming to the above rules, will appear in this metric
Records filtered out via a filter statement will not appear in this metric
Records inserted with an orphaned zone (ie, a zone not assigned to the campaign zoneset) will not appear in this metric
Total Active Records: is a count of the total records in a campaign list with a status of “Active”.
Event closures, Operating Hours, and zoneset dialling times will not affect this metric
Filtered records will be included in this metric
Orphaned zones will be included in this metric
Recycle Campaign: pops a modal which will allow for the resetting of recall and callback times, by disposition
Delete Campaign: allows for deletion of a single campaign (campaign must be stopped)
Select Campaign: selection button for individual or multiple campaigns
Note, this is a common field in all applicable modules
Campaign Groups
The Campaign Groups section will list your configured campaign groups. Campaign groups contain campaign/s, configured at different priorities, with configurable weighting options, and are applied to agents in the VoiceFoundry Agent Desktop.

Campaign Groups List: this section lists your configured campaign groups
Number of associated campaigns: this section lists the number of campaigns associated to each campaign group
Add Campaign Group: provides the functionality to create a new campaign group
Delete Selected: deletes selected campaign groups
Delete Individual: deletes the campaign group at an individual level
Schema
The Schema section allows you to configure all schema fields which may be applied to your campaigns. You will need to configure all of the possible fields you would like to import into the dialler in this section if you would like to use the fields for filtering, sorting, agent display, record insert validation, as well as if you would like the field returned in the attempt reporting payload.
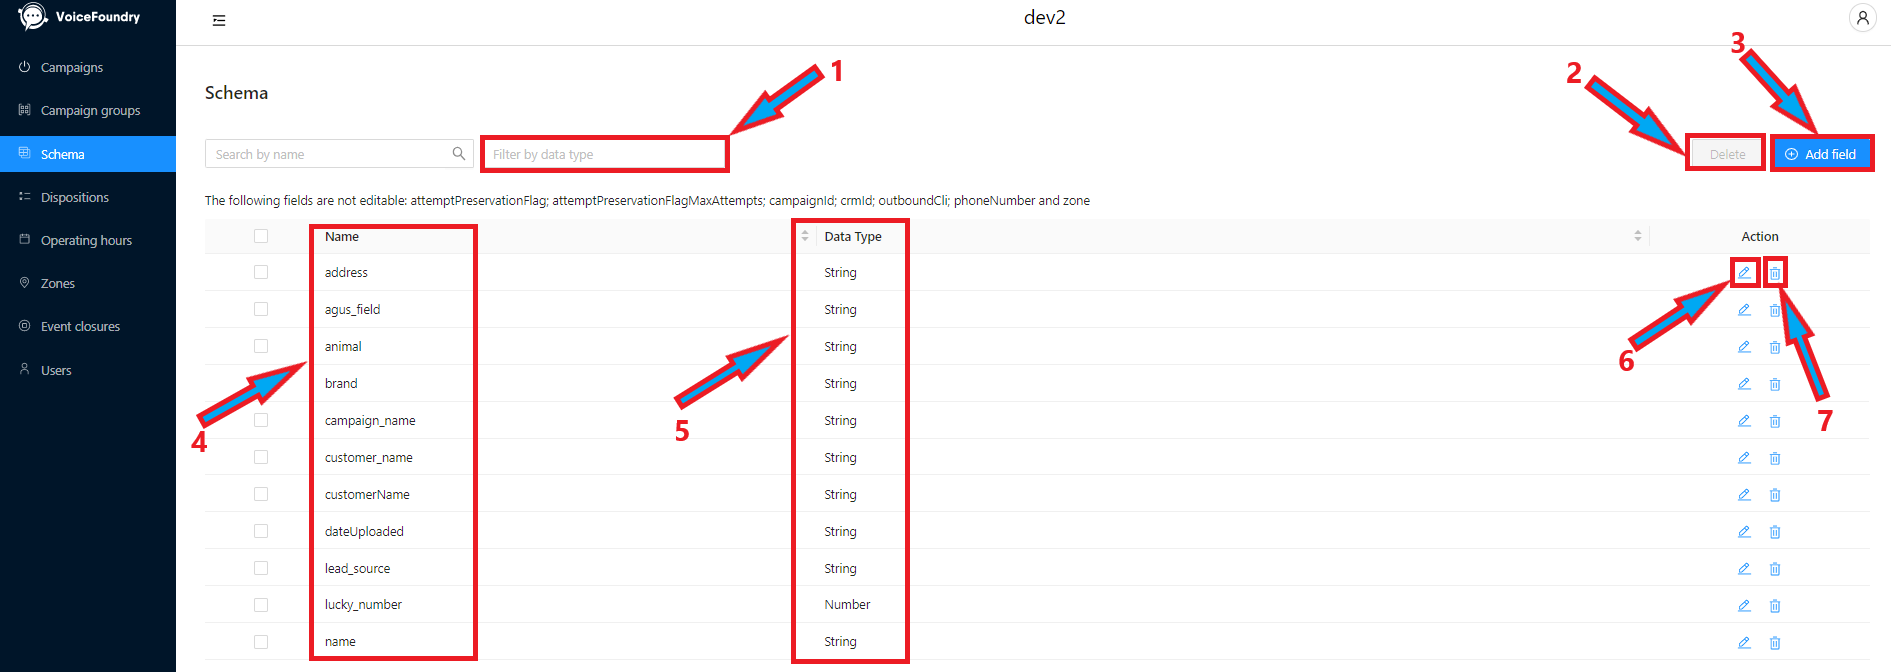
Filter by data type: allows you to filter your configured schema fields by data type
Delete Selected: allows you to delete the selected schema fields
Add Field: allows you to add a new schema field
Schema Field List: displays a list of all of the schema fields you have configured via this interface
Data Type: displays the data type for your configured schema fields
Edit Field: allows editing of an existing schema field
Delete Individual: allows for the deletion of an existing schema field
Dispositions
The Dispositions module will pop up with two separate modules.
Dispositions Module
The dispositions module is where you would setup your individual, de-duplicated dispositions labels, in one large list. After creation, these dispositions are assigned to disposition groups.

Disposition Groups Tab: this button takes you to the Disposition Groups section (below). Button 1 and 2 allow you to navigate between the two sections
Dispositions Tab: this button takes you to the screen above. Button 1 and 2 allow you to navigate between the two sections
Disposition Groups: this section shows the disposition groups applied to each individual disposition
Name: the name of the configured disposition
Delete Selected: deletes the selected dispositions
Add Disposition: adds a new disposition to the list
Edit Disposition: allows editing of the selected disposition
Delete Individual: deletes the selected disposition
Disposition Groups Module
This module allows for the creation of groups of your configured dispositions. You will set your disposition types and recall times in this section.
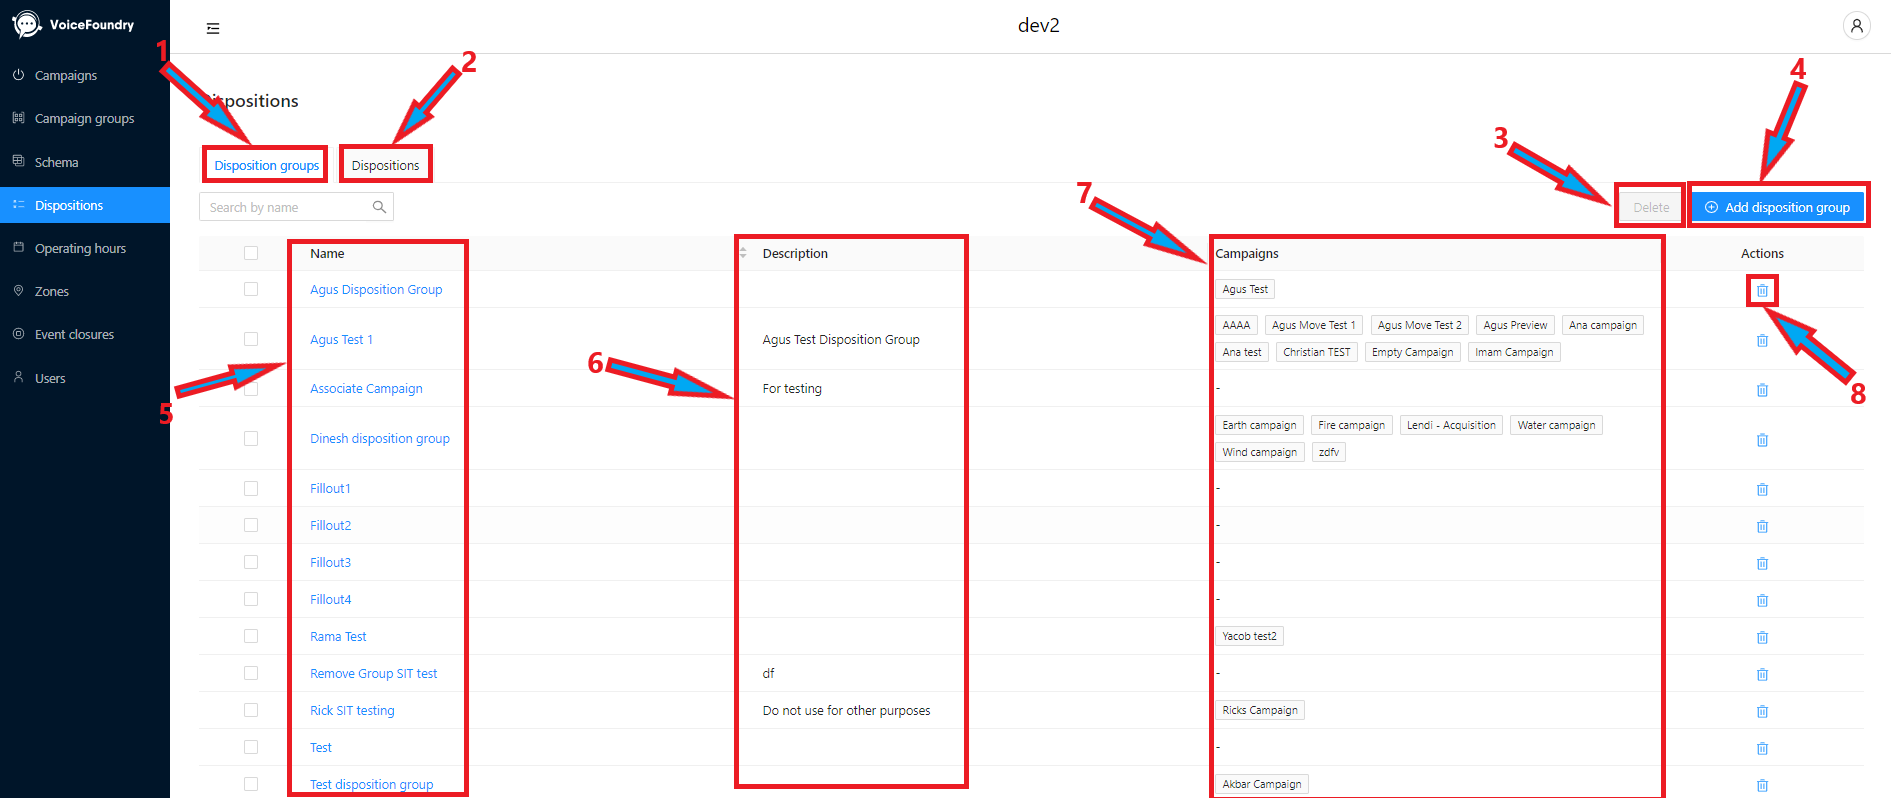
Disposition Groups Tab: this button takes you to the screen above. Button 1 and 2 allow you to navigate between the two sections
Dispositions Tab: this button takes you to the Disposition Groups section (below). Button 1 and 2 allow you to navigate between the two sections
Delete Selected: deletes the selected dispositions
Add Disposition Group: adds a new disposition group and provides an interface for configuration of the new group
Disposition Group List: displays a list of the currently configured disposition groups
Description: the disposition group description as configured in the associated disposition group
Campaigns Assigned: displays the campaigns assigned to the specific disposition group
Delete Individual: deletes this specific disposition group
Operating Hours
This module allows for the configuration of high level operating hours, which are assigned to individual campaigns. Operating hours determine the automated start and stop times of a campaign at the higher level (ie, campaign level, and not zone level, which is controlled by Zones)
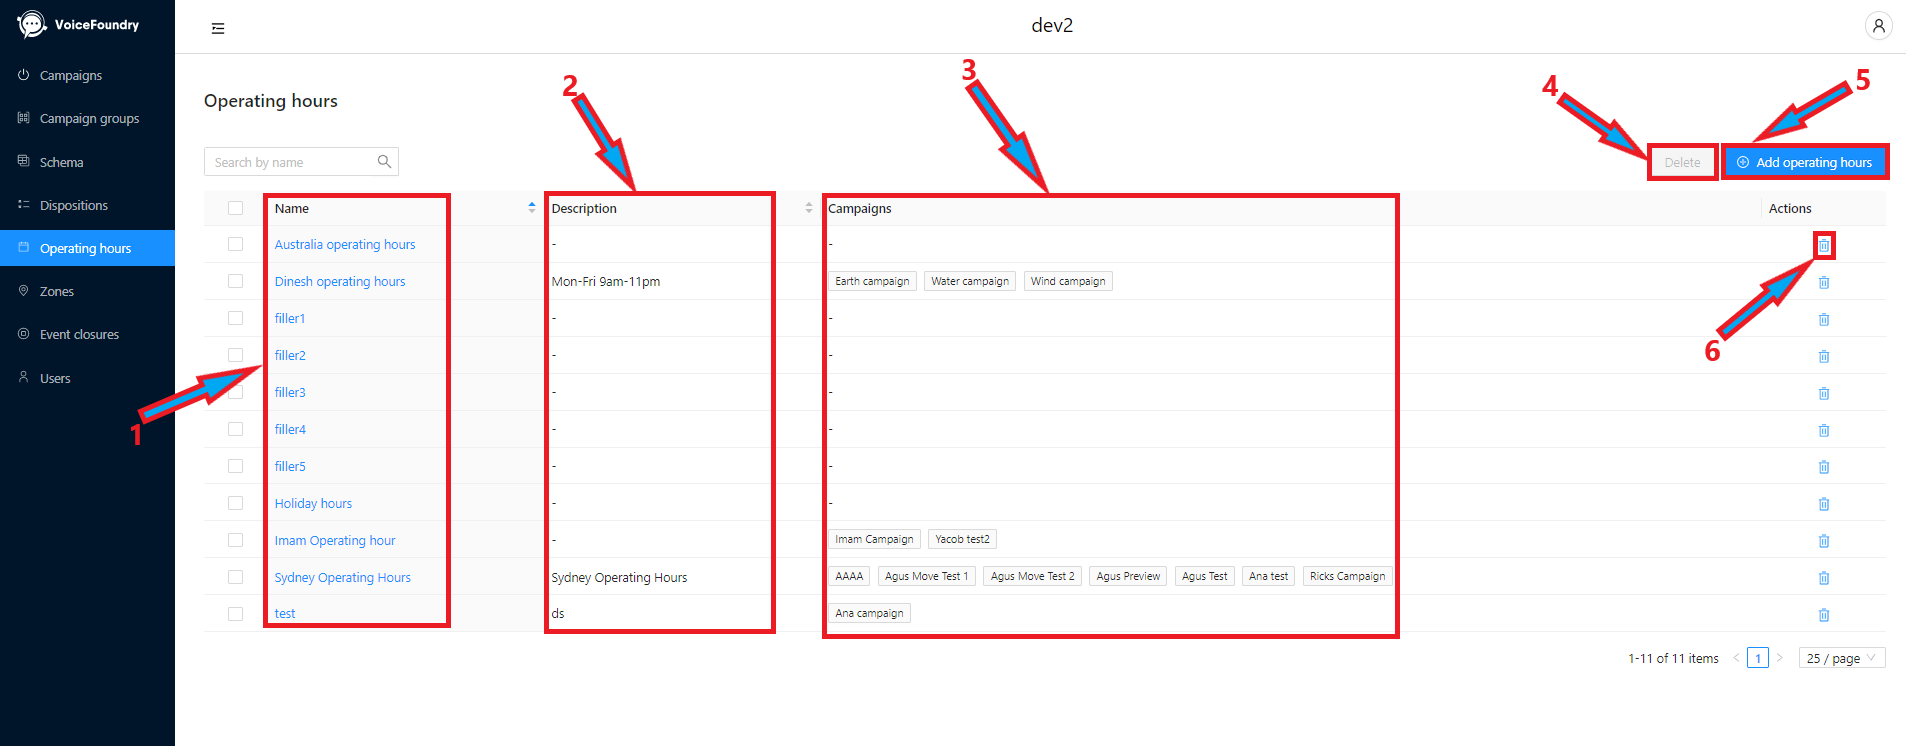
Operating Hours list: list of the operating hours configured within the dialler administration portal
Description: the description of each operating hours group configured within the dialler administration portal
Campaigns: lists the campaigns assigned to individual operating hours groups
Delete Selected: deletes the selected operating hours group
Add Operating Hours: adds a new operating hours group
Delete Individual: deletes the selected operating hours group
Zones
The Zones module will pop up with two separate zone related tabs.
Zones
The Zones tab will show a list of all configured zones. Zones are string values applied to records, and are used in Zone Groups to set subset operating hours for each zone.
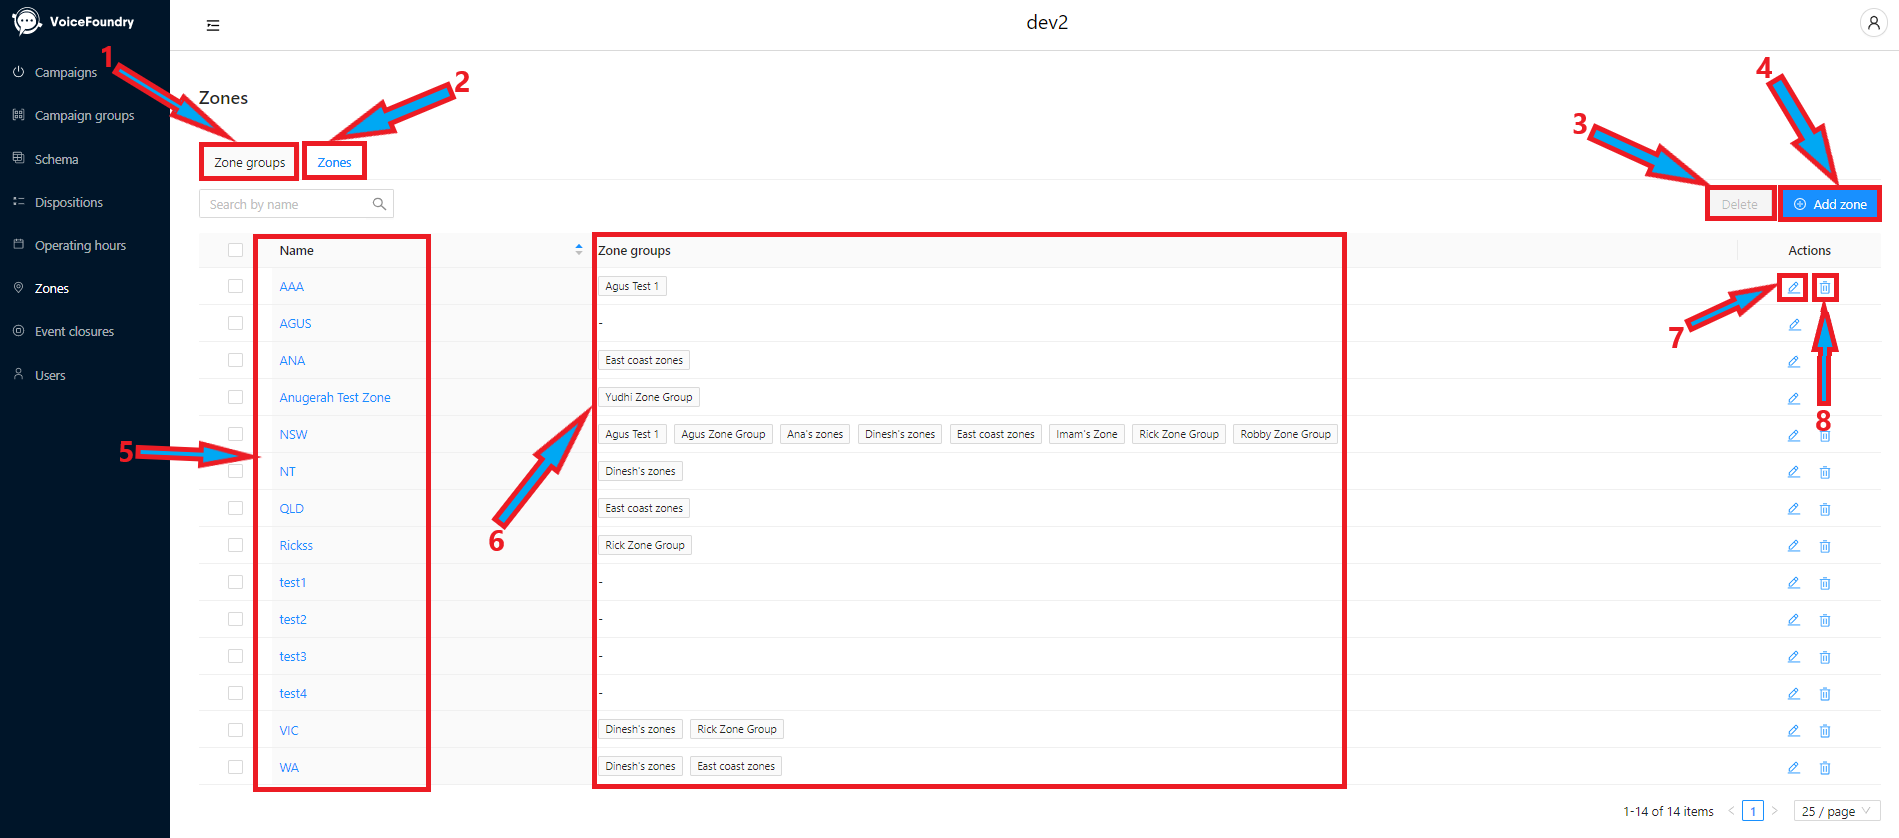
Zone Groups tab: this button takes you to the Zone Groups tab (below). Button 1 and 2 allow you to navigate between the two sections
Zones tab: this button takes you to the above. Button 1 and 2 allow you to navigate between the two sections
Delete Selected: allows you to delete the selected Zones
Add Zone: allows you to add a new zone to the dialler administration portal
Zone list: a complete list of all zones created in the dialler administration portal
Zone Groups: shows the zone groups each zone is applied to
Edit Zone: edits the selected zone
Delete Individual: deletes the selected zone
Zone Groups
Zone groups is where you set the dialling times for your zones.
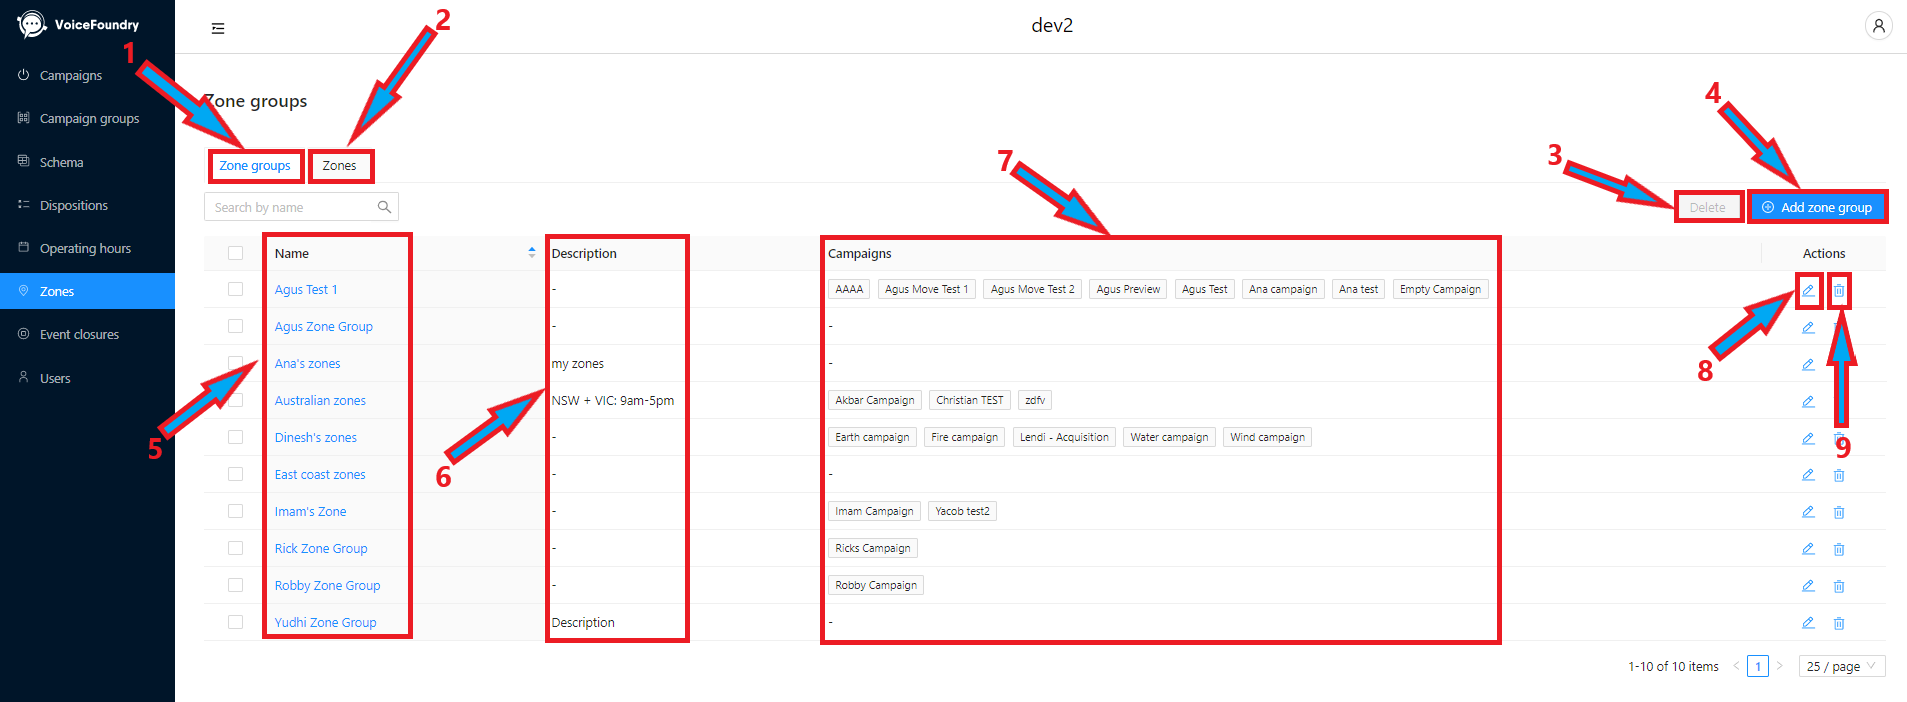
Zone Groups tab: this button takes you to the above. Button 1 and 2 allow you to navigate between the two sections
Zones tab: this button takes you to the Zones tab (above). Button 1 and 2 allow you to navigate between the two sections
Delete Selected: allows you to delete the selected Zones
Add Zone Group: allows you to add a new zone group to the dialler administration portal
Zone Group list: a complete list of all zones groups created in the dialler administration portal
Description: shows the description of each zone group
Assigned Campaigns: shows the campaigns assigned to each zone group
Edit Zone Group: edits the selected zone group
Delete Individual: deletes the selected zone group
Event Closures
Event closures are one off events which can be created, and assigned to campaigns. Event closures override hours of operation, and can be assigned at the zone level to cater for specific state based public holidays
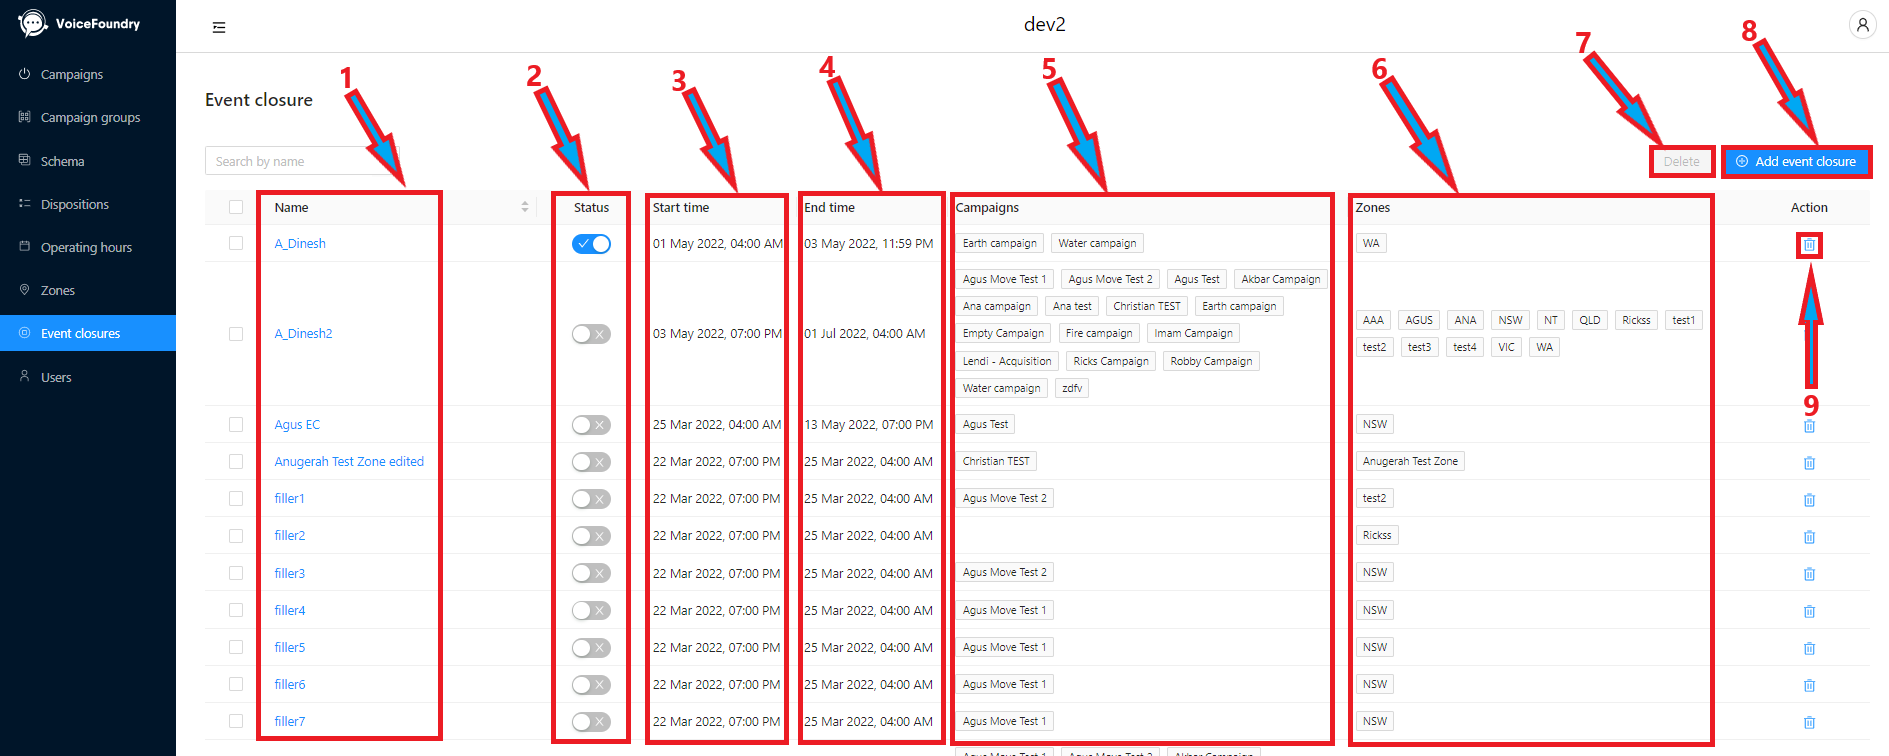
Event Closure list: a list of your previously configured event closures
Status: the status of the event closure (on or off)
Start Time: the start time/date of the event closure
End Time: the end time/date of the event closure
Campaigns: the campaigns this event closure is assigned to
Zones: the zones this event closure is assigned to
Delete Selected: allows you to delete the selected Zones
Add Event Closure: allows you to add a new event closure
Delete Individual: deletes the selected event closure
Users
The users module is where you setup administrative users for the dialler administration portal.

First Name: configured user’s first name
Last Name: configured user’s last name
Email: configured user’s email address for authentication via SSO
Add User: allows you to add a new user to the dialler administration portal
Delete Selected: allows you to delete the selected Zones
Delete Individual: deletes the selected event closure
