v1.0 - Schema
Schema Creation Process
Creating your schema requires an overarching understanding of the general structure of all of your records, and an understanding of how that structure applies to specific campaigns. This document aims to assist in the steps required to understand these structures.
To gain this understanding, it’s important to understand (at a high level) how the different elements of OCM are configured.
Generally speaking, instance configuration is achieved via a 2 part process:
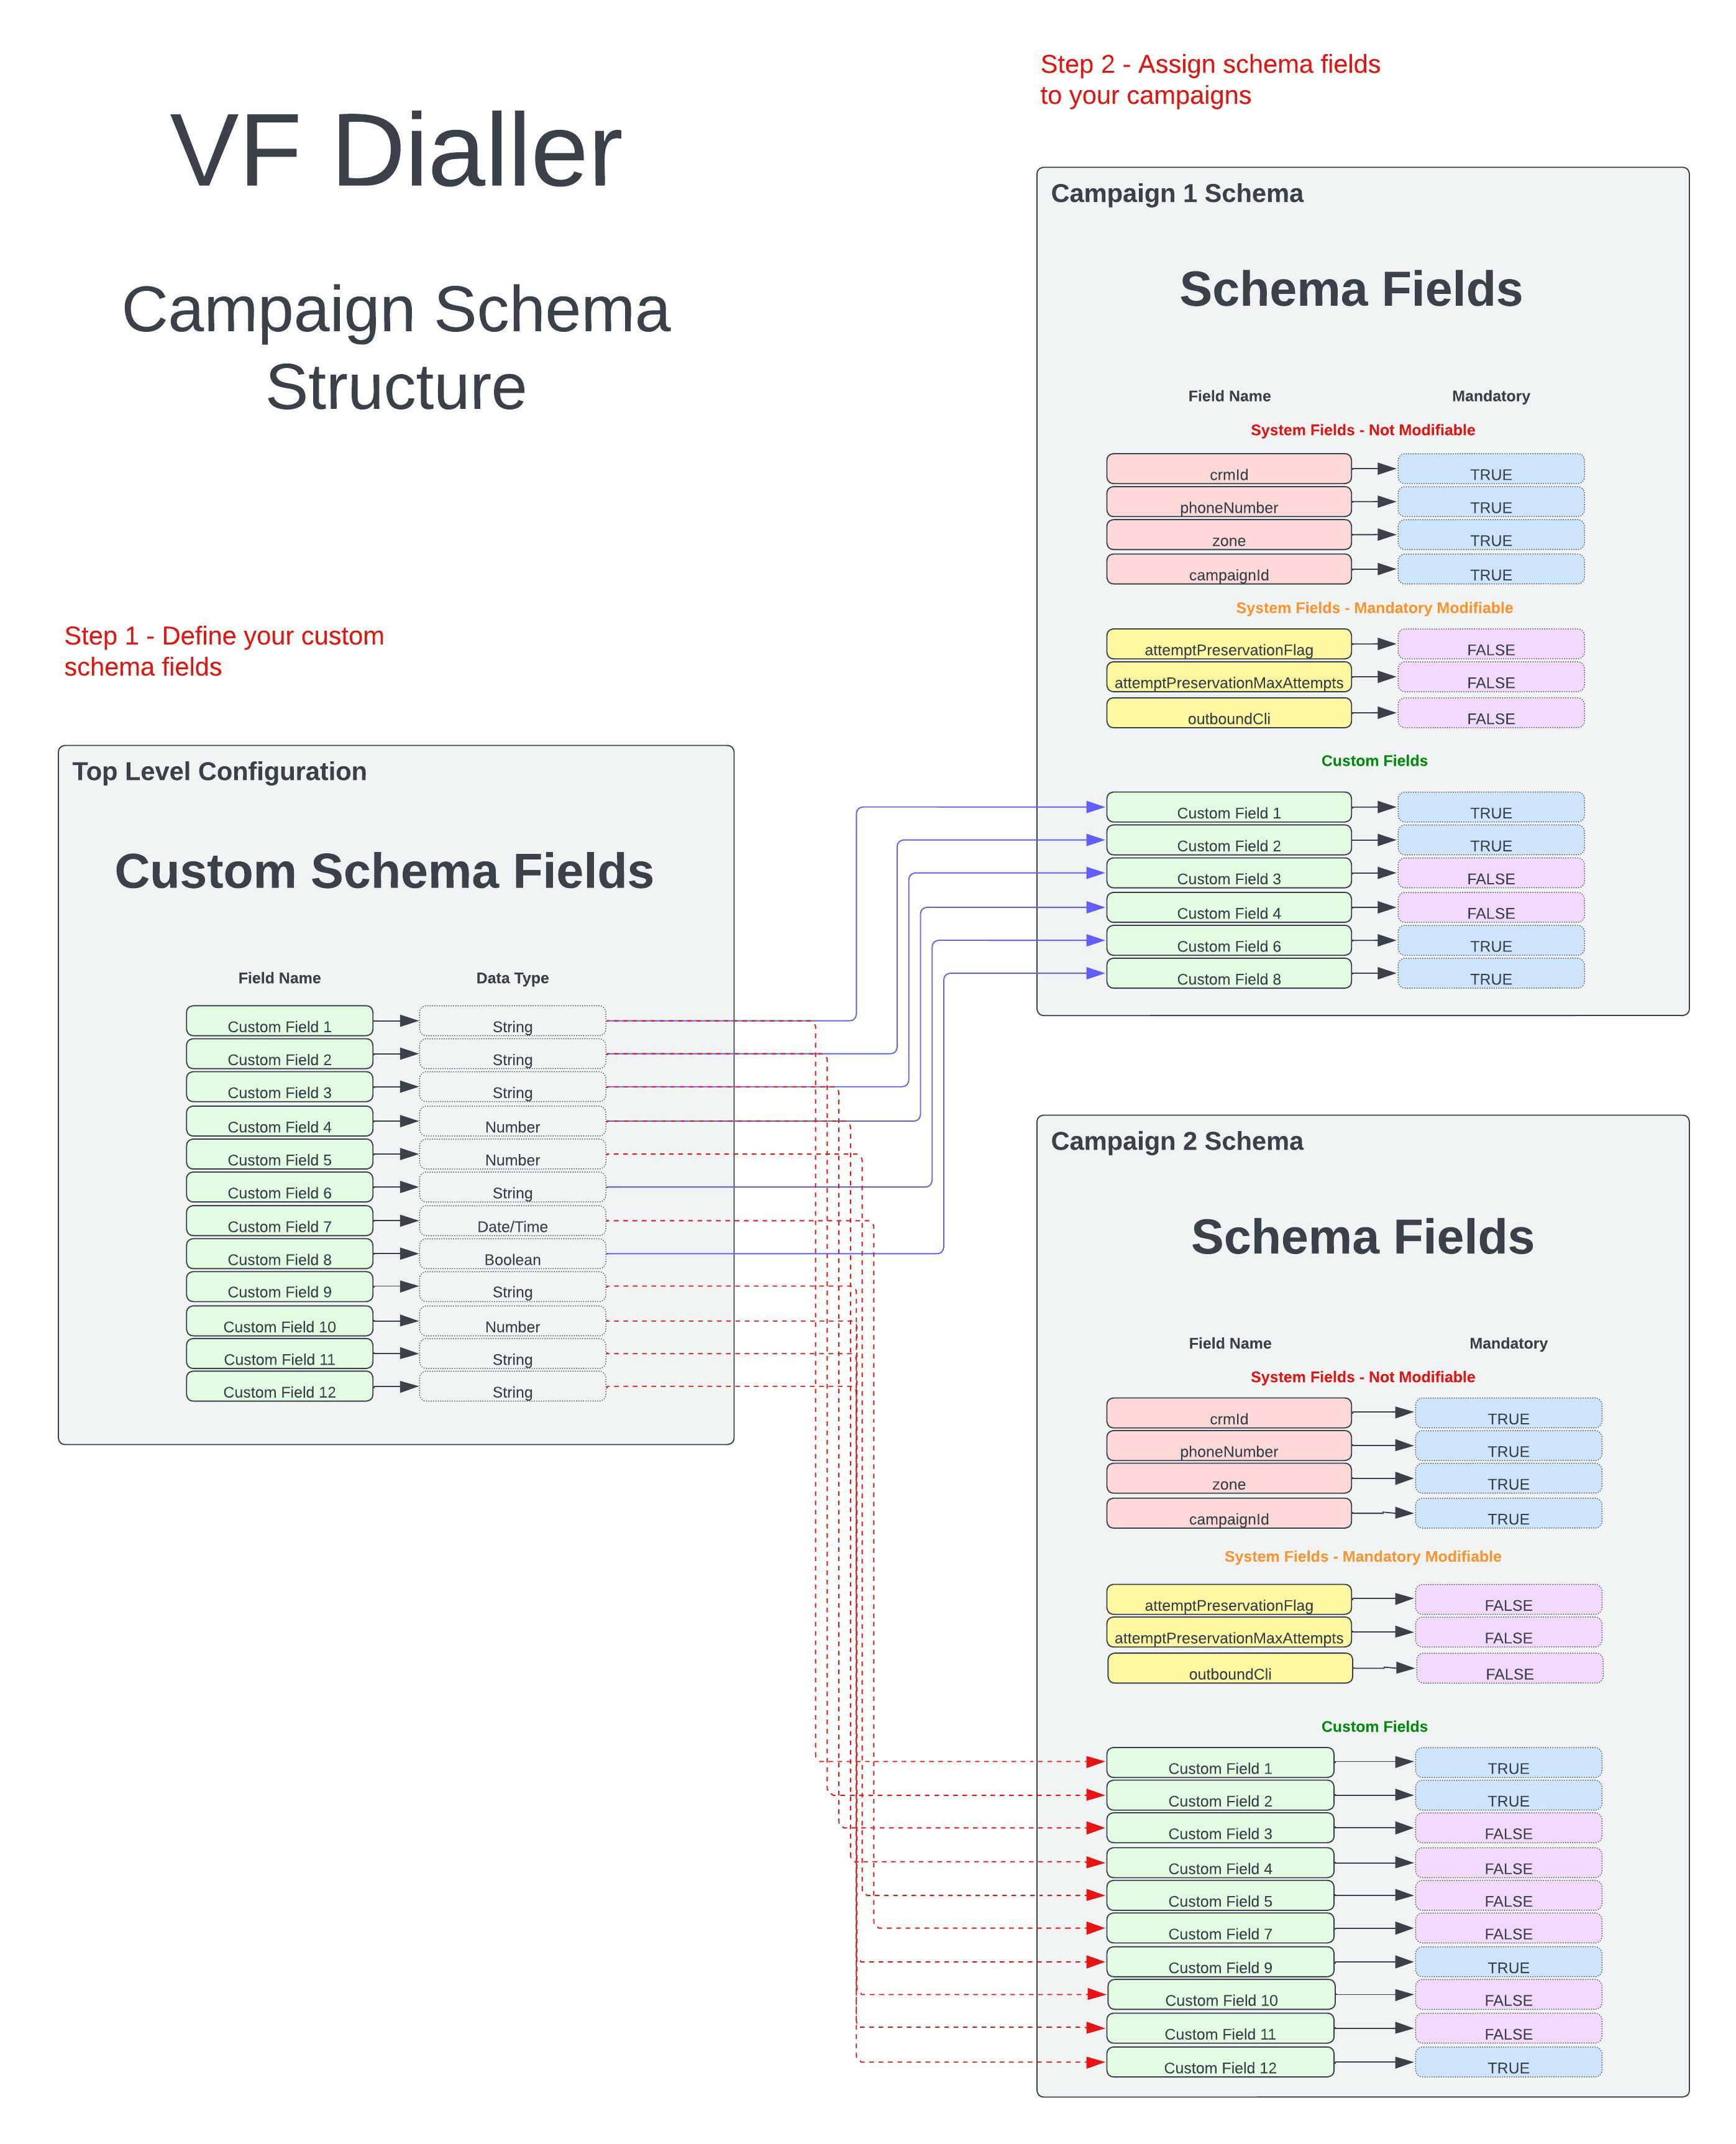
Diagram 1 - high level visual description of the schema creation and application steps
Part 1: Instance Level configuration
Schemas, dispositions, zonesets, hours of operation, blackout periods, and campaign groups are configured at the instance level
These top-level configurations are then applied at the campaign level (to allow for instance level changes filtering down to campaigns, easing the config load for admins)
Part 2: Campaign Configuration
Schemas, disposition groups, zone groups, and hours of operation (created in Part 1) are applied to campaigns at this level
Campaign specific settings (ie, agent interfaces, filtering and sorting, max attempts, outbound CLI etc) are applied at the campaign level
Each part is important for the creation of campaigns, and both parts touch on the dialler schema.
Mandatory Fields
You’ll notice the term “Mandatory” being used a lot in the description of schema fields. As such it’s important to understand what this means.
The purpose of mandatory fields is primarily
For record validation on insert
For record validation upon schema change (after a campaign schema has been configured)
Mandatory fields are subject to the following rules:
The mandatory property can be set at the schema level for all System Dependent/Optional, as well as Custom fields (see below)
If a campaign schema has a field set as mandatory, any records inserted into the campaign must have the mandatory field associated with the record
If this field does not exist at the record level upon insert, the record insert will fail
Schema Configuration
Part 1: Initial instance setup
At this stage of Schema creation, we define all potential schema fields for any and all records which may be inserted into any campaign
There are three categories of schema fields which can be applied to campaigns. These are as follows:
System/Required – these fields will be applied to all campaign schemas and cannot be changed or removed in any way
System Dependent/Optional – these fields will be applied to all campaign schemas. Their field names cannot be changed and the fields cannot be removed, however the mandatory property can be changed in Part 2
Custom Fields – these fields are completely customizable by Lendi. Any field can be added, and it’s mandatory property can be turned on or off in Part 2
During the initial setup, we primarily define custom fields.
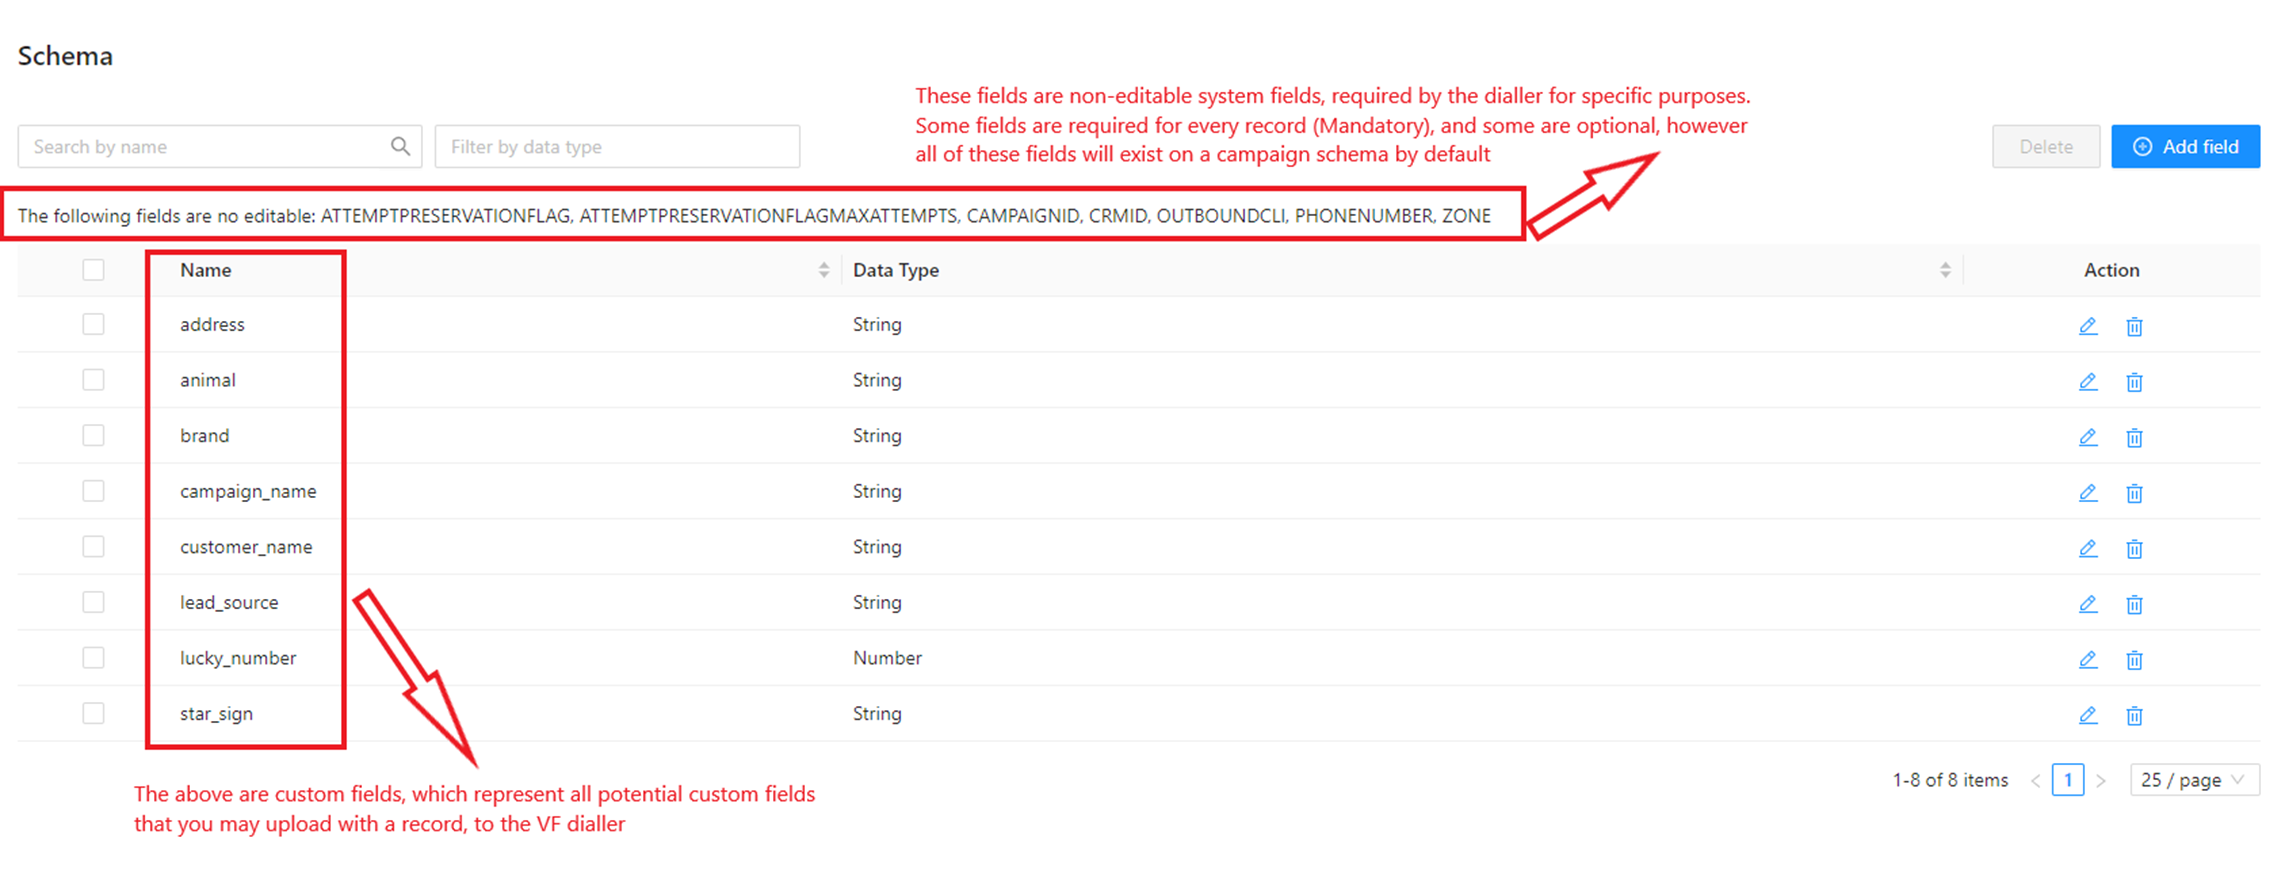
Diagram 2 – a pre-production sample of the Top Level Schema Configuration, displaying custom field additions.
The definition of these fields is simply the field name (coming from the source), and the data type of this field.
Fields are defined at a instance level for all campaigns, primarily for validation purposes.
Once all potential fields are defined, the fields will then be added to the campaign specific schemas in Part 2 (see below).
Primarily therefore, during Part 1 of configuration, we are only defining all potential fields which a record may have when being inserted into a campaign
Part 2: Individual campaign setup
Apply the fields setup in Part 1 to your campaigns, and set the Mandatory option
It is at this stage that the schema fields you have defined in Part 1 are applied to your outbound campaigns.
A campaign schema will automatically consist of the first two categories of schema fields above (Mandatory/Non Editable, Optional/Non Editable), as well as selectable Custom fields
The Mandatory property of the fields (except for Mandatory/Non-Editable fields) is configurable in the Campaign Schema section of configuration
Campaign schemas are setup when creating a campaign for the first time, and are also editable (under the correct conditions) after the campaign has been setup
The workflow for creating a campaign schema involves the following:
Create your campaign
Progress through the campaign creation wizard to the Campaign Schema page
Select the schema fields for this campaign, which have previously been defined in Part 1
Select whether or not your editable fields are mandatory, or not
Save the campaign Schema
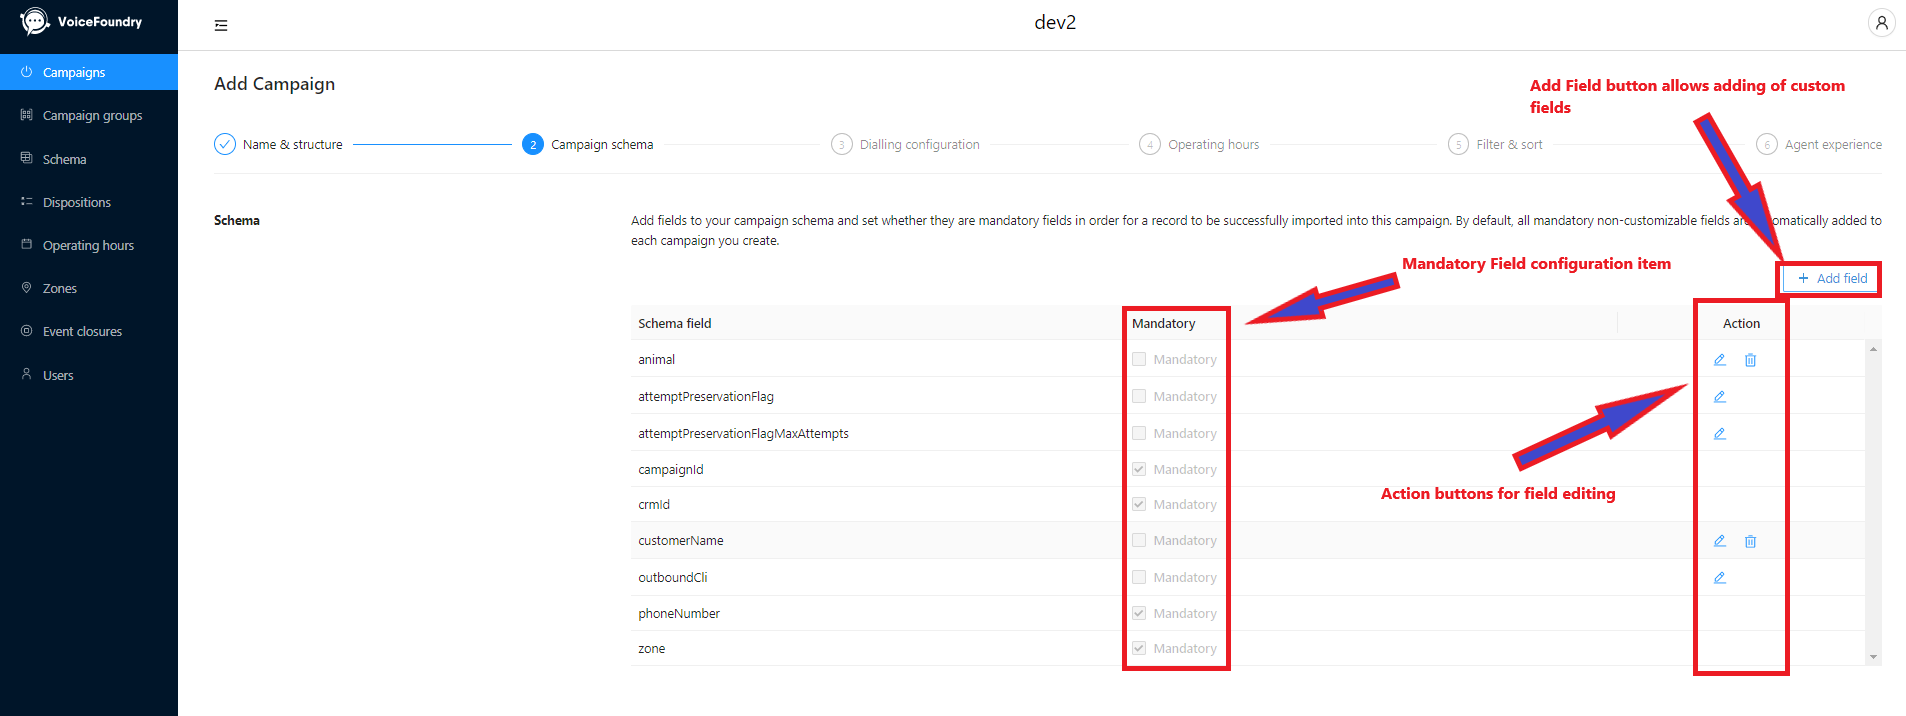
Diagram 3 – a pre-production sample of the Campaign Level Schema Configuration. Note the ability to change the field type to and from Mandatory, for certain fields:
Schema Dependencies
The campaign schema primarily affects the following functionality:
Record insert validation – if a campaign defines a schema field as mandatory, then this field must be present in the API payload for the record, for the record insert to be accepted
Sort Criteria – records can only be sorted (at the campaign level) by fields applied to the campaign schema
Filter Criteria – records can only be filtered (at the campaign level) by fields applied to the campaign schema
Agent Interface (agent display) – you can only display fields applied to the schema to agents (via the agent console), when a call is connected to a customer
Reporting Requirements - after a record has been attempted, the outcome data of that attempt is provided back to Kafka, which includes specific system information, as well as all data fields associated with the record schema
Records can be inserted with non campaign schema fields – a record insert with a field (for example) that is not defined in the schema will not be rejected. Records will only be rejected if a record insert is attempted which does not contain a MANDATORY schema field, as configured in the campaign schema.
Prepare for the Schema Configuration
To accurately create your campaign schemas, some preparation is invaluable:
Step 1 - Understand all of your records
Work to understand every field that any record could be inserted along with, for all of your campaigns, that will be useful in the day to day running of your dialler. The term “useful” in this context is defined as:
A field used for display to the agent
A field you would like to filter a campaign by
A field you would like to sort a campaign by
A field you want returned as part of your attempt reporting payload, after every attempt
A field you would like the record insert/update API action validated against
Step 2 - List your custom fields, their data types, and their purpose
Proceed to list every custom field and it’s associated datatype. For example:
Brand = STRING
Loan Amount = STRING
Age = NUMBER
Date Uploaded = DATE/TIME
Note - select your data type carefully, as once a schema field has been added (and records exist in your system with data in the field), the schema field data type cannot be changed.
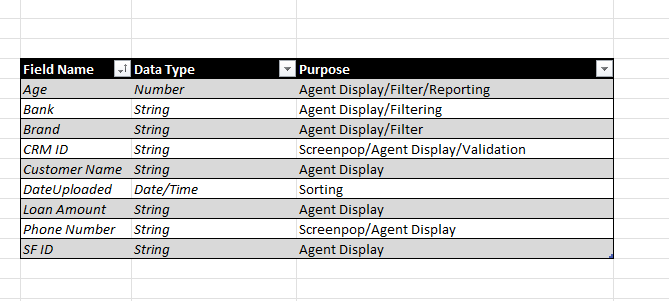
Diagram 4 - A rudimentary list of all possible schema fields which could apply to records in your campaigns. Note - no campaign is assigned to each field at this stage, and the field list has been de-duplicated
Step 3 - Determine which system dependent – optional fields you want to use, by campaign
For example
Attempt Preservation Flag – are you using this feature for this campaign?
Attempt Preservation Flag Max Attempts – are you using this feature for this campaign?
Outbound CLI – are you using the record based outbound CLI feature for this campaign?
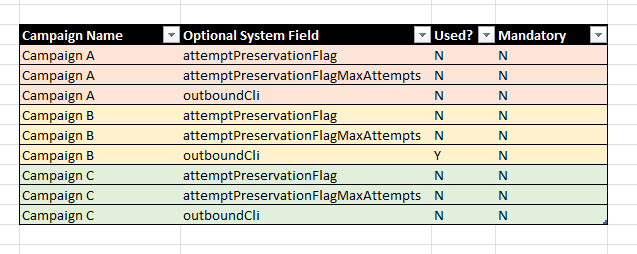
Diagram 5 - mapping all of your campaigns to the optional system fields. We determine whether or not the field is used, as well as it’s mandatory property
Step 4 - Determine which custom fields (of the fields you have determined in Step 2) you want applied to each campaign
And proceed to list these by campaign
This step ensures that you are only using required fields in the new dialler
This step gives you the opportunity to cut down on the fields you send to the dialler
You may not need to send all fields due to the Salesforce integration
You can use the same fields for all campaigns if you wish
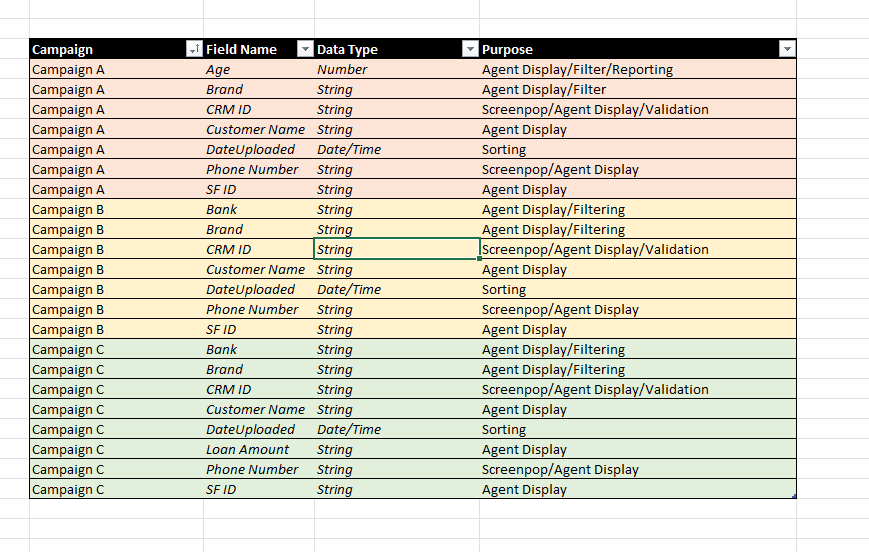
Diagram 6 - campaigns have been listed, and your custom fields have been mapped to each campaign. Included are Data Type, Field Name, and the field’s purpose
Step 5 - Determine which fields will be mandatory
Based on your understanding of the mandatory rationale, and it’s effects.
Any custom field required for sorting or filtering should be set to Mandatory, to ensure future record inserts are captured in filters and sorting
The reason for this is that, if you have a campaign filtered or sorted by a particular field, but the record does not contain it, the record will either be:
Excluded from dialling, or
Sorted incorrectly
Any agent display fields which must be presented to the agent on successful connection to the customer should be set as Mandatory
The reason for this is that, if you have a campaign which displays a particular field to the agent, but the record does not contain it, the record will still be presented to the agent, however the associated field will not be displayed
Any fields which must be present (for any reason such as reporting, agent display, sorting or filtering) for a record insert, and you would like to validate the import against, should be set to Mandatory. This validation occurs at the record insert stage
For example, if you will refuse to accept a record insert for a campaign if the record doesn’t have the “Brand” field, ensure this field is determined as mandatory
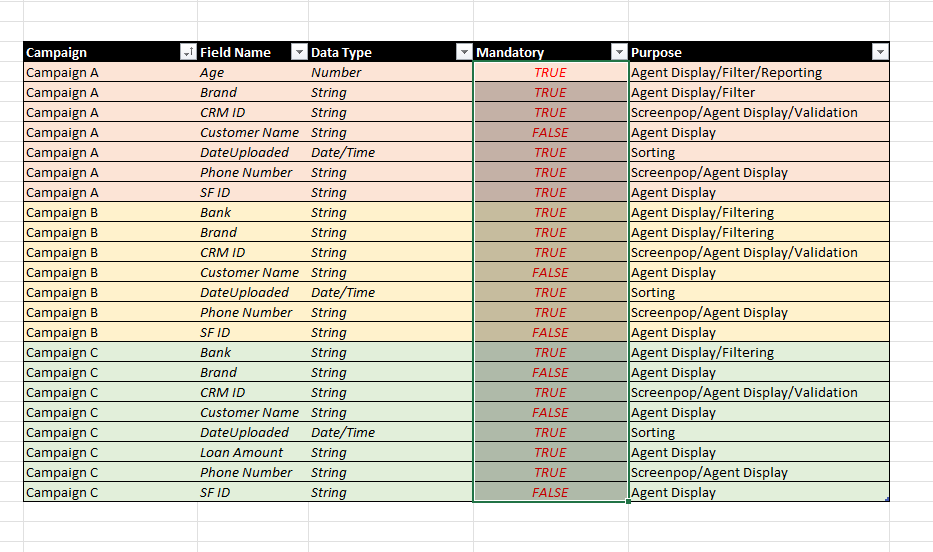
Diagram 7 - for each field, based on the mandatory logic, determine the mandatory configuration per campaign
Step 6 - Add your optional system fields to each campaign
This is important for the schema creation process:
For each campaign in your list, add the 3 optional system fields as per step 3
This will complete your preparatory work required for addition of schema fields, and creation of campaign schemas

Diagram 8 - add your optional system fields (setup in step 3) to each campaign. This results in a full schema per campaign
Schema Creation
Now that you’ve prepared for your schema configuration, we are going to start the actual process of inputting this configuration into OCM.
Referring to an earlier section of this document, the process is completed in two parts:
Part 1 - Instance Level Configuration
Part 2 - Campaign Configuration
Part 1 will be described below. Part 2 will be described in the “Campaigns” section of this training guide. Please refer to this section when working through campaign configuration.
Part 1 - Instance Level Configuration
The first part of configuration is the addition of the custom schema fields which we identified in the “Prepare for Schema Configuration” section, part 2 above. If we recall, based on our example, we have a list of custom schema fields as follows:

Diagram 4 - A rudimentary list of all possible schema fields which could apply to records in your campaigns. Note - no campaign is assigned to each field at this stage, and the field list has been de-duplicated
The first step is to configure these schema fields in the dialler at the instance level. This is achieved by following the below instructions:
Step 1 - Open your dialler instance, and navigate to the “Schemas” section
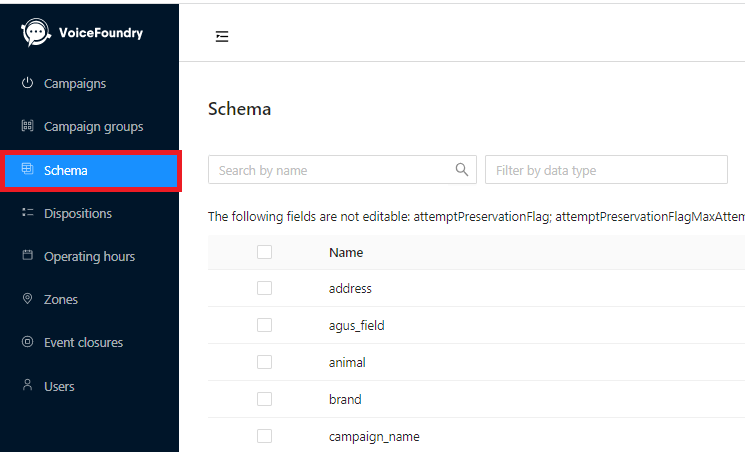
Step 2 - Click the “Add Field” button

Step 3 - Input the first field name from your list of fields, and map the data type
Note 1 - the field name here must match the field name which will be inserted with the record exactly. This field is case sensitive
Note 2 - select your data type carefully, as once a schema field has been added (and records exist in your system with data in the field), the schema field data type cannot be changed.
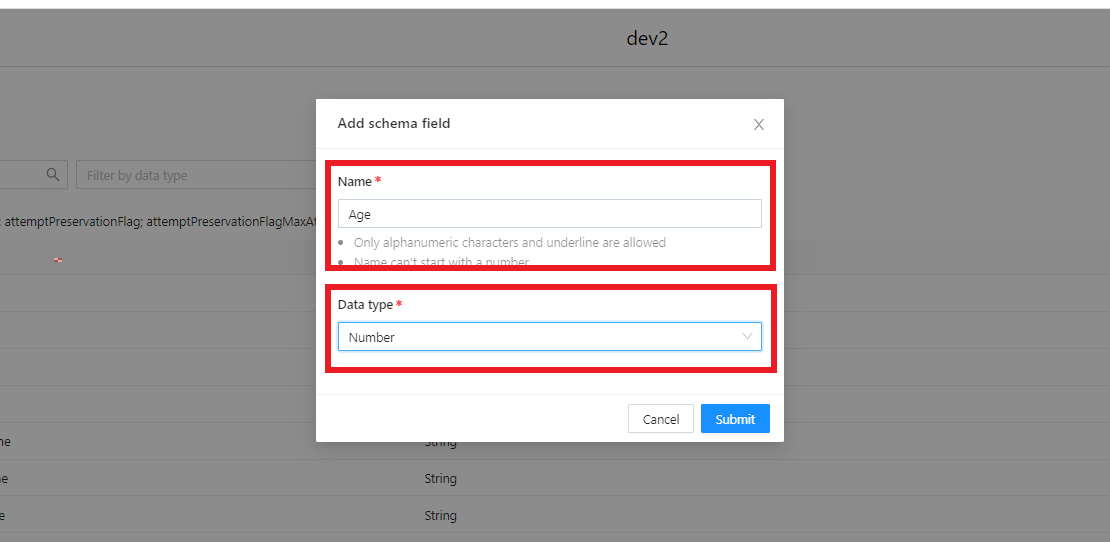
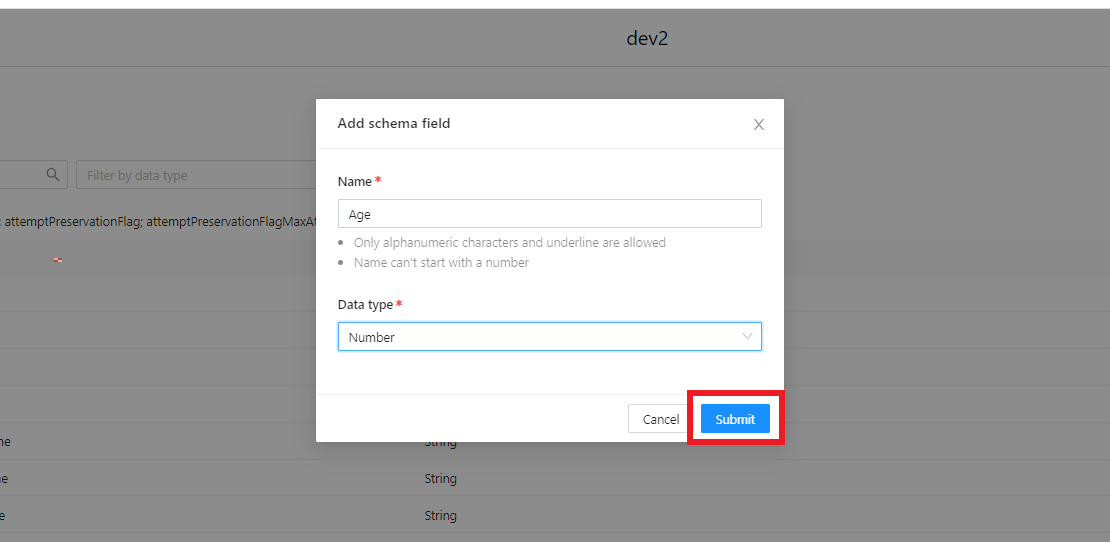
Step 4 - Click “Submit”, and repeat this process for all custom fields
Step 5 - Finished!
All steps required to create your campaign schemas has now been completed. Keep the preparatory work you have already done, as we will use this in the “Campaigns” section of this guide.
