v1.0 - Operating Hours
Introduction
Operating hours act as the second “Gate” to dialling assessment for your campaign. Operating hours determine the limits of your opening and closing times for your campaign. Within these times, records may be dialled, so long as the record’s zone has been allowed to dial within the campaign’s zone group. Operating hours are configured at the instance level, are applied at the campaign level, and can be reused across multiple campaigns.
Operating hours are setup as a day/time schedule (multiple entries per day supported).
Operating hours are easy to setup in OCM, and we will go through the configuration steps in this section.
Understanding the gates
It is important to understand how operating hours fit into the multi-gate assessment process, and how they affect your campaign dialling times. Operating hours work in conjunction with the other gates in your system. These gates, in order of execution, are as follows:
Gate 1 - Event Closures
Gate 2 - Operating Hours
Gate 3 - Zone Group Hours
Gate 4 - Filter Conditions
In other words, records will not dial in a campaign unless there are no active event closures, the campaign is within operating hours, the record is within zone group’s hours, and the record passes filter conditions. These separate gates are described elsewhere in this training guide, however it is important to understand that operating hours (Gate 2) is considered only if assessment of Gate 1 has been passed.
Pre-requisites
To configure operating hours, you need to understand the requirements around the upper and lower limits of your campaign dialling hours, in their totality. Your zone dialling hours should also be considered. VoiceFoundry recommend mapping your operating hours to your campaigns in advance, so that the actual configuration is a lot easier.
Let’s take an example, and discover how we can pre-plan for this activity:
Example Case
Lets start with the things that you may know about your dialler, and your contact center. In this example, we know the following to be true:
Your dialler agents work from 9AM - 10PM every weekday (split across shifts)
Your dialler agents work from 9AM - 5PM on Saturdays
Your agents do not work on Sundays
You dial records from all states across the country
Your agents will only dial records from 9-10PM on weekdays where this is legal in the state of the customer you are dialling (ie, WA or QLD records in daylight savings times)
This resource/workload plan applies across all of your campaigns
You need to comply with the Telecommunications (Telemarketing and Research Calls) Industry Standard 2017 with regard to the times you can dial your records
With the information above, we can assume that:
Your campaigns should be open between 9AM and 10PM daily
Between 9PM and 10PM, your campaigns should still be dialling, but select records only
The dialling between 9PM and 10PM for certain states is controlled by zones and zone groups, and this will be covered further in the next section, however we can see that your campaign dialling hours, for all campaigns, is as follows:
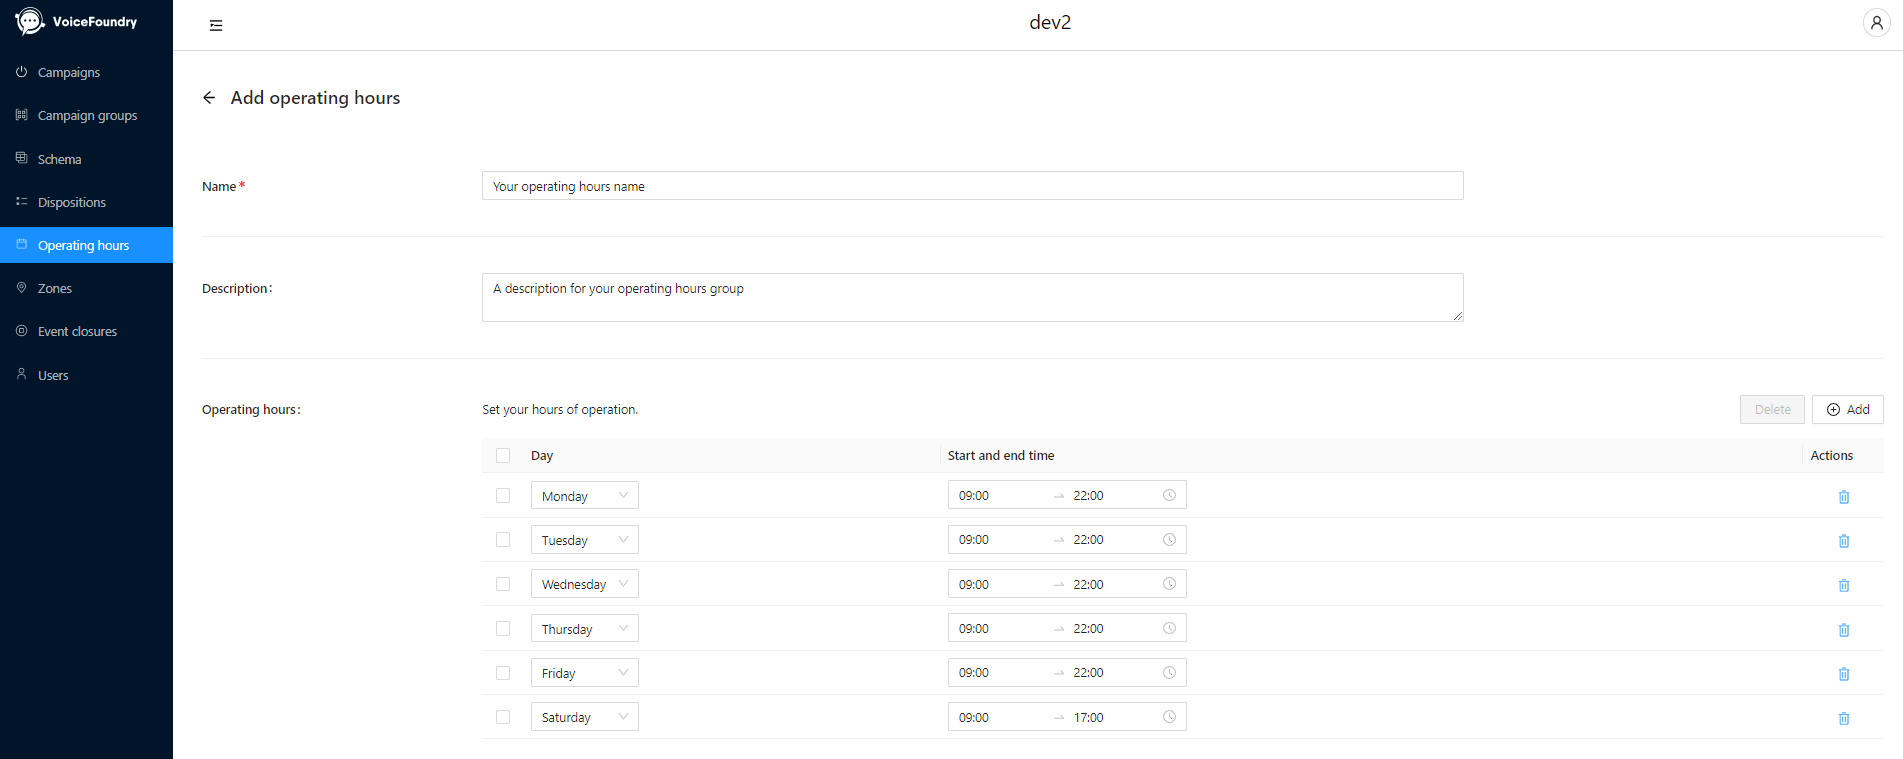
Monday to Friday - 9AM - 10PM
Saturday - 9AM - 5PM
Sunday - No dialling
If you have different requirements for different campaigns, it will be worthwhile splitting the above analysis into a campaign specific one. Below is a way to represent this in Excel:

Once you have mapped your campaigns to your dialling hours, it’s simple to configure these in OCM.
Configuration
Configuration begins by logging into the OCM Administration portal.
Step 1 - Navigate to “Operating Hours”
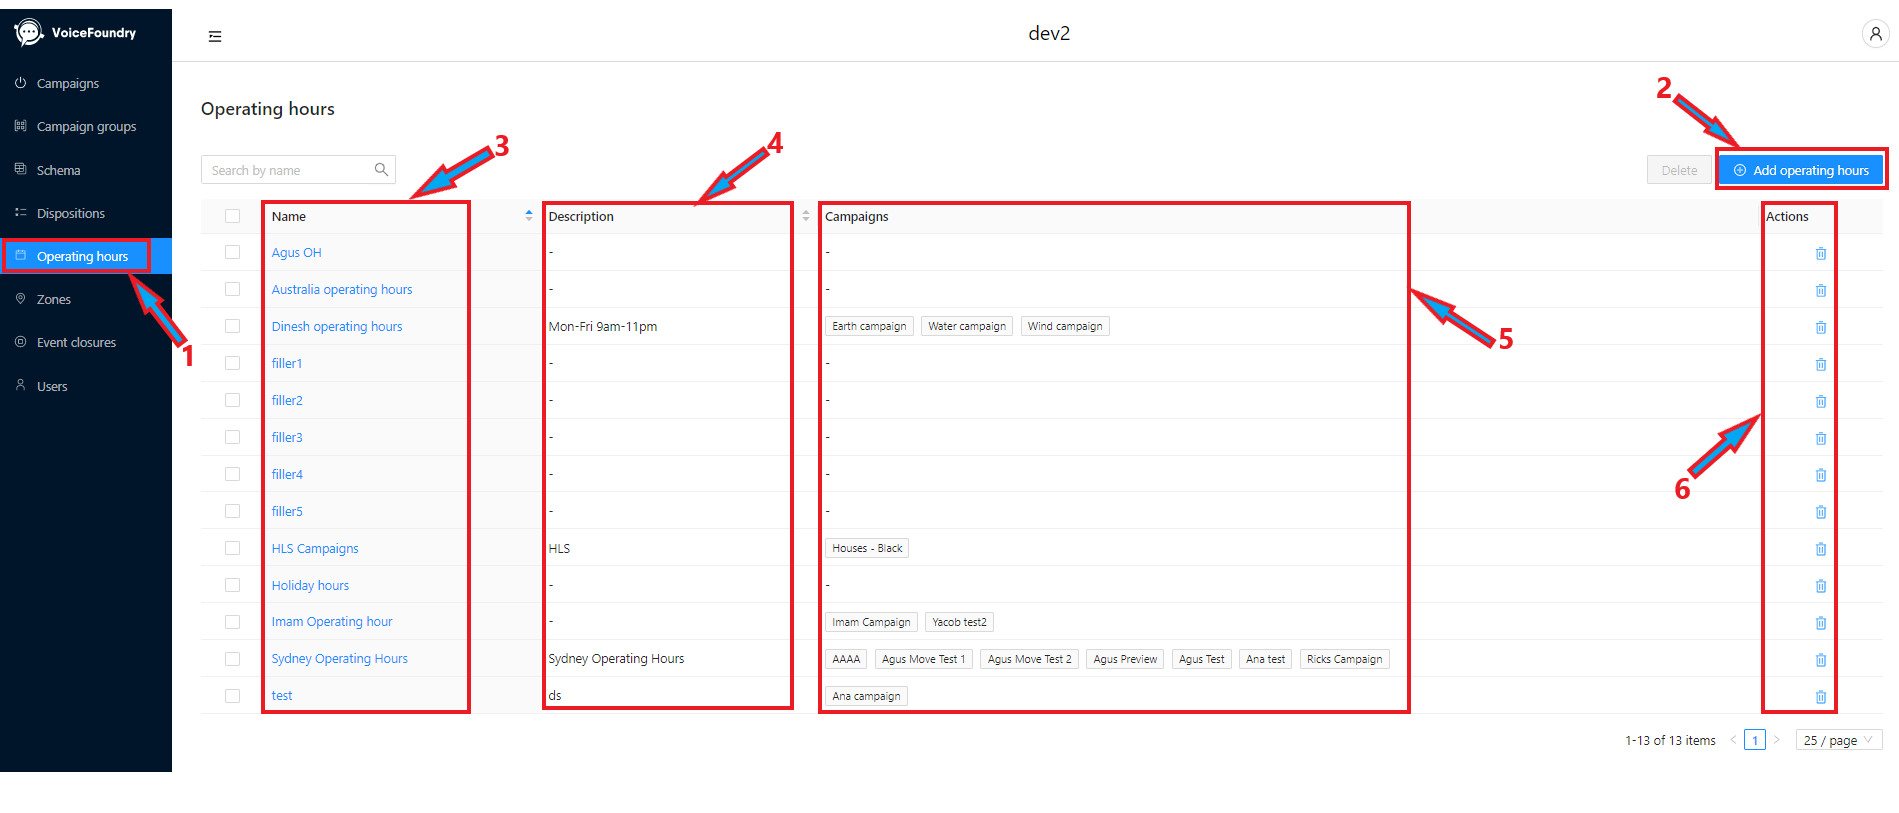
Navigate to Operating Hours (1). You will be presented with the below interface, with an “Add Operating Hours” button (2), a list of your configured operating hours (3), your operating hours descriptions (4), assigned campaigns (5), and some actions to delete an operating hours group (6).

Step 2 - Create a new operating hours group
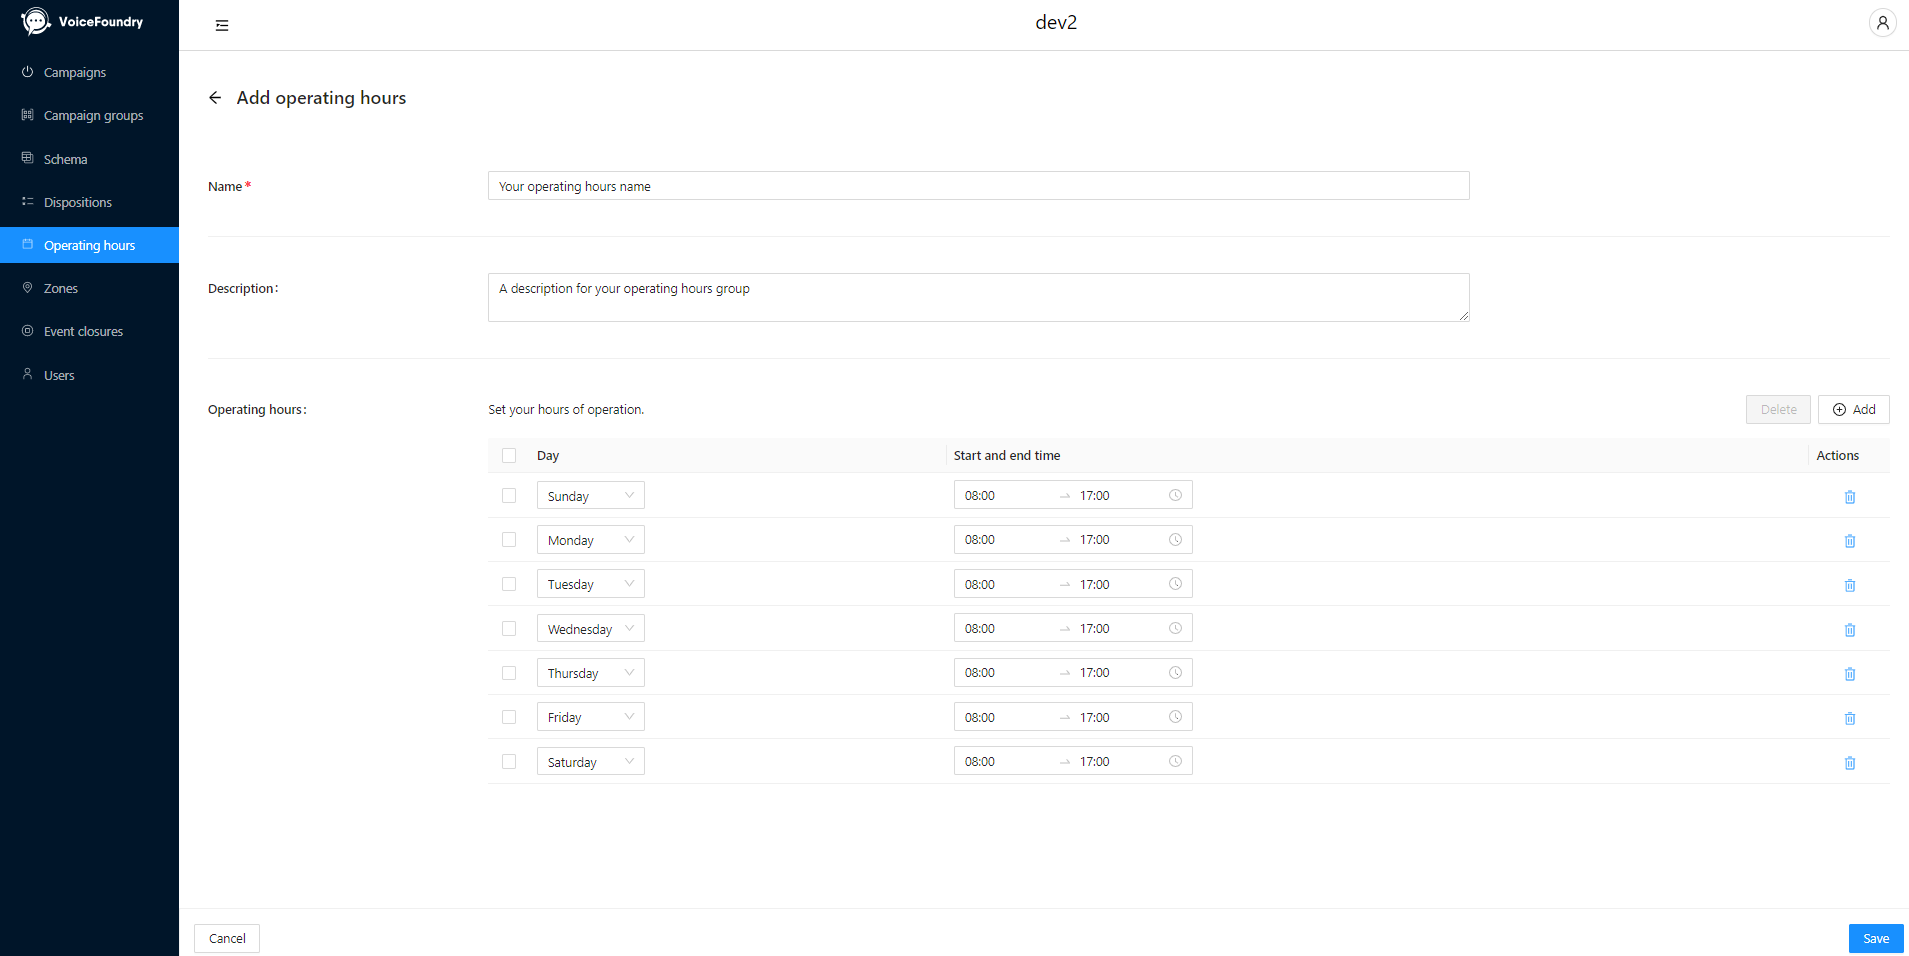
Click the “Add Operating Hours” button. You will be presented with the below interface. At this point, add a name and a description to your operating hours group:

Step 3 - Configure your upper and lower limits
Configure this screen to capture the earliest start, and the latest finish, that your campaign/s will adhere to.
Note - these times are in local time

Step 4 - Save your operating hours group
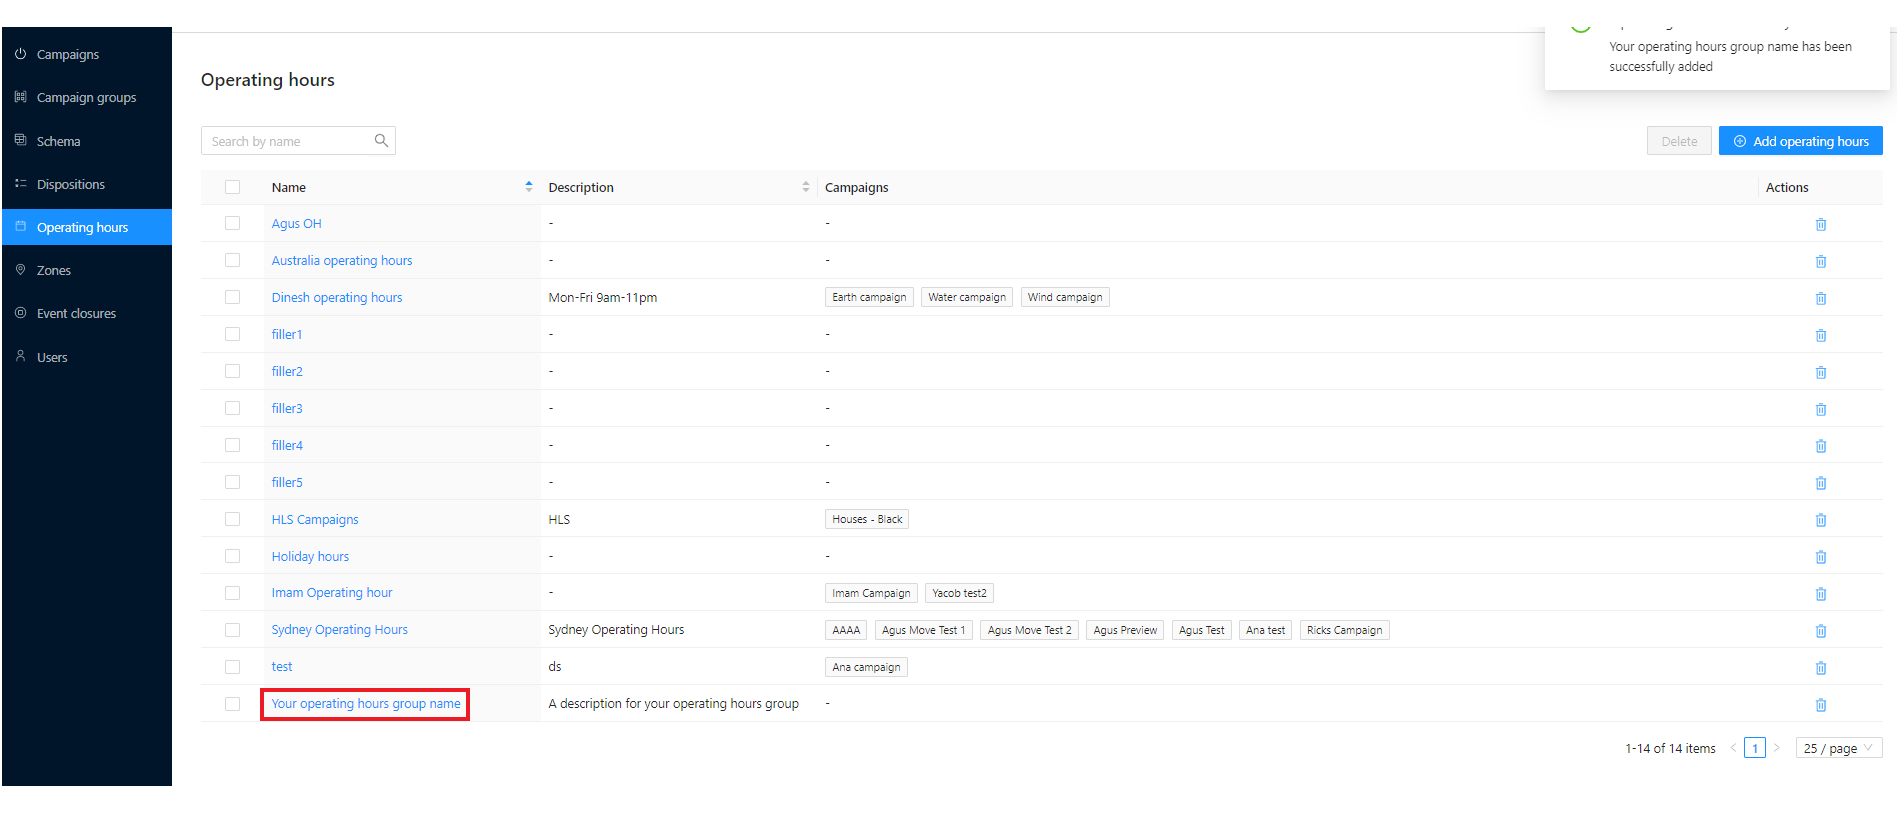
Click the “Save” button at the bottom right of this interface. Your new operating hours group will appear in the list:

Step 5 - Repeat for all required operating hours groups
Repeat the above steps for all groups which you need to create (if applicable).
Step 6 - Assign operating hours to campaigns
This step is covered in the “Campaigns” section of this guide
Step 7 - Finished
You are now done creating your operating hours groups!
A note on Operating Hours edits
Please note that you will not be able to delete an Operating Hours group which is already assigned to an active campaign. To delete an operating hour group, de-assign these from all campaigns, and then delete the group from this screen.
Upon editing a group’s schedule, the new edited schedule will apply to the associated campaigns immediately.
