v1.0 - Dialler Dispositions
Introduction
This section of the guide will explain the concepts behind setting up dispositions from start to finish, including:
High Level
The concept of dispositions
The application of dispositions in OCM
Preparation
What do you need to do to prepare for creation of dispositions
Things to think about
Disposition label concepts
Disposition Labels
Setting up your individual dispositions
Disposition Groups
Disposition group concepts
Disposition types and their behaviours (including Recall time)
Applying your dispositions to a disposition group
Setting your disposition type within the disposition group
Applying disposition levels to your disposition group
Campaign Disposition Configuration
Applying your disposition group to your campaign
High Level
Dispositions Concept
Outbound dispositions exist primarily for two reasons in an outbound dialler:
To categorize the outcome of your dialler call (for reporting, analysis and workflow purposes)
To “tell” the dialler what to do next with the record (ie, call it back after a set amount of time, or set it as a callback to a particular agent at a specific time, or to no longer call the record and mark it as completed)
There are always two main types of dispositions:
Agent Dispositions - dispositions applied by the agent at the end of a connected dialler call
System Dispositions - dispositions applied by the system, when the system detects that a dialler call has resulted in a non-live customer event (ie, voicemail, answering machine, busy tones, no answer, etc)
Dispositions are setup in the instance level configuration section of the dialler, and are then assigned to individual campaigns where applicable.
Disposition Application
The OCM disposition workflow, at a high level, consists of the following steps:
Step 1: create all Agent disposition labels, regardless of their type, at the instance level
Step 2: assign these dispositions to groups
Step 3: arrange the dispositions in their hierarchies
Step 4: configure the next action for each end point disposition (ie, the disposition at the bottom of the hierarchy)
Step 5: apply the disposition group to the campaign
VoiceFoundry have created dispositions in this way to:
Achieve consistency in reporting, provide ultimate flexibility in configuration
Provide an optimised user experience for campaign creation
Reduce rework when changing disposition settings which are applied to multiple campaigns
Provide a level of recall and outcome customization to better suit the administrator user experience
The next sections will describe exactly how this process is achieved within OCM.
Preparation
Preparing for disposition configuration
Before starting to add dispositions, it’s good practice to understand what dispositions do to the record, how you can use these dispositions to affect the next action for the customer, and how this applies to your campaigns, records and reporting. It may therefore be pertinent to ask yourself:
What type of reporting do you need for your dialler outcomes?
How will you use the outcome data from a reporting perspective?
What kinds of post call operations are required after a dialler call has been made? Think about:
Do you want to call the customer back?
If so, who do you want to call the customer back? The agent who last spoke to them, or anyone dialling from the campaign?
Do you want the record to be completed after the disposition has been applied?
Do the record outcomes influence the customer journey?
The above questions are examples of the relationships that dispositions maintain with business processes (the above list is not exhaustive). An example for each category could be:
Reporting
We need to report on the Contact Rate, Connect Rate, Penetration and Saturation, best times to dial customers, and conversion
We need to report on the average number of attempts to connect to a customer
We need to report on the number of callbacks an agent sets to themselves
We need to report on the number of a specific call outcome type
How do we use the data
We programmatically update all records with a disposition of a certain code, where the customer’s record has met a certain condition in our CRM, to ensure the customer is no longer dialled
We programmatically move customers from one campaign to another when a specific disposition is captured on their record
Post Call Operations
We want some system detected outcomes to have an automatic callback time of 2 hours from the time of outcome (ie, No Answer)
We want other system detected outcomes to automatically stop the record from dialling in future (ie, Fax Machine)
We want certain agent outcomes to set an automated callback for the agent in 2 hours
We want certain agent outcomes to reflect the intention to call the customer back at a specific time
…etc
A little forethought will help you to finalize the most optimal state for your dialler, to consolidate your dispositions and clean up your dialler, and achieve the business results that you require.
The above exercise should leave you with a list of dispositions, and their actions. During this process, you should consider disposition categories as entirely distinct dispositions. For example, if you have disposition categories and sub-dispositions as follows:
Category | Disposition |
|---|---|
No Contact | Voicemail Agent |
No Contact | No Answer Agent |
No Contact | Busy Tones Agent |
Success | Sale |
Success | Quote Given |
Success | Quote Confirmed |
You would therefore capture the following dispositions:
No Contact
Success
Voicemail Agent
No answer agent
Busy Tones Agent
Sale
Quote Given
Quote Confirmed
In the next section, we will discuss how your internal business process analysis and disposition identification would be configured in OCM.
Preparing Disposition Types
The above steps prepare you for the import of all dispositions and their levels. After identifying and configuring your dispositions at the instance level, you will need to determine a disposition type for the preparation of disposition groups. The Disposition Type determines the next dialler action for a record.
Disposition types are assigned at the disposition group level, which means you can assign a single disposition (for example, Answering Machine) to multiple disposition types, separated by disposition group.
There are four disposition types. The types, and next action, are described below:
Recall - sets an offset recall time to the record. The record will be re-dialled after the offset time has elapsed.
Note 1- the recall time section is enabled upon selecting this disposition type
Note 2 - recall time must be specified in HH:MM format
Note 3 - recalls which are set after hours will be dialled the next day
Complete - removes the record from further dialling by OCM.
Agent Callback - allows the agent to set a specific time for a dialler callback for the customer, and assign the callback directly to themselves.
Note 1 - this disposition displays a date/time picker modal at the time of selection for the agent in the Agent Console
Note 2 - the agent who sets this callback must be available in the same campaign at the time of callback, or the callback will not occur. If the agent logs in after the scheduled time, the callback will occur for that agent upon next login
Group Callback - allows the agent to set a specific time for a dialler callback for the customer, and assign the callback to anyone logged into the campaign at the time of callback.
Note 1 - this disposition displays a date/time picker modal at the time of selection for the agent in the Agent Console
Note 2 - this callback will occur to any agent logged into the campaign at the time the callback has been set
Note 3 - callbacks will queue - any callbacks set for the same day, which have not been dialled, will be queued for dialling the next time agents are logged into the active campaign
The next step in preparation is to assign Disposition Types (in Excel, for example) to each disposition you would like to apply to a disposition group. This will be configured in the Disposition Group section below.
Disposition Labels
The first step to disposition creation is to create all of the dispositions you have identified at the end of the preparation section above, in OCM. Creation of these dispositions is done at the high level config end. The creation process is very simple, and involves creating each disposition once. After we create the dispositions, we will be able to “import” these into multiple campaigns. As such, it is not necessary (and not possible) to duplicate your dispositions, and as part of the next step in this process, you will need to de-duplicate your disposition list.
Setting up your individual dispositions
Lets go through the disposition creation process, step by step:
Step 1: Prepare your list of disposition categories and final dispositions.
You will need to enter these manually, so you can prepare these any way you prefer (Notepad, Excel etc)
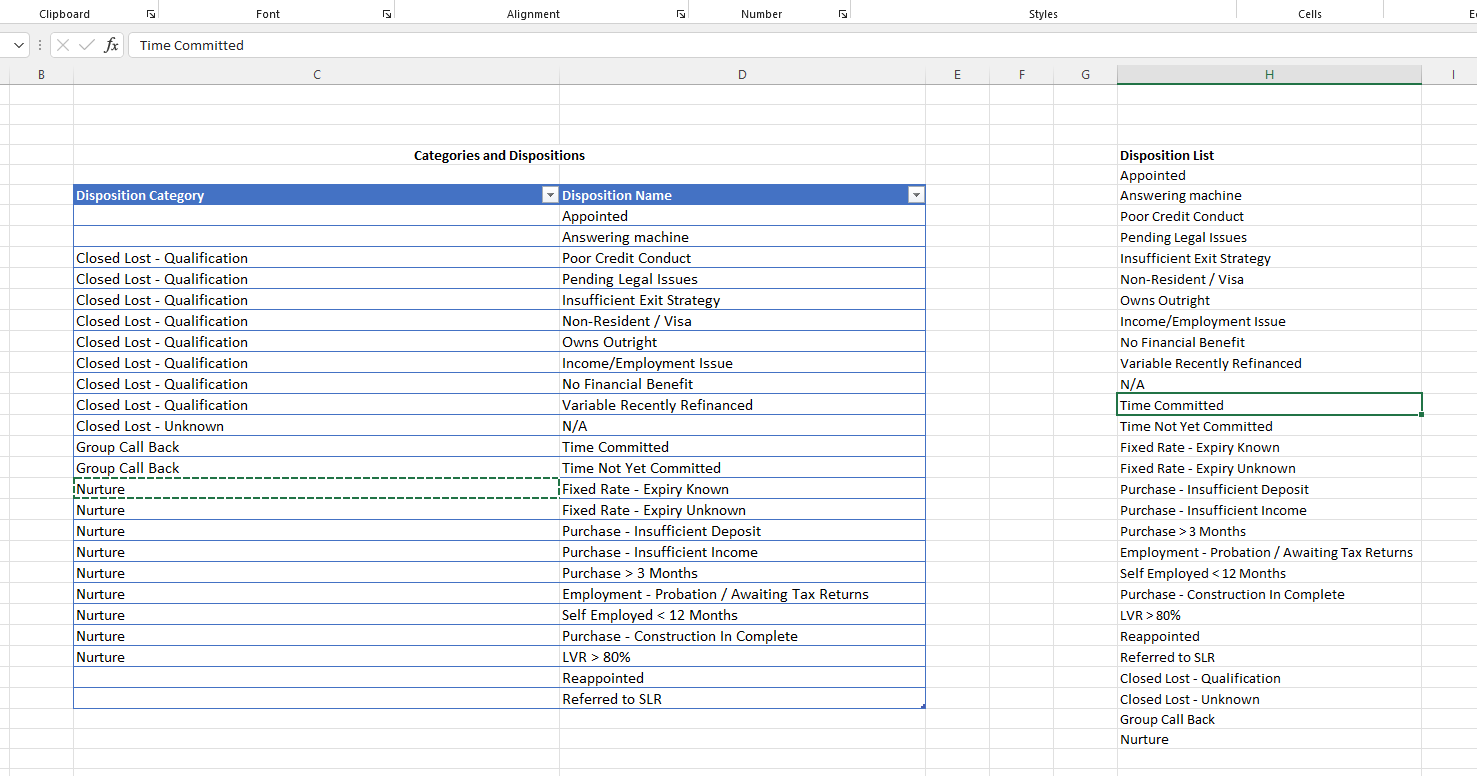
An disposition transformation example - categories and individual dispositions are listed, de-duplicated, as distinct dispositions
Step 2: Navigate to Dispositions
Log in to OCM, and click on “Dispositions” on the navigation bar
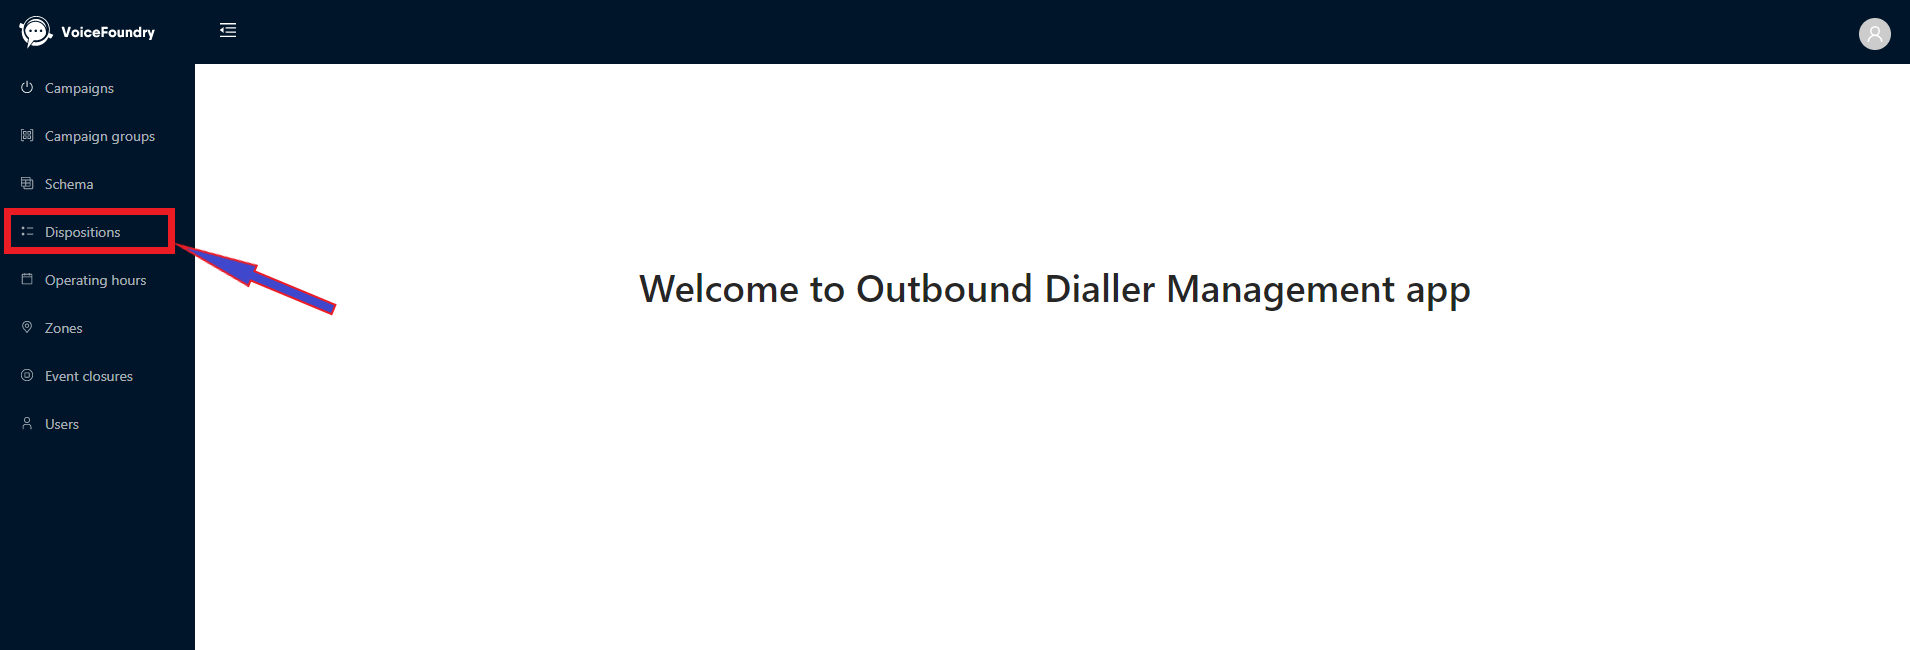
The outbound dialler management app. Note the module selector on the left panel
Step 3: Navigate to the individual dispositions tab
Click on the “Dispositions” tab that appears on the right side of the next screen. You will see a screen similar to below (note, if this is the first disposition you are adding, you will not see an existing list of dispositions):
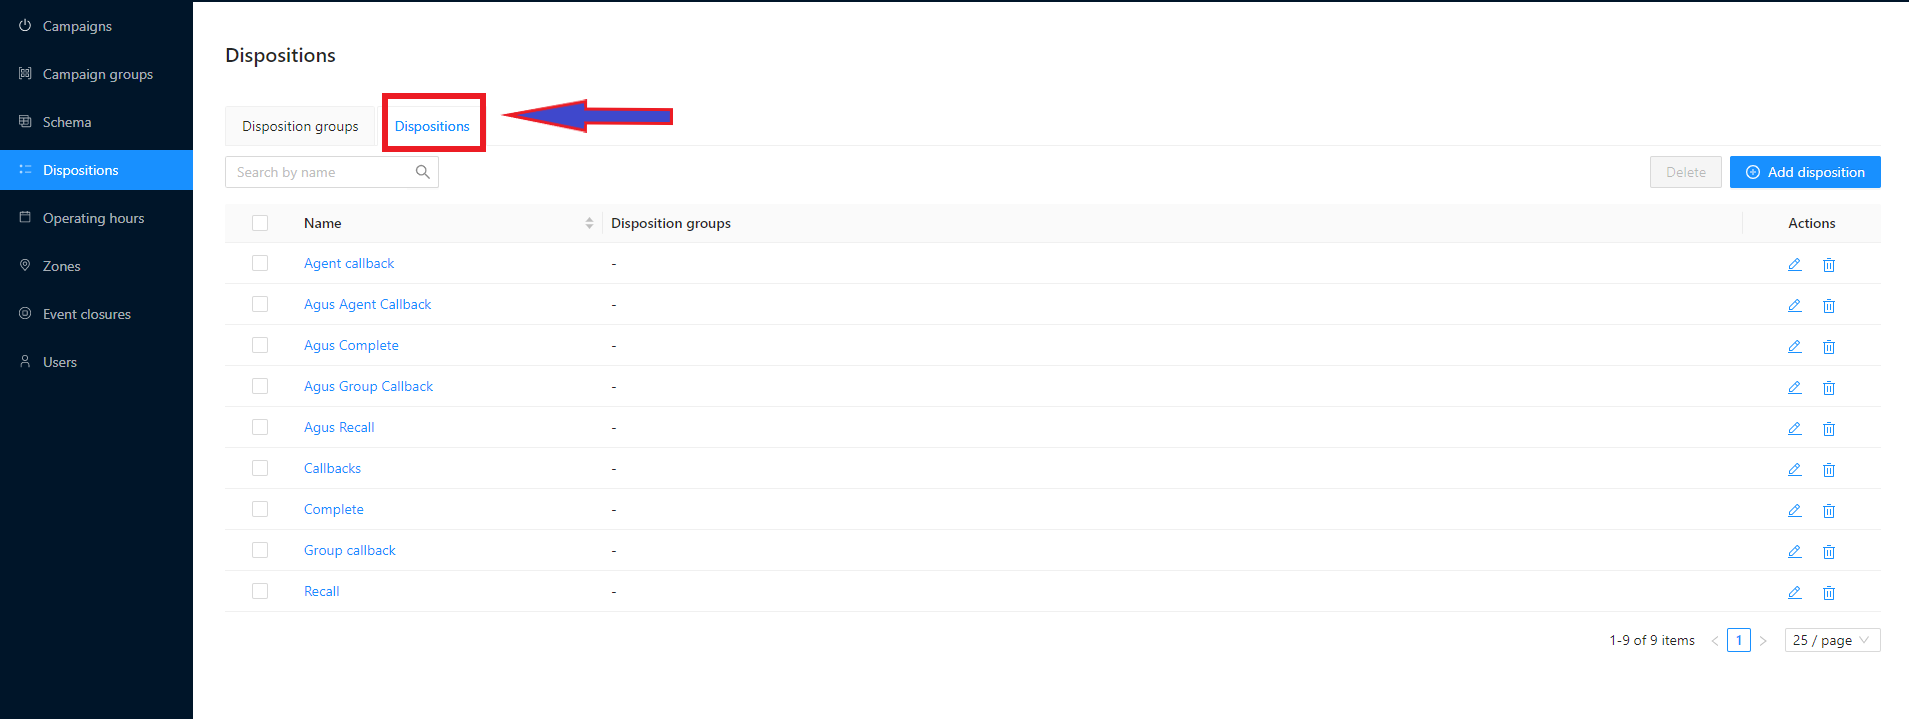
Some modules will open to a tabbed selection screen. This module exposes two tabs - Disposition Groups and Dispositions.
Step 4: Prepare to add dispositions
Click the “Add Disposition” button at the top right of the Dispositions screen. You will be prompted with an input at this point:

Adding a new disposition
Step 5: Add your dispositions
Start adding the dispositions you have identified at Step 1, one at a time, until all dispositions have been added. Disposition levels need to be added here also as separate dispositions:

Naming your new disposition
Once you have completed adding your dispositions and disposition levels to this section, you are ready to start creating Disposition Groups.
Disposition Groups
The next step in configuring your dispositions is to create disposition groups. Disposition groups are where you configure important disposition settings, such as
Applicable Dispositions
Disposition Types
Disposition Levels
Recall Times
Once we create these groups and configure all settings, we will save the disposition group. Once saved, the disposition group can be applied to campaigns.
Disposition Group Configuration
Now it’s time to configure your dispositions within disposition groups.
Step 1: Arrange your dispositions
Arrange the dispositions which you configured in “Disposition Labels” - Step 1 above, by campaign, and assign disposition types to the dispositions. For any Recall type dispositions, determine your recall offset time. For example
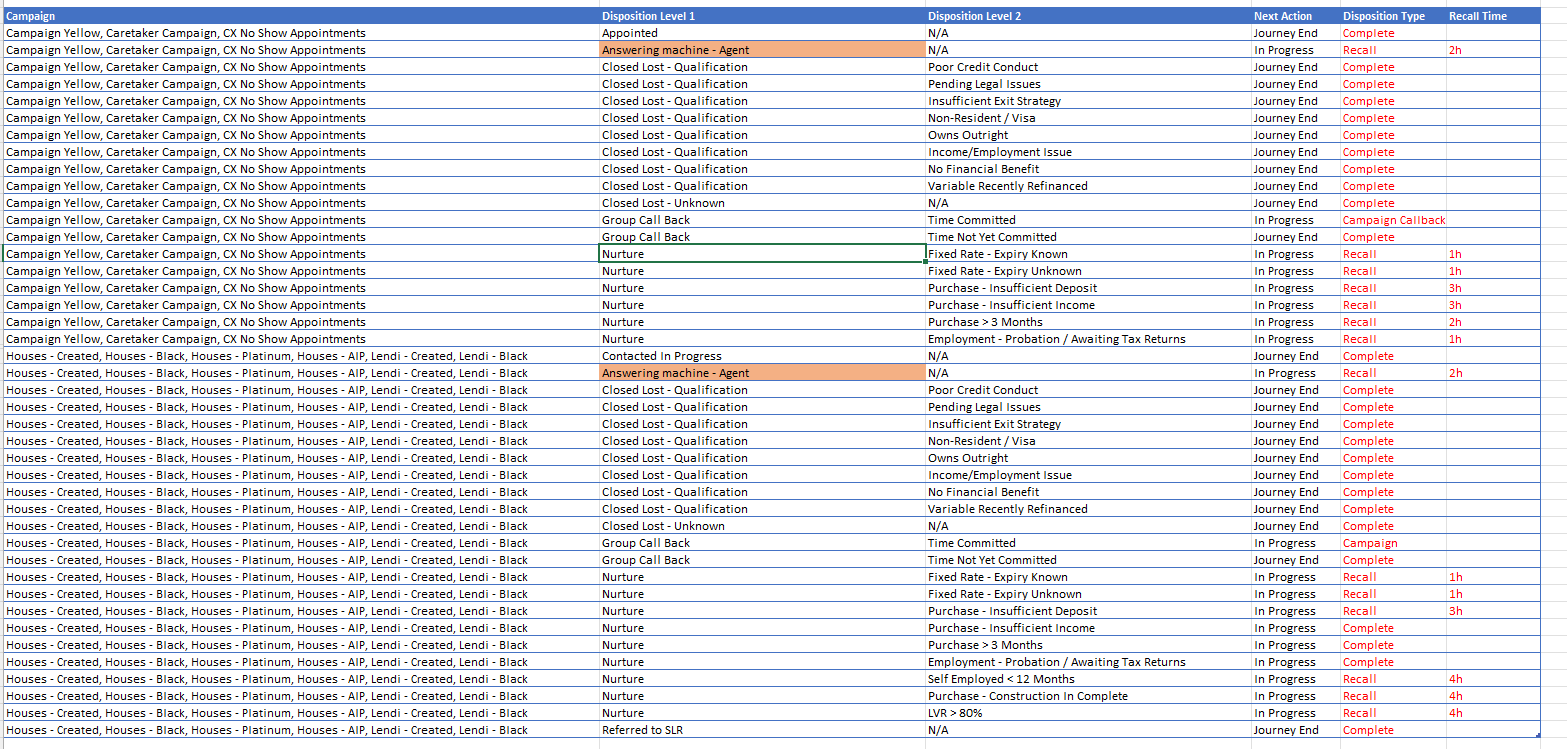
Arranging your disposition labels by campaign, and adding Disposition Type and Recall Time (in red text)
You’ll need to rename any dispositions which are labelled the same as system dispositions, as system dispositions cannot be modified. Above, you can see that “Answering Machine” has been re-labelled “Answering Machine - Agent”.
Step 2: Assign a Disposition Group name
Assign a disposition group name to your dispositions, by campaign: your disposition groups can be applied to multiple campaigns at once. This means, using the example above, you can create one Disposition Group to apply to the “Campaign Yellow”, “Caretaker Campaign”, and “CS No Show Appointments” campaigns. The same goes with your “Houses” campaigns below. Create a Disposition Group name column in the above for labelling purposes (to be used in the below steps):
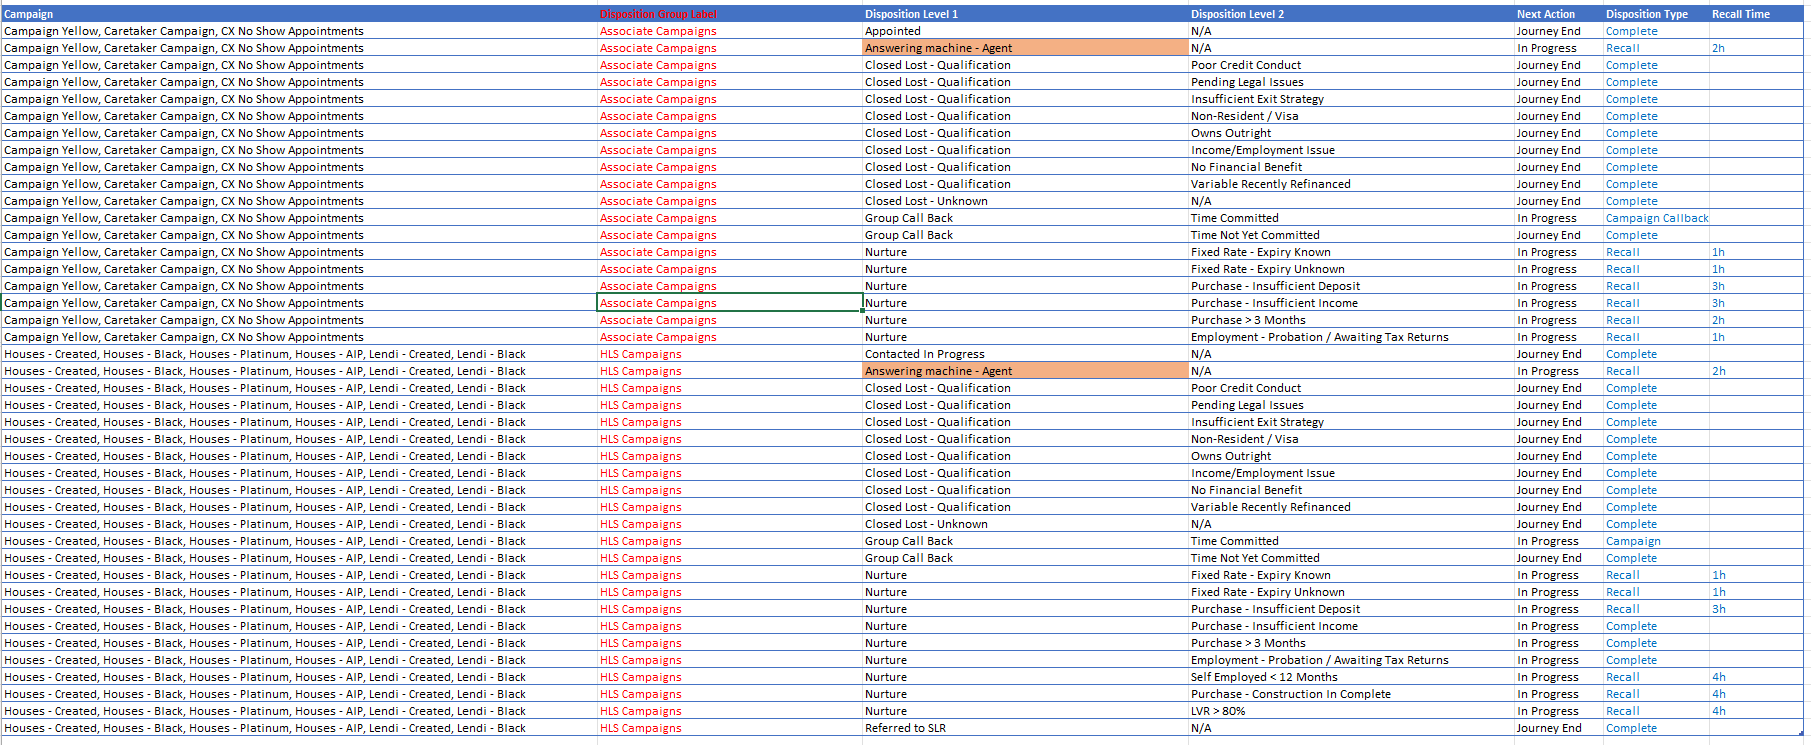
Soft assignment of disposition group name, for preparatory purposes (in red text)
Step 3: Assign system dispositions
Assign system disposition types in the same sheet: add the 6 system detected dispositions to your list, for each disposition group, and assign the disposition type and recall times (if required):
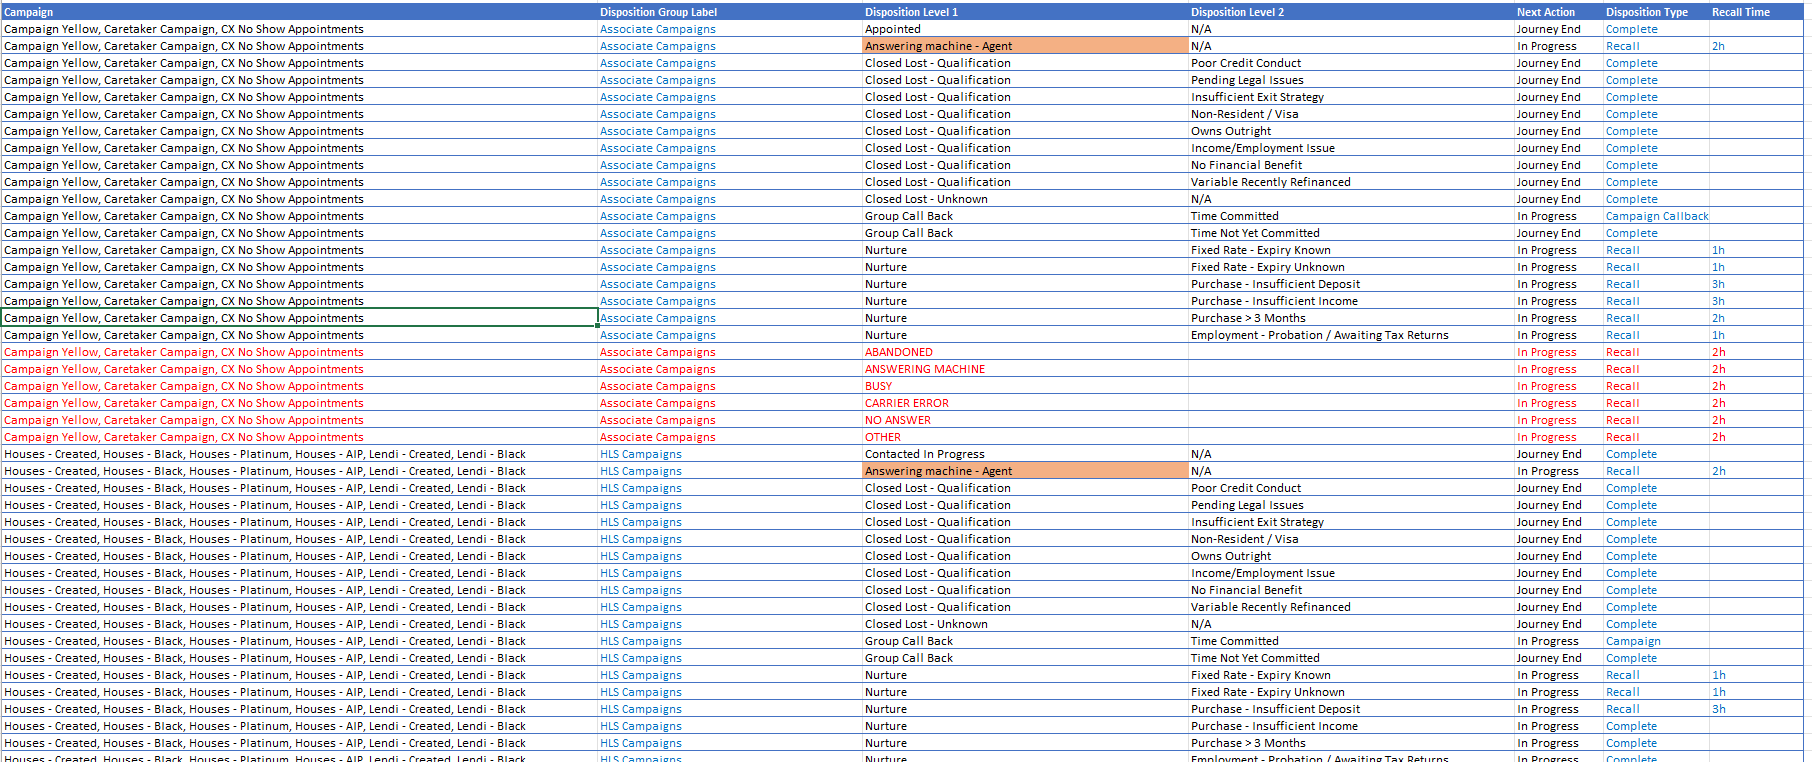
System Dispositions highlighted (in red text). These need to be added to every disposition group
Step 4: Navigate within OCM
Log in to OCM, and click on “Dispositions” on the navigation bar

The outbound dialler management app. Note the module selector on the left panel
Step 5: Add disposition group
Add a new disposition group: click on the “Disposition Groups” tab that appears on the right hand side of the next screen (labelled “1”), and then click the “Add disposition group” button on the far right of the next screen (labelled “2”)
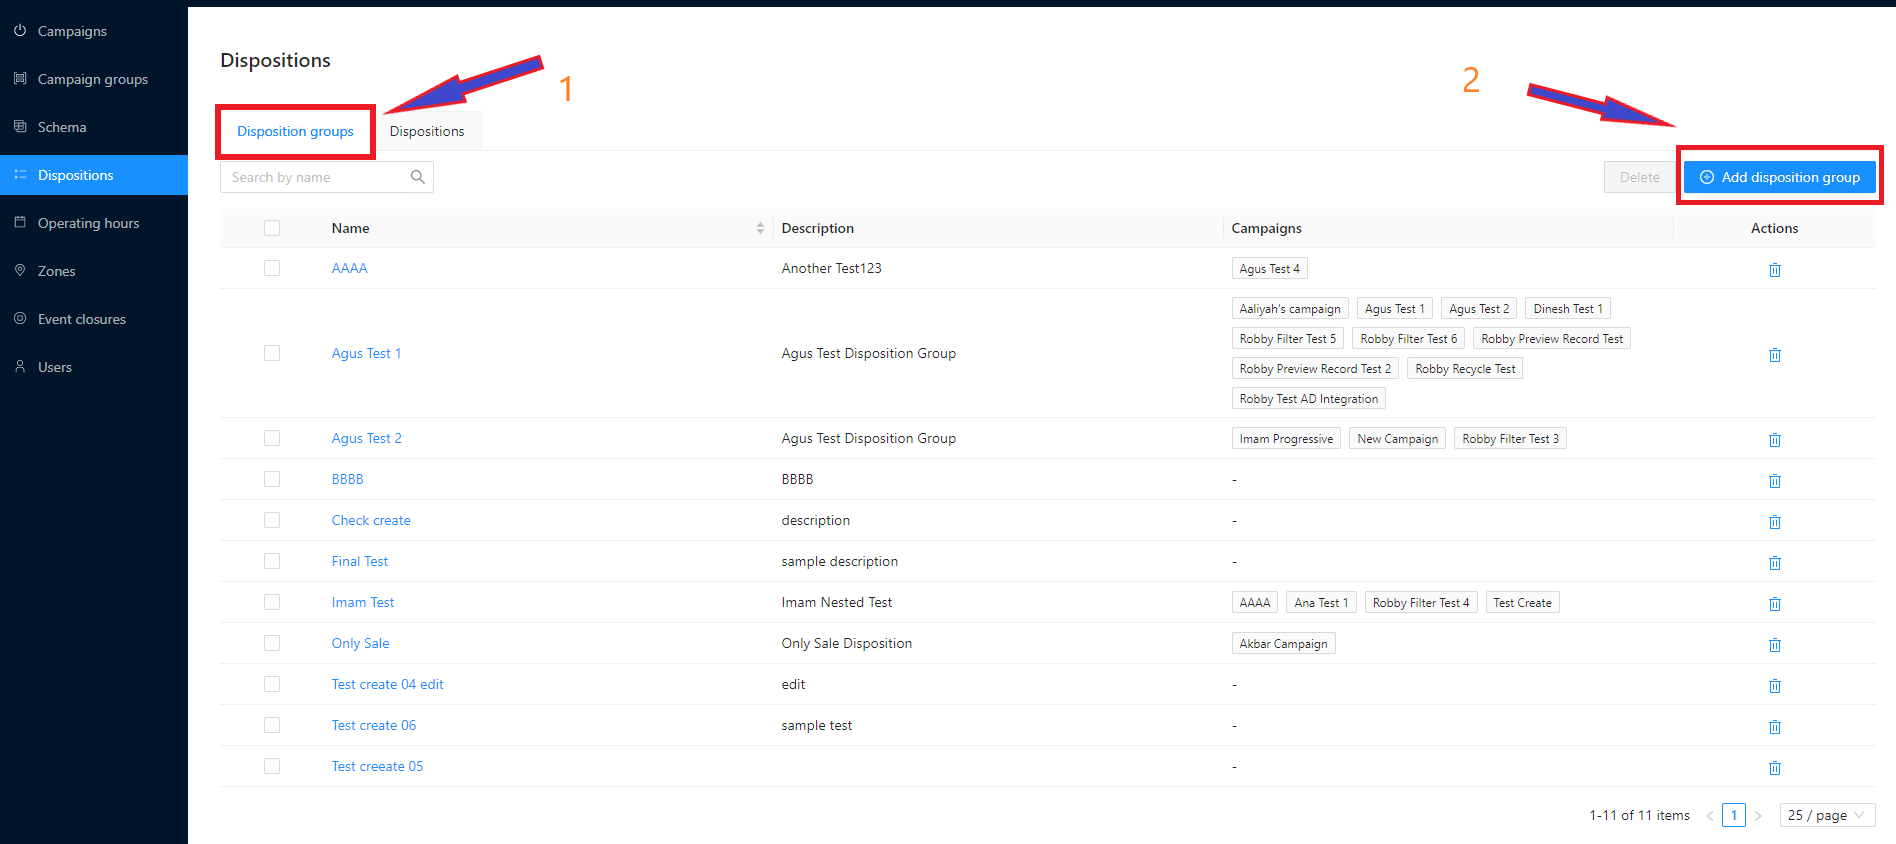
Adding a new disposition group
Step 6: Configure disposition group
Name and Describe your disposition group: a new dialogue page will open, which is the disposition group configuration screen. First, name your disposition group (1), and give it a meaningful description (2). You can use the names you assigned in Step 2 above.
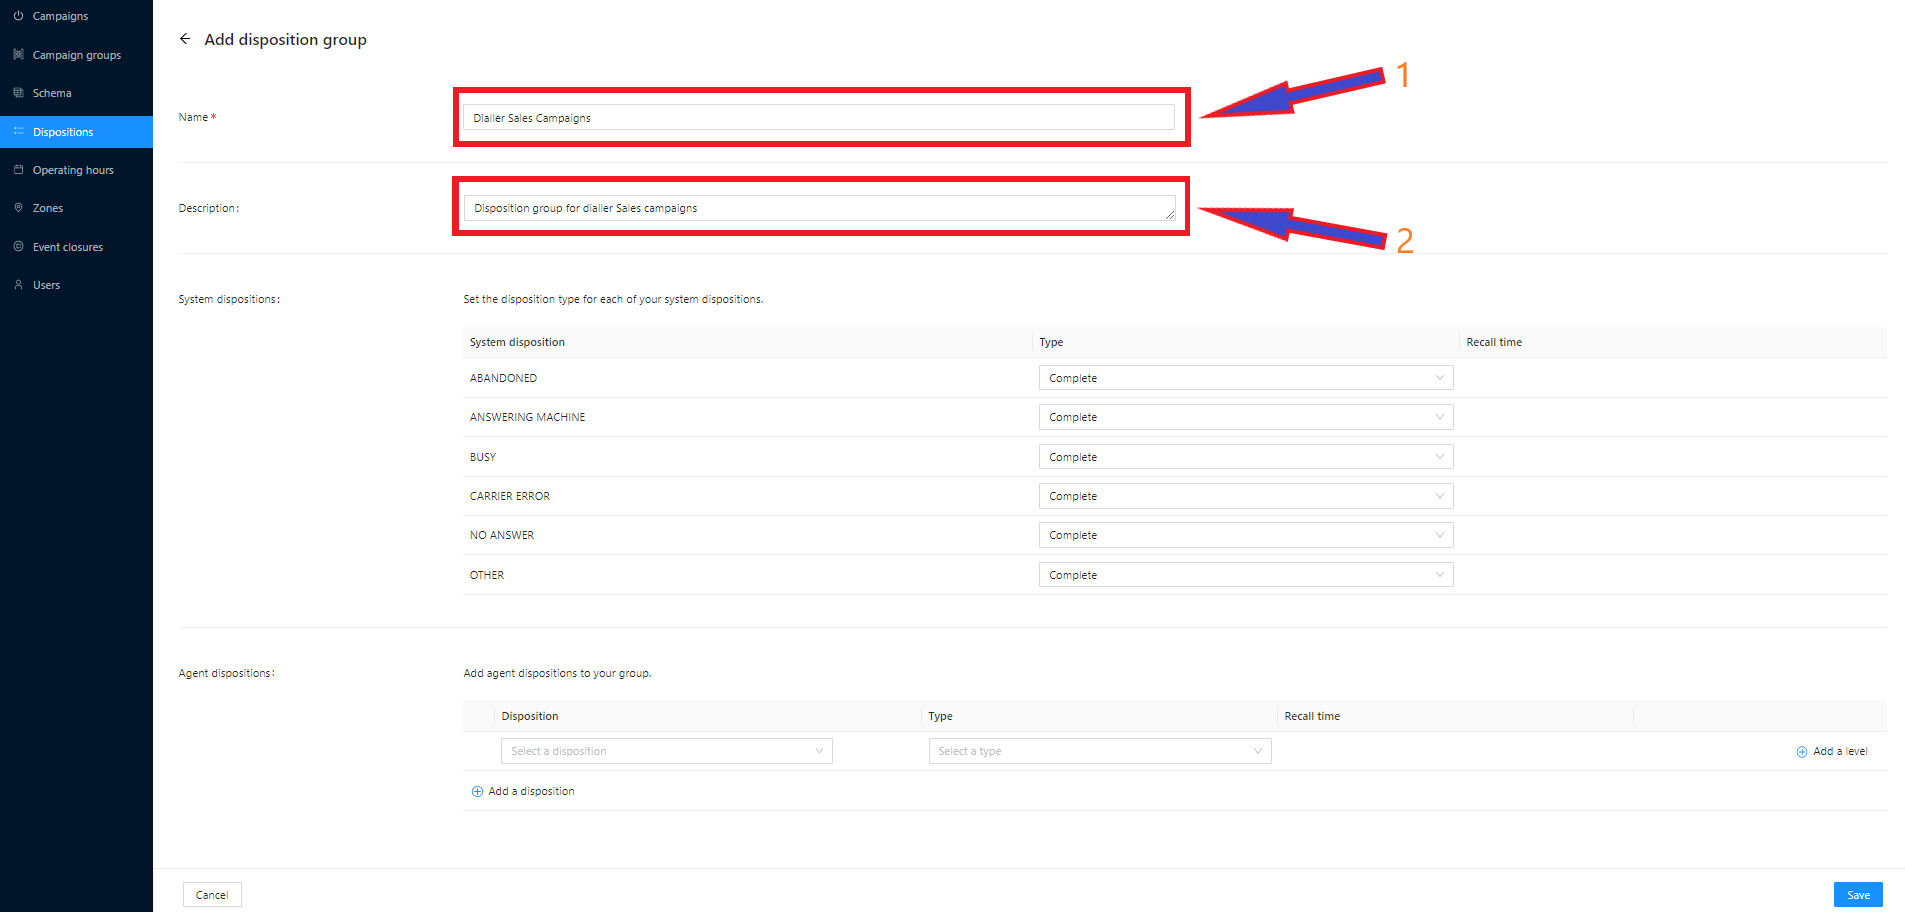
Disposition group naming and description
Step 7: Set system disposition types
Set your System Disposition Types: system dispositions will be used if the campaign is switched to a detectable mode (ie, Predictive or Progressive with CPD and AMD on)
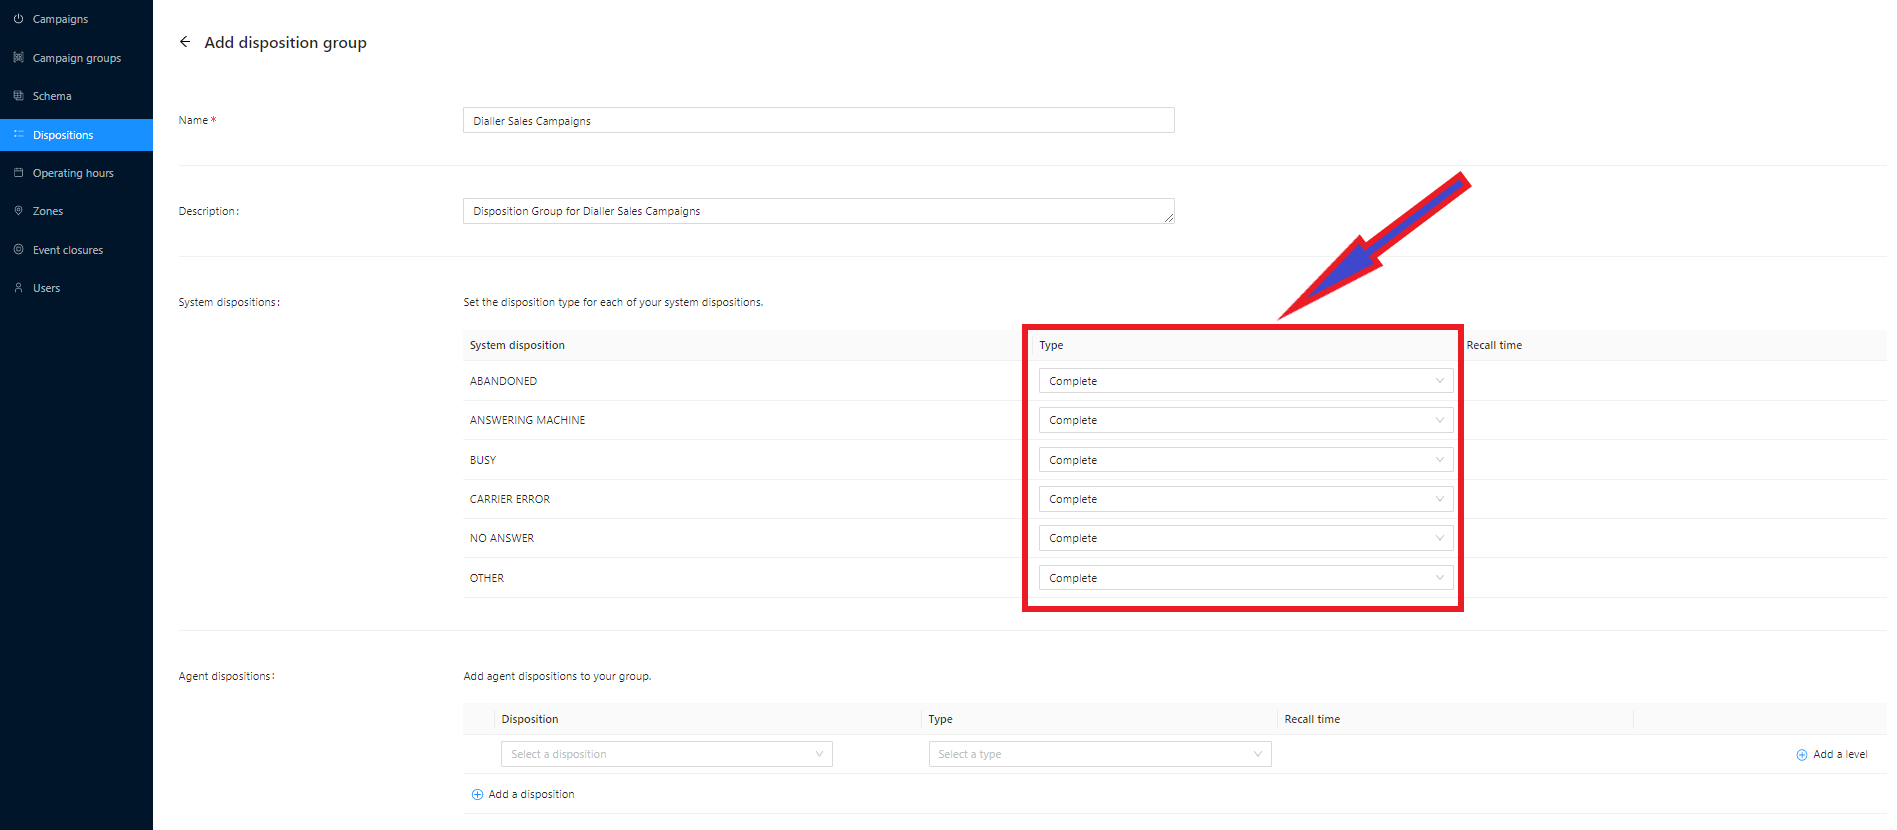
System disposition type setting
Step 8: Add custom dispositions to group
Add your agent dispositions: once system disposition types and recalls have been configured, it’s time to add your agent dispositions which you finished soft-configuring in steps 1-3. Disposition levels are created here too.
To start, you will create your disposition layer structure. Add top levels using the “Select Disposition” drop down, and any sub-levels by clicking the “Add Level” button, which will create a layer beneath the top level.
Next, we will assign disposition types to each lower level disposition, along with any applicable recall times.
All of your work now will be completed in the Disposition Group (as per below) - we’ve highlighted the main sections we’ll be configuring below:
Note: Only lower level dispositions will be assignable to type.
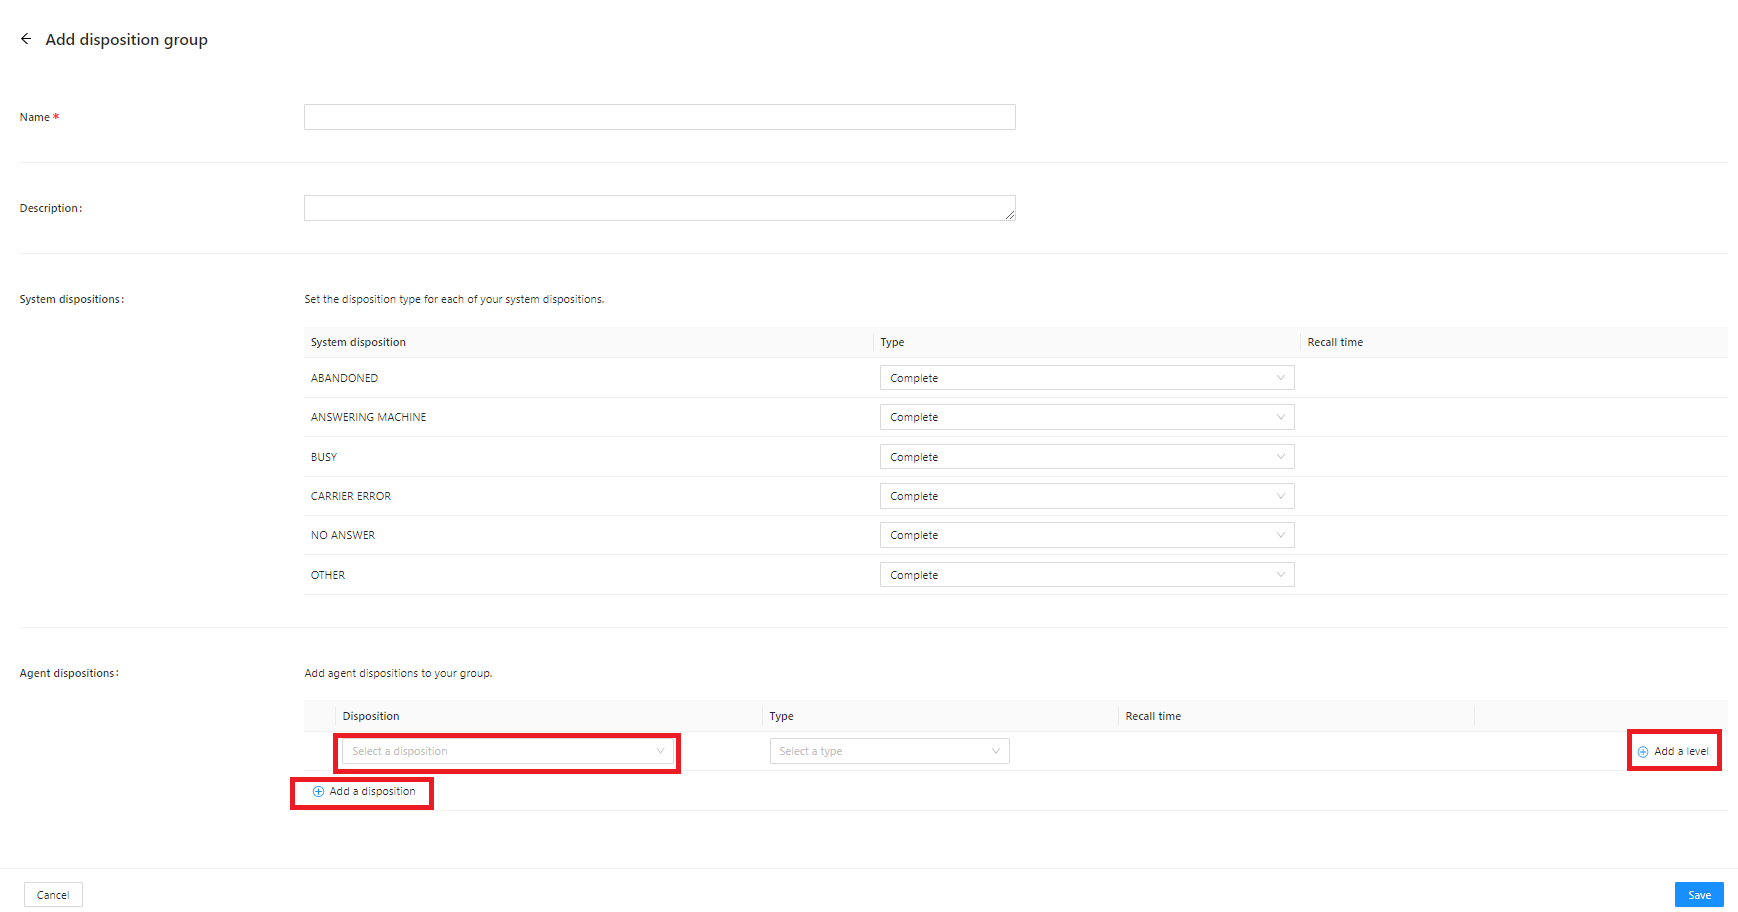
“Add a disposition” adds dispositions to this layer. “Add a level” creates a level below the selected layer
The first step is best explained using an example. Below is an example of a few different dispositions - some top level, and some at the lower level (which will have the disposition type assigned).
EXAMPLE:
Let’s go through an example of the usage of “Add a disposition” and “Add a level” to create some layered disposition types. For this example, I have created 8 dispositions labels:
Top Level Disposition 1
Top Level Disposition 2
Lower Level Disposition 1
Lower Level Disposition 2
Lower Level Disposition 3
Lower Level Disposition 4
Lower Level Disposition 5
Lower Level Disposition 6
I will organize the dispositions, and set their disposition types, as follows:
Top Level Disposition 1
Lower Level Disposition 1 - Complete
Lower Level Disposition 2 - Recall (2 hr)
Lower Level Disposition 3 - Recall (4 hr)
Top Level Disposition 2
Lower Level Disposition 4 - Agent Callback
Lower Level Disposition 5 - Complete
Lower Level Disposition 6 - Group Callback
In this example, your Disposition Label screen should look as follows (the dispositions I have added are within red boxes for visual purposes):
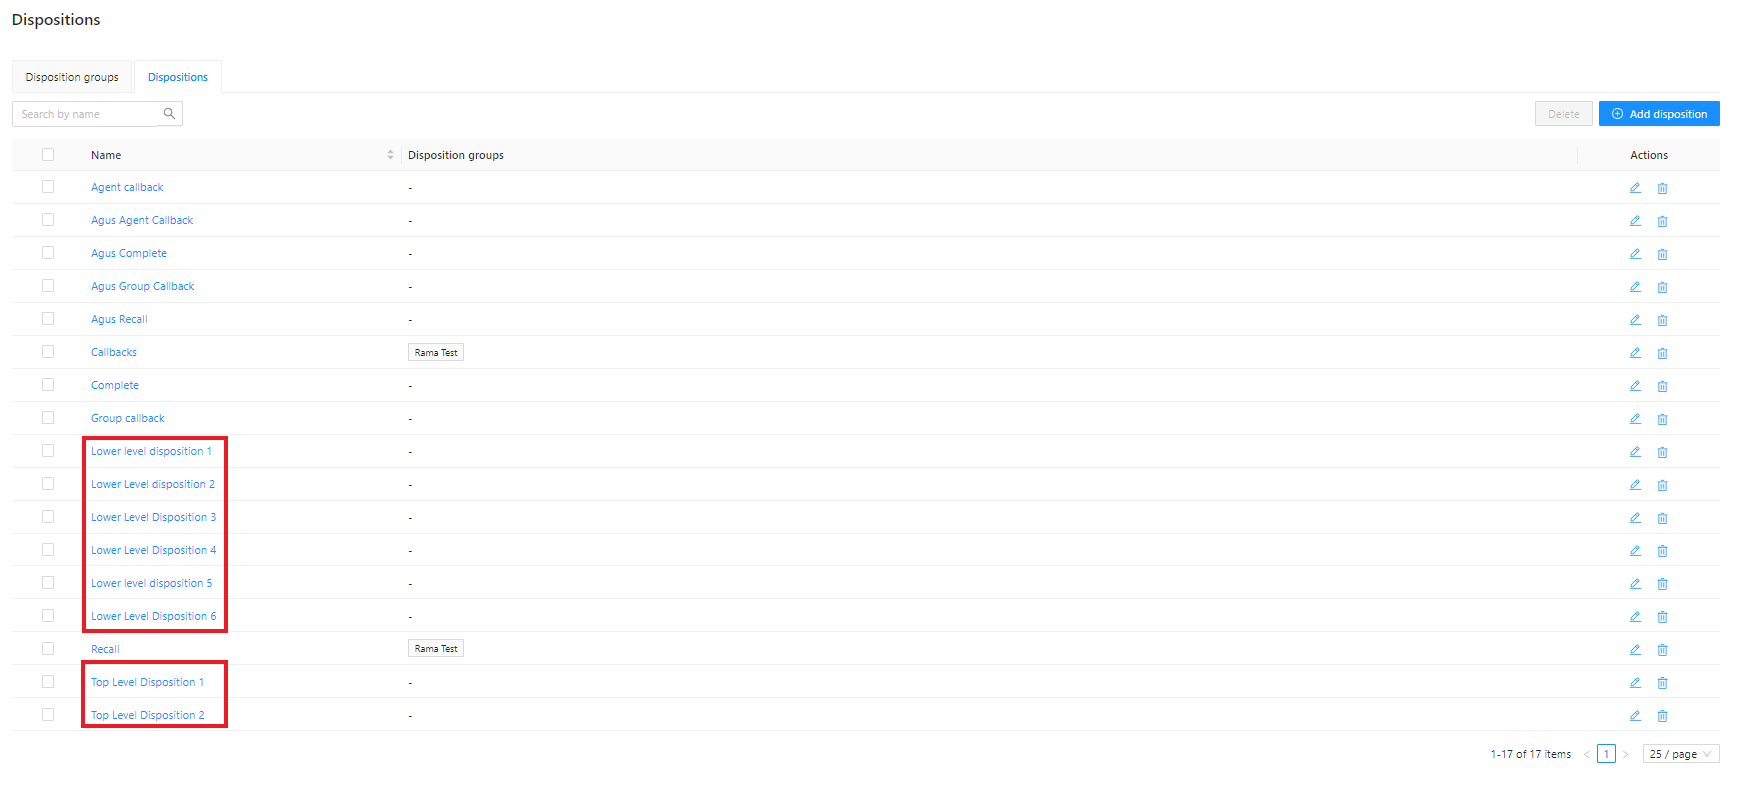
Dispositions setup as per the example above, boxed in Red
Now, to create your layers as per the example, navigate to “Disposition Groups” and set your group up as follows:
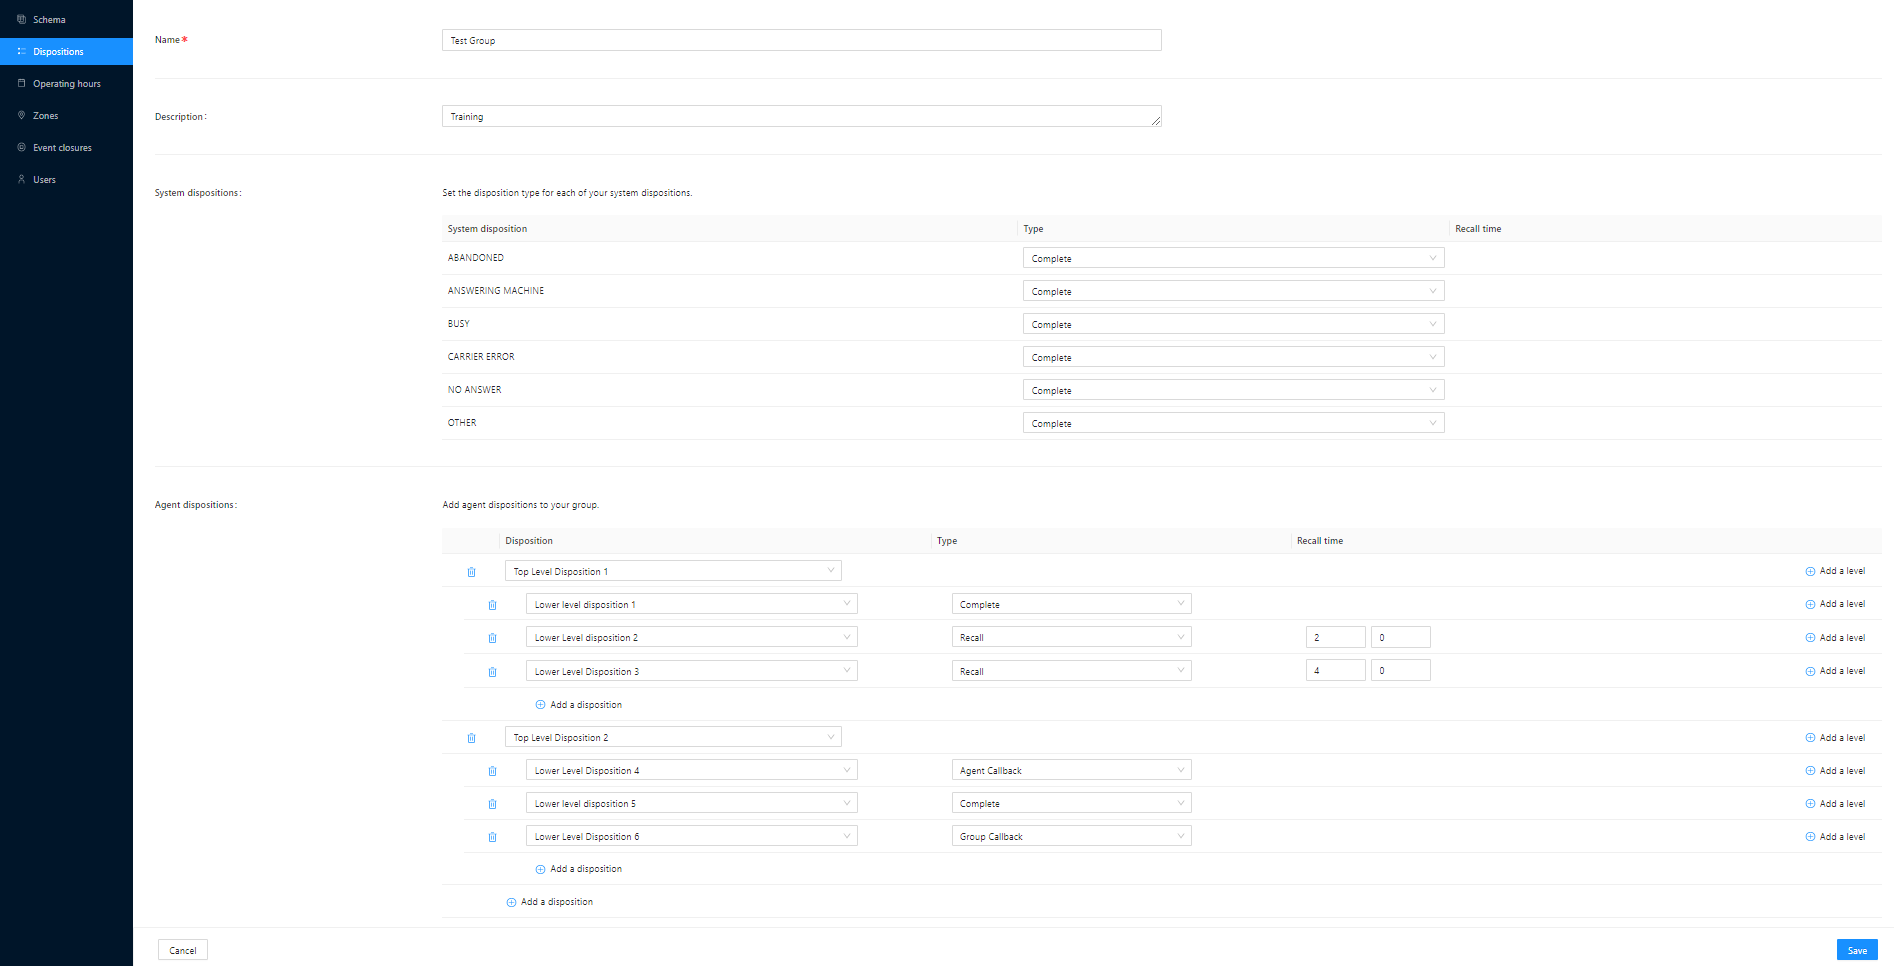
Disposition and levels configured as per the example
To complete this step, you will:
Add the Top Level Disposition 1 as the first disposition in the list
Add the Tope Level Disposition 2 as the second disposition in the list
Click “Add a level” three times at the Top Level Disposition 1 level. This will create 3 blank disposition placeholders under Top Level Disposition 1
Click “Add a level” three times at the Top Level Disposition 2 level. This will create 3 blank disposition placeholders under Top Level Disposition 2
Add your three dispositions (Lower level disposition 1, Lower level disposition 2, and Lower level disposition 3) into the 3 blank disposition placeholders beneath Top Level Disposition 1
Add your three dispositions (Lower level disposition 4, Lower level disposition 5, and Lower level disposition 6) into the 3 blank disposition placeholders beneath Top Level Disposition 2
Add your disposition types to all lower level dispositions
Click “Save”
You should now be taken back to the main Disposition Group page, and your new disposition group should be visible.

You will see that the “Test Group” disposition group is not assigned to any campaigns… yet
