v1.0 - Campaigns
Campaign Introduction
Now that we’ve created our schema fields, dispositions and disposition groups, event closures, operating hours, zones and zone groups, we are finally ready to start creating our campaigns. All of the previous configurations were completed first, so that we could easily and quickly create our campaigns. This section of the guide will take you through the campaign creation process, as well as editing a campaign. Let’s start with campaign creation.
Campaign Creation
Creating campaigns in OCM is easy, once you’ve created all of the supporting configuration. It is in your campaigns that you will configure things like:
Maximum Attempts
Campaign Schema
Outbound CLI
Dial Mode
Record Filters
Record Sorting
Agent Interface
As well as assigning the pre-configured items to your campaigns, such as:
Disposition Groups
Schema Fields
Hours of Operation
Zone group mapping
Step 1 - Create your campaign via the Campaign Creation wizard
To start creating your campaigns, navigate to the “Campaigns” module (1) in the Dialler Administration portal, and click “Add Campaign” (2) to open the Campaign Creation Wizard

You will be presented with a screen that looks like this:

Step 2 - Name and describe your campaign
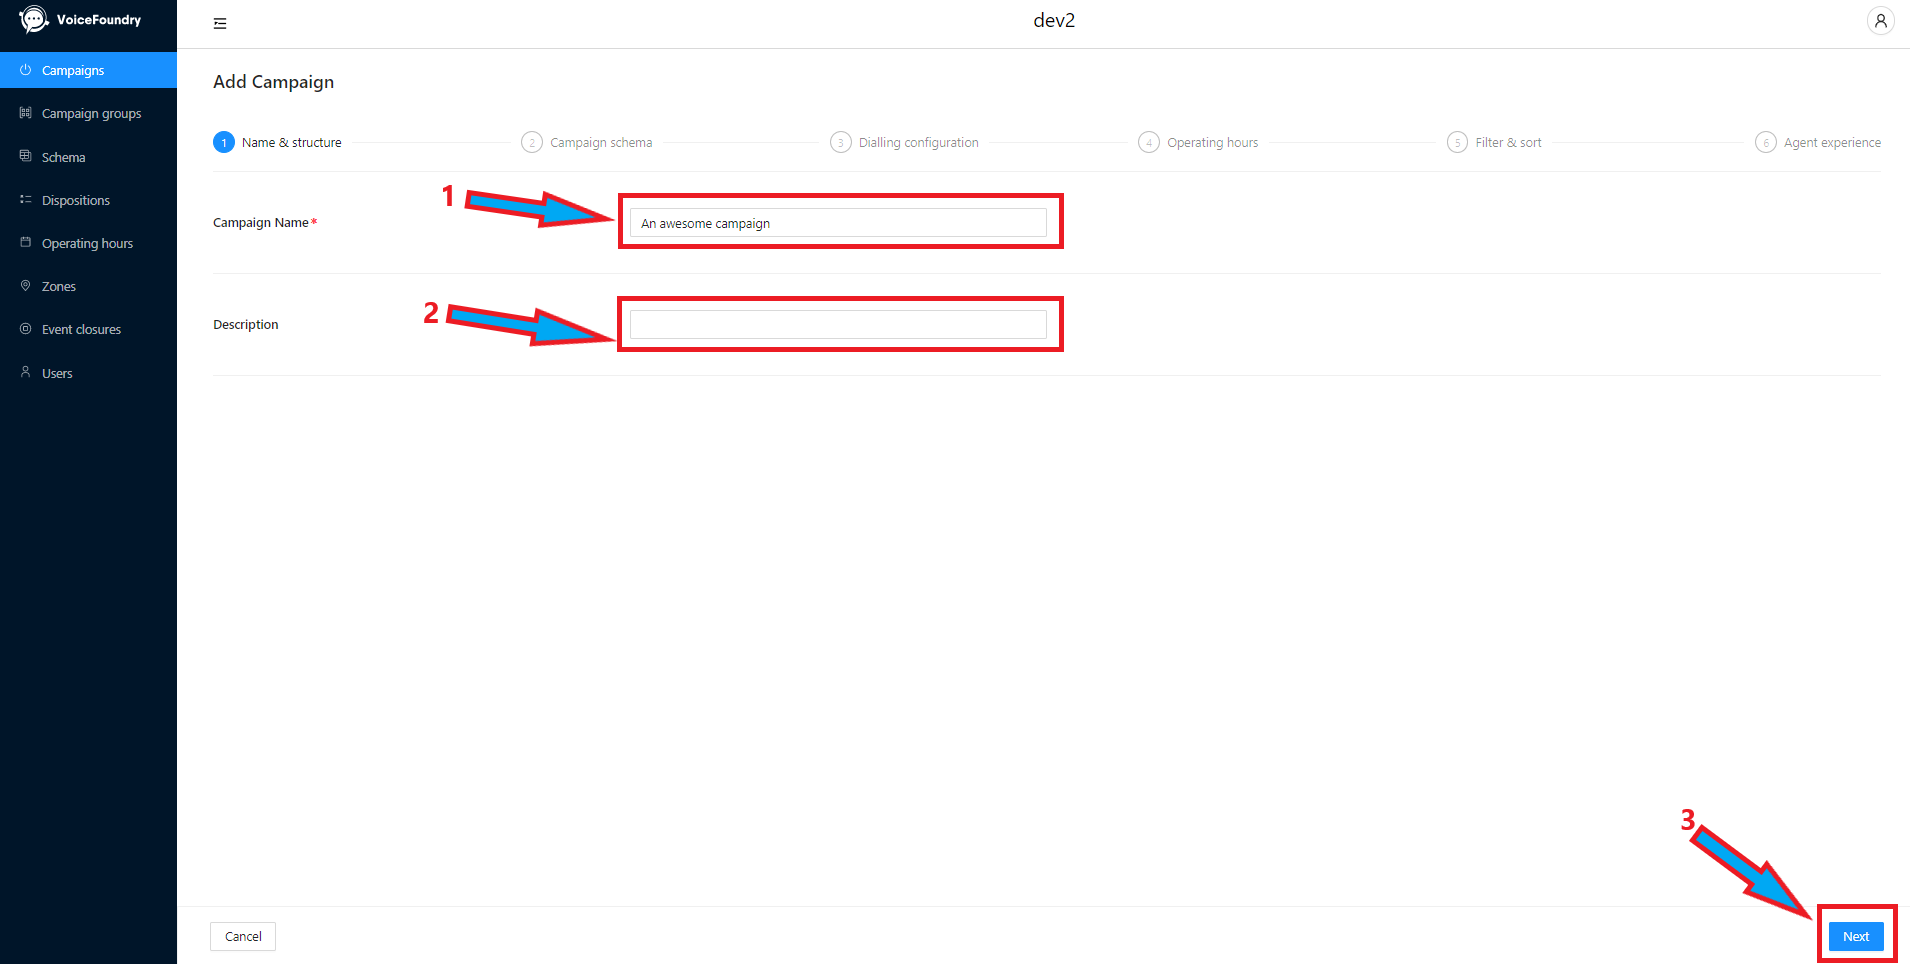
Add a name (1) and optional description (2) to your campaign, and then press the “Next” (3) button, which will take you to the Campaign Schema screen.
Step 3 - Create your campaign schema
Now it’s time to create our Campaign Schema, which was referred to in the Schema document of this training guide. The Schema document will guide you on important preparatory work required for this step, as well as providing an explanation of the dependencies that your campaign schema will be subject to. Please ensure you are familiar with this section of the training guide before attempting to create a campaign schema.
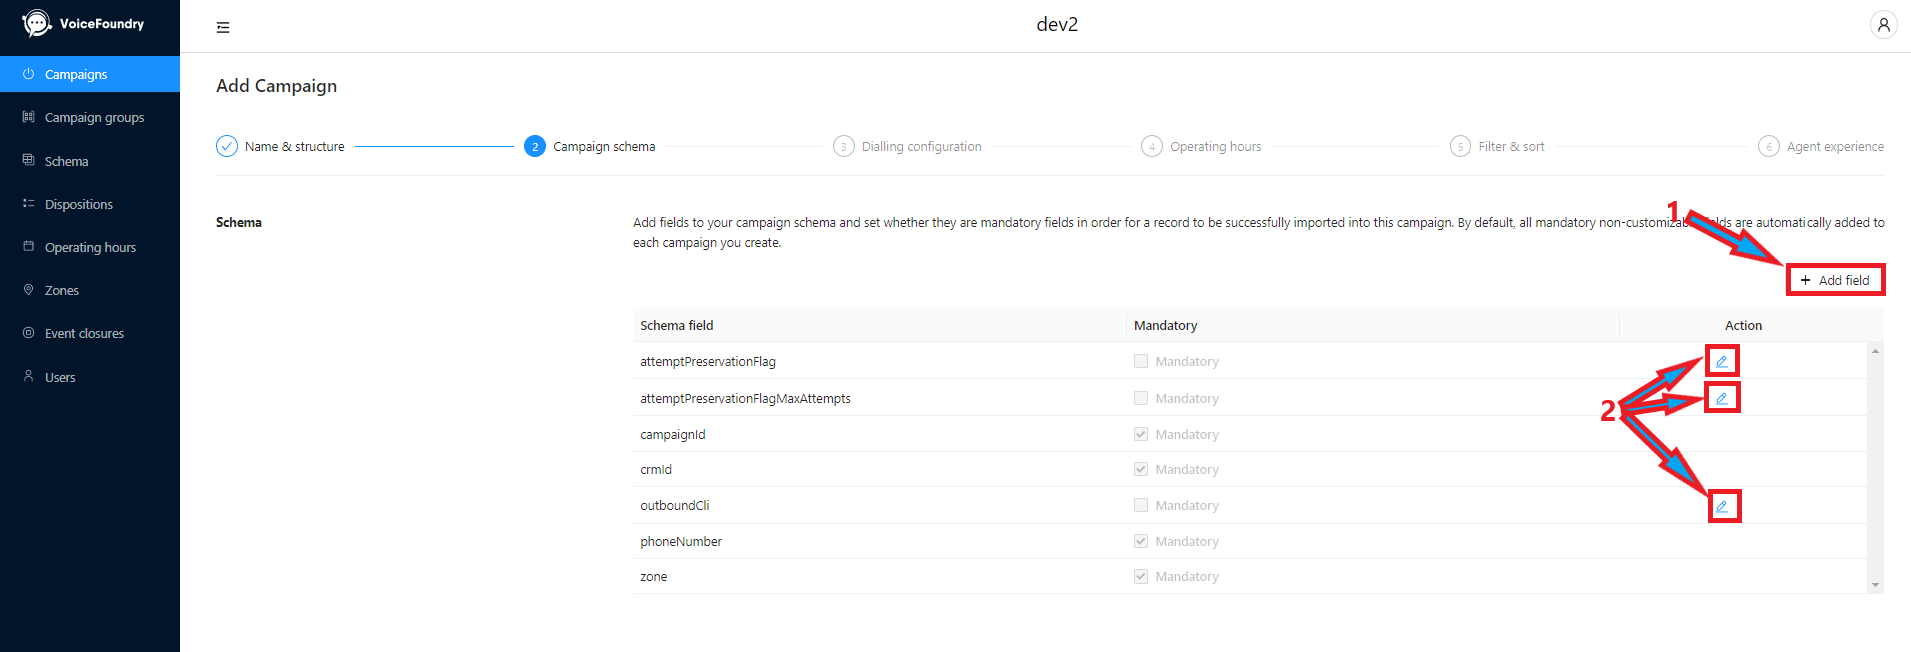
The campaign schema page allows you to add your schema fields, and set the mandatory status of each field. The “Add Field” button (1) allows you to add your custom fields to the campaign schema.
When you first see this page, your system optional/mandatory fields will be visible (refer to Schemas for further information). You can set the mandatory configuration for your system optional fields at this step, by pressing the Edit button (2) against any system optional field.
Step 4 - Configure Mandatory on System Optional fields
Click “Edit” (1) on any of the system optional fields to change the configuration of “mandatory” against these fields.
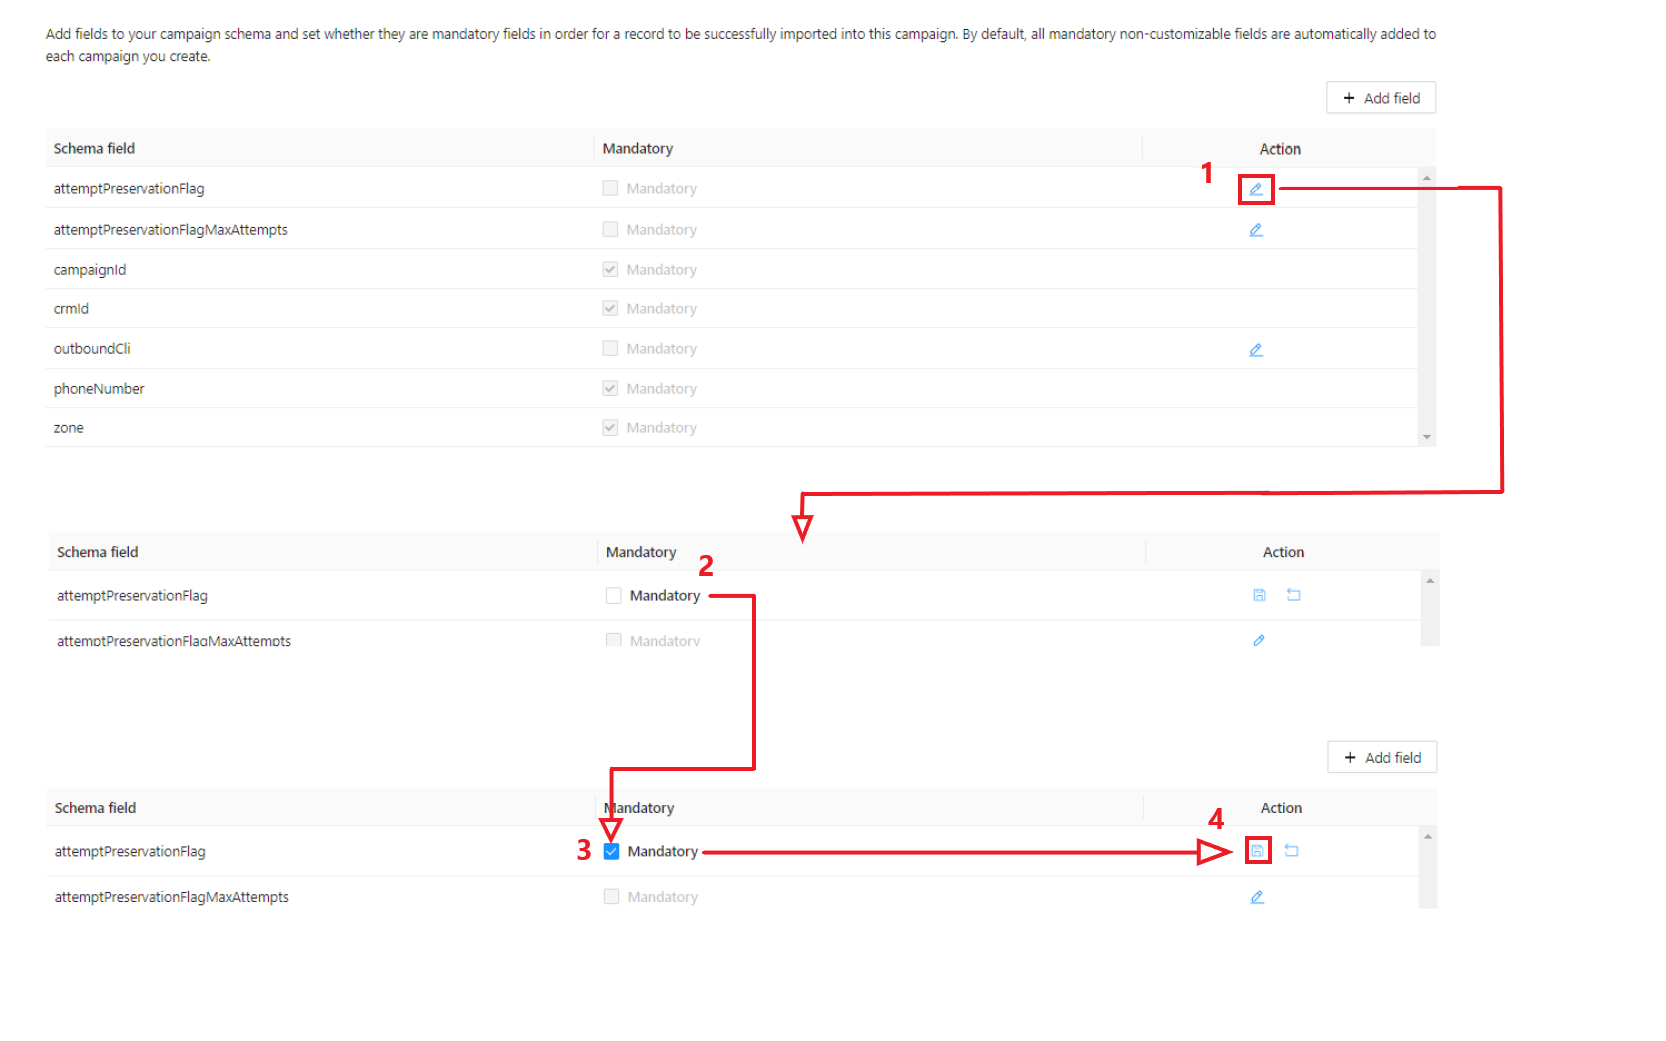
Click the Mandatory (2) button after clicking on Edit (to unlock the selection for change). Mandatory will become ticked (3). Now, press the miniature Save button (4) to save the field setting.
Step 5 - Add your custom Schema fields
Click the “Add Field” (1) button. A new dialogue box will appear, prompting selection of your custom field from the drop down list (2). Select your disposition, and configure mandatory, then press Add (4).
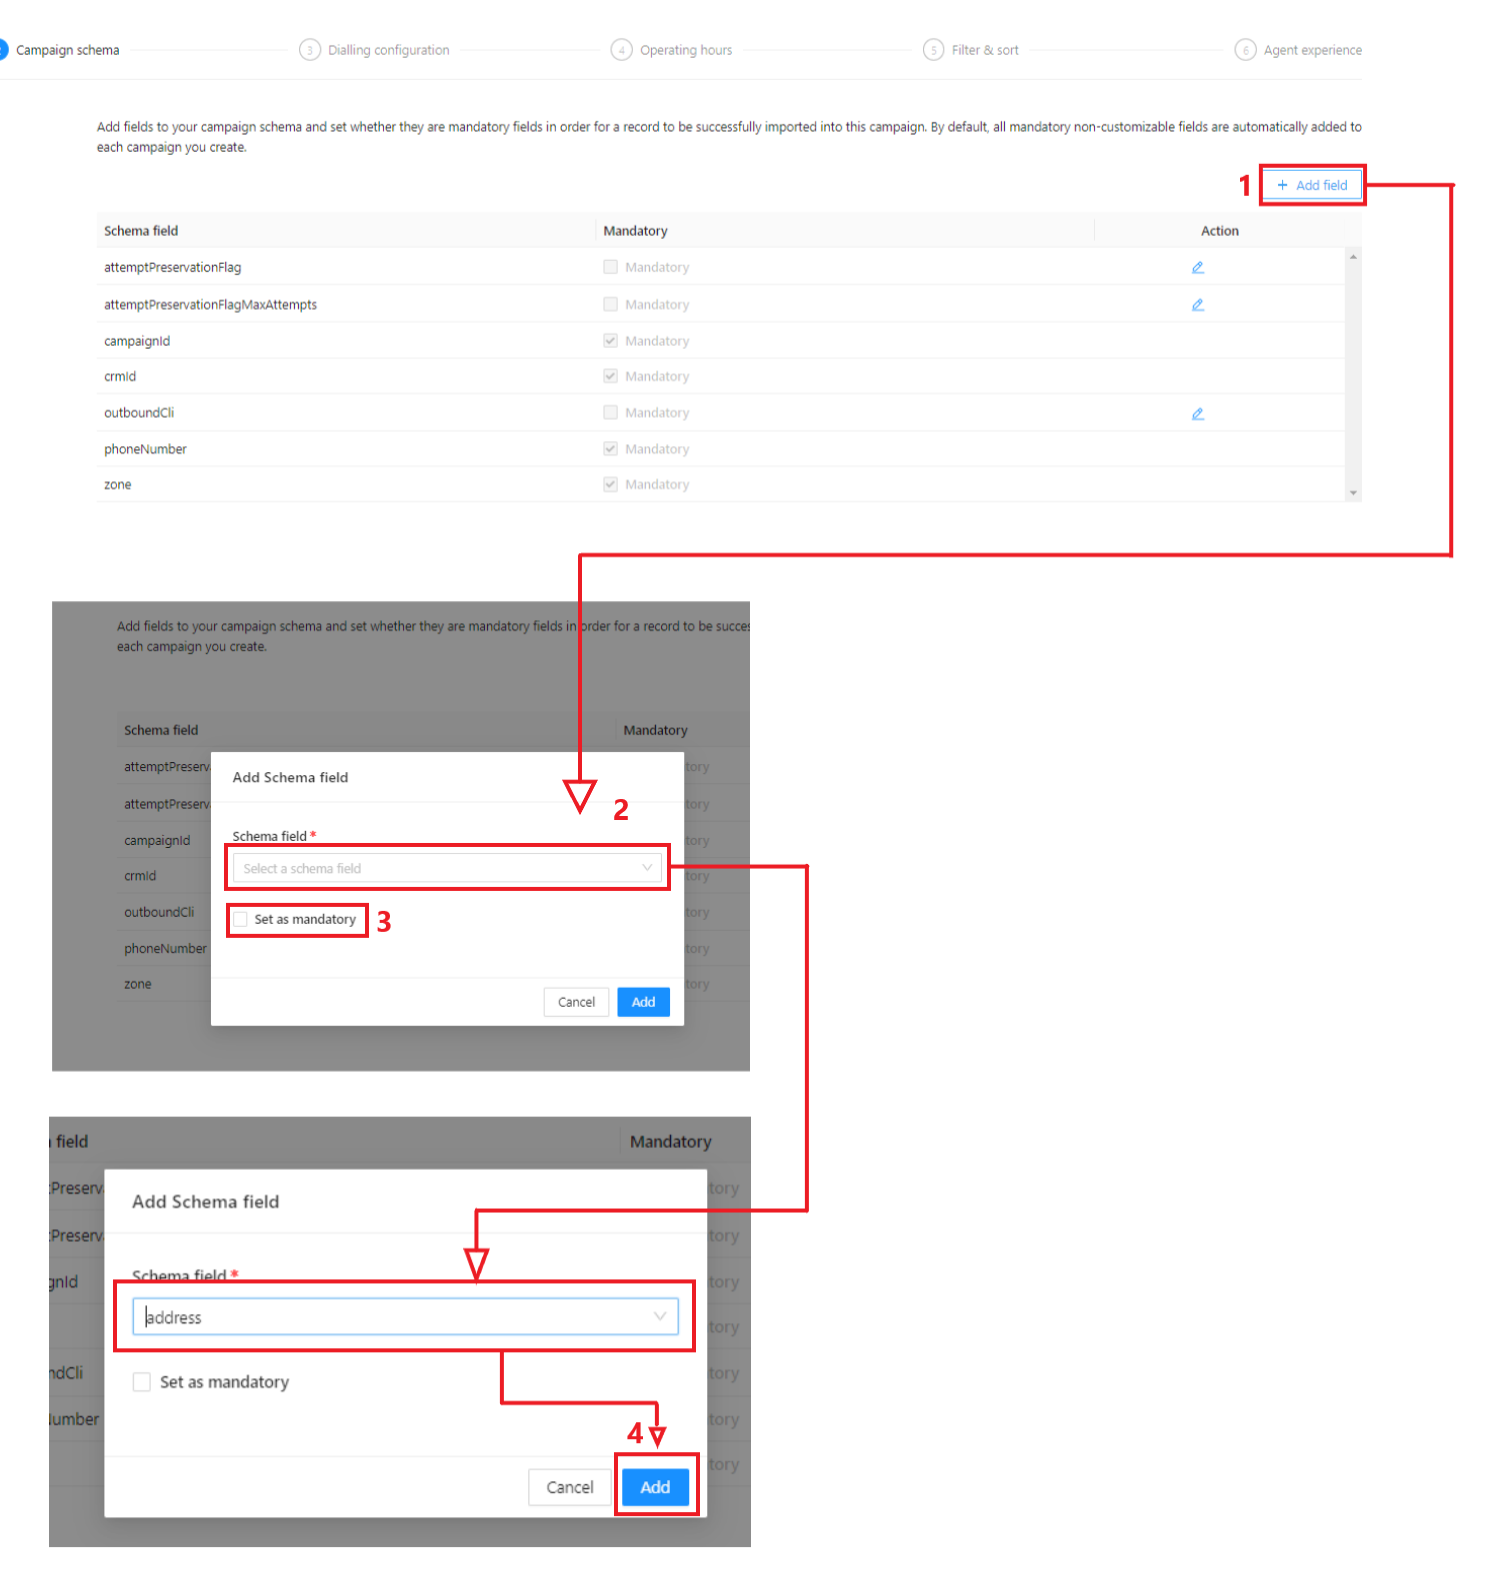
Finish adding all schema fields, then click the “Next” button at the bottom right of your screen, to transition to the next step.
Step 6 - Dialling Configuration settings
At this step, we configure the following:
Dial Mode (1): at the time of writing this guide, you have two modes to select from:
Preview Mode: displays the record to the agent before dialling, and allows the agent to dial the record when they are ready. No detections exist in this mode, so all call results (except for carrier errors and busy tones) will be presented to the agent
Progressive Mode: automatically dials the record for the agent, and only connects the record to the agent once the customer side has connected. This mode will detect Busy Tones and No Answers, and will not route calls with this outcome through to the agent
Note: More modes coming soon!
Outbound CLI (2): you can select the outbound CLI that calls will be made from via this section. The outbound CLI needs to be a phone number which has been claimed in Amazon Connect. All claimed numbers in Amazon Connect will appear in this dropdown
Max Attempts (3): can range from 1-99 attempts. Records will continually dial to this value, unless the record has been completed by setting a completed-type disposition
Disposition Group (4): the disposition group you would like to apply to the campaign. You created your disposition group in the “Dispositions” section of this guide
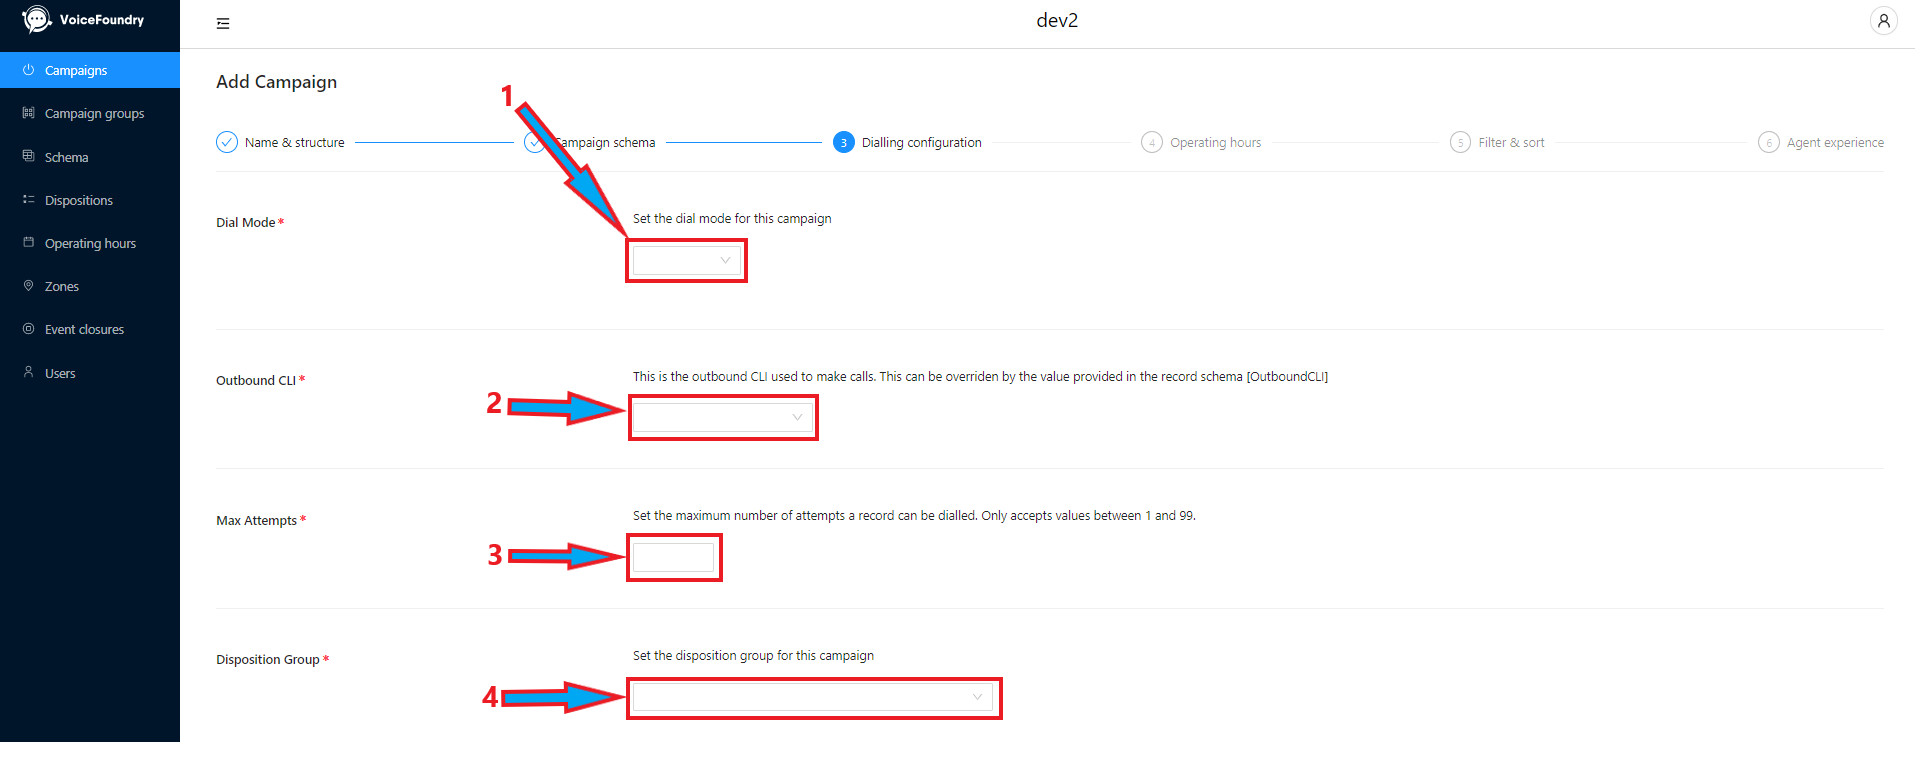
Set your values, and click the “Next” button at the bottom right of your screen:

Step 7 - Operating Hours
Setup your Operating Hours (1) and Zoneset gate (2)in the next page:

Once selected, click the “Next” button:
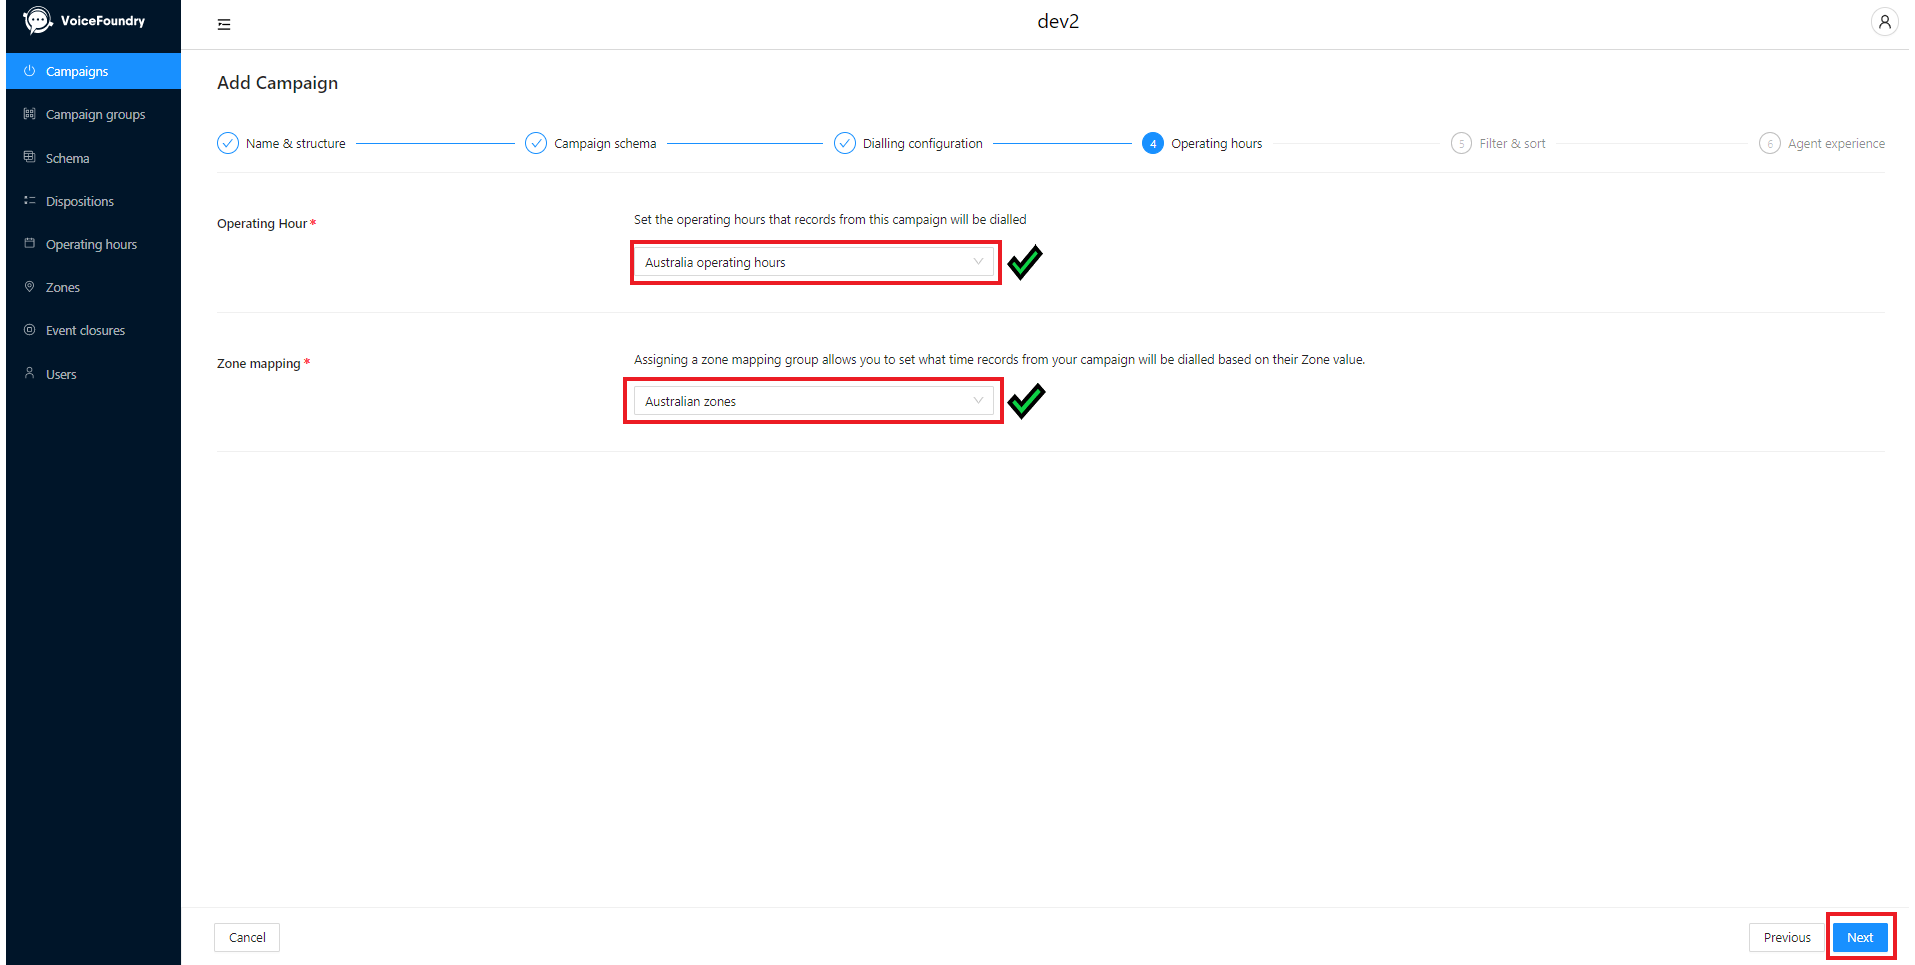
Step 8 - Add Filter and Sort criteria
At this step, we setup our Filter Criteria (1), and Sort Criteria (2), for our campaign. Filtering and sorting is completely optional.
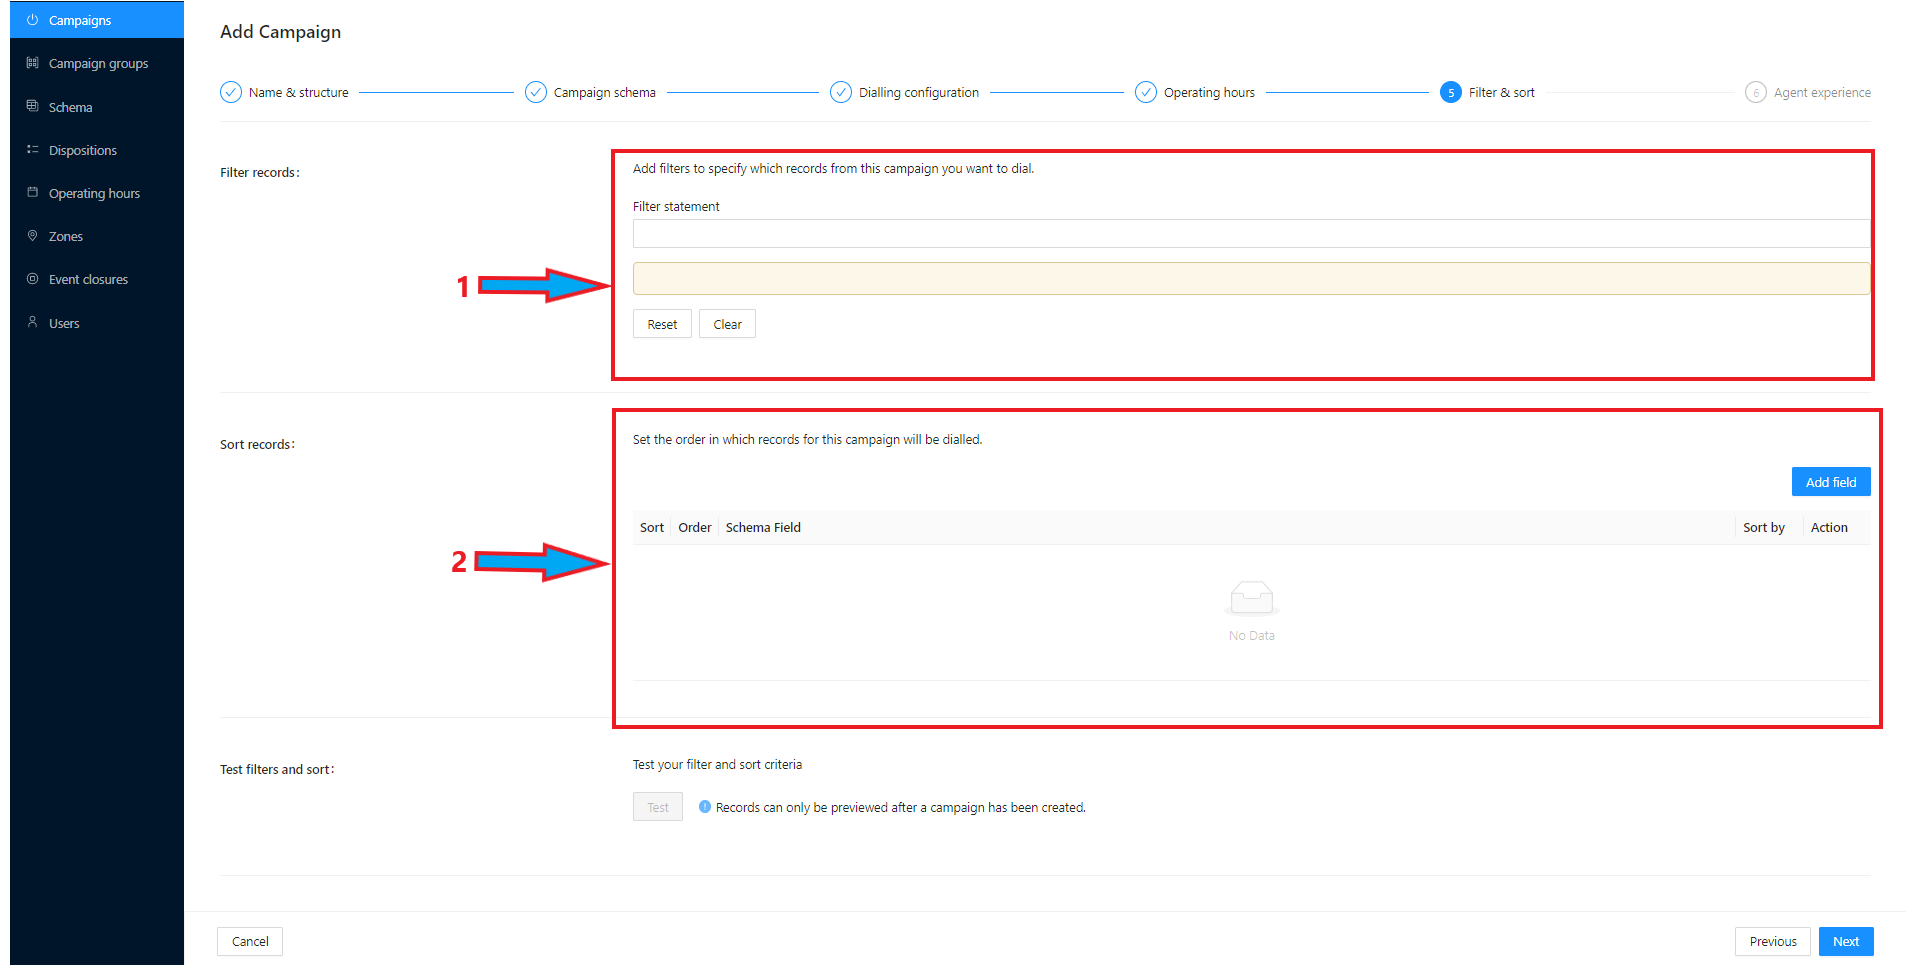
There is a bit to go through here, so lets split these parts out, and lets start with Filtering
Filter Records
The filter records section allows you to select multiple schema fields that you added in step 5, and create filters against those fields. Filtering records will include or exclude certain records. If you want to filter your list by a field, it must be included in the schema for the campaign.
To filter a campaign, first hover over the orange field of the Filter Records section. A couple of buttons will appear: Add rule (1) and Add Group (2).
Note - you can reset or clear your filters at any time by pressing either button (3) & (4)

Clicking Add rule will add a row with a drop down selection box. You can select a field from your schema from this box (1)
Clicking Add rule once will also support a hover condition (the “NOT” condition). Click the NOT condition to exclude the statement you are about to configure in the rule
Use Groups to ensure your rule has been setup correctly. Some examples of grouping are as follows:
Example 1 - Filter in where “Brand” = x and y, and filter out “Zone” = VIC
To add this filter I added a group first, and added the brand conditions
I then added another group, specified the “NOT” condition on the group, and set that filter as below

Example 2 - Filter out brand = x, and filter in zone = VIC and zone = NSW
To add this filter, I added a group first and included the zone conditions
I then added another group, and filtered out (using the NOT condition at the top of the group) where zone = VIC
Note, that I can achieve the same thing by switching the key specific operator (ie, the == sign instead of the “NOT” condition at the top of the group)

The easiest way to validate your filter is the “Filter Statement” section at the top of the filter. This statement will automatically update with an SQL style statement when you are visually modifying your filter.

You can also move your filter statements within the entire statement using the following item, which will appear when hovering your mouse over the selected filter

More information will be provided in the training session, however if you are using complex filters (as above), it is important to understand how logical operators and grouping works from the data perspective.
Sorting
Sorting is much simpler, and is achieved in the section below filtering. You can add multiple sort conditions to your records, and you can change the position of each sort statement, to change the order your records are sorted in. If you want to sort your list by a field, it must be included in the schema for the campaign.
Sorting is allowed on any inserted dialler schema field, and is always performed in an Ascending/Descending manner.
To sort your records, in the sort section, click the “Add Field” button:
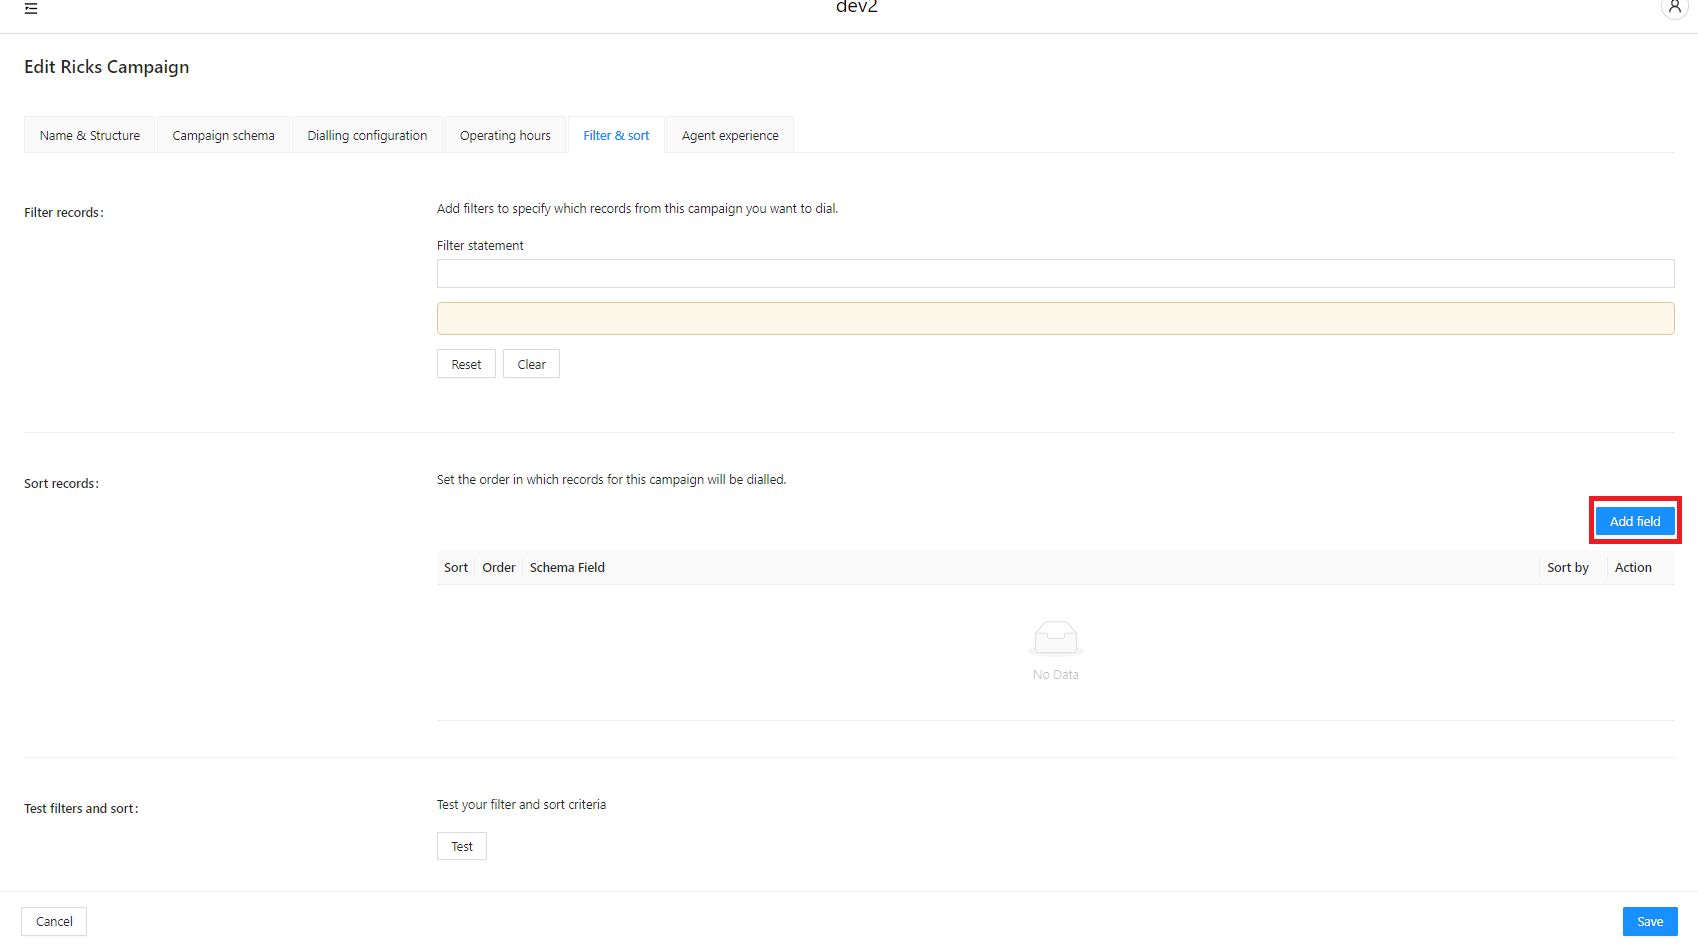
A modal will appear, asking you to select the field you would like to sort by (1), as well as the sort type (2):
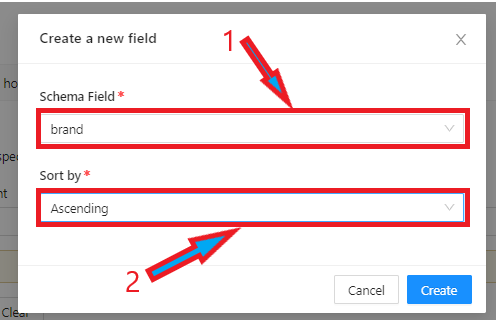
Select your field and your sorting criteria, and click “Create”. Your sort field will appear in the sort criteria screen (1). You can also see how the sort is occurring (2) on your newly added field. You can also delete the sort criteria (3), modify it (4), and move it’s position in the list (5) when you have multiple sort criteria.
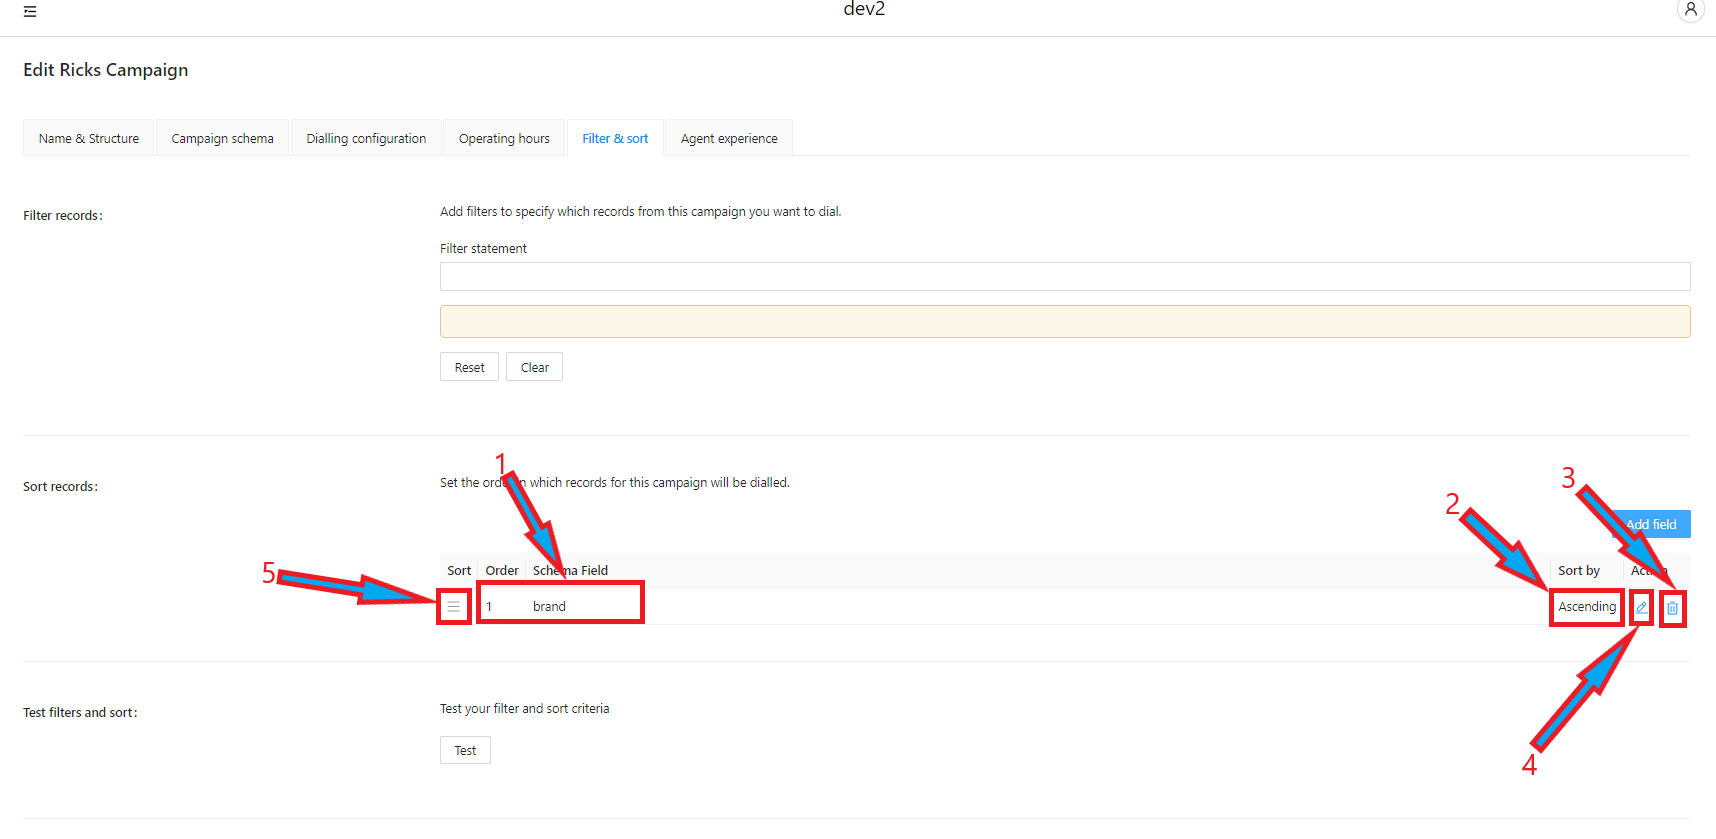
You can now add another sort criteria by pressing the “Add Field” button again, and inserting another field and configuring the sort criteria. You can then move these items to change the field sorting order using the button in the above screenshot (button 5 above):

Now that you’ve sorted and filtered, you can click the “Next” button to transition to the last page in campaign creation.
Note - you will not be able to test your filter at this time, as you will not have any records in the campaign to test. You can do this after the campaign has been created, and records uploaded to itS
Step 9 - Agent Interface
The agent interface is where you select which schema fields you would like to display to the agent via the Agent Console, when a call is connected to the agent. If you want to display a field, it must be included in the schema for the campaign.
The agent interface allows you to take a dialler schema field, and rename that field for the purpose of agent display, and then display the field to the agent.
The interface below allows you to add these fields and to rename them. To get started, click the “Add Field” button (1):

You will be presented with another modal which allows you to select your field (1), and change the name of that field on the agent’s display (2)
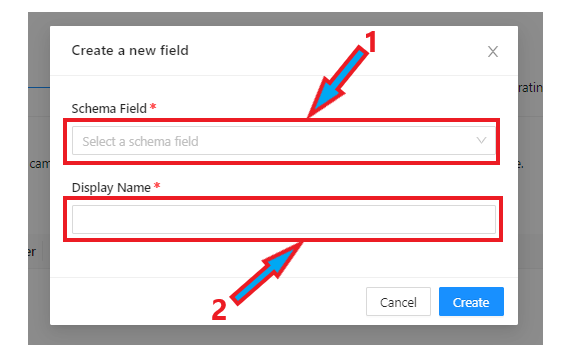
Select your field, and give the field a name. In the below example, I took the field “FamilyType” and changed this to “Customer Family Type”:
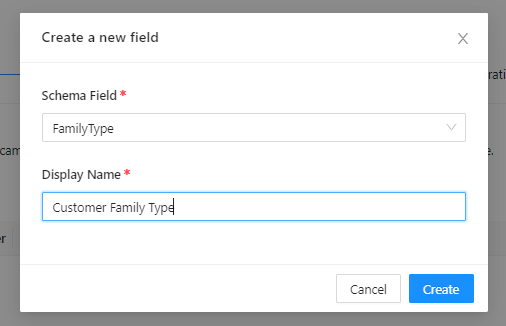
Next, click “Create” and repeat the process to complete your list of fields:

You can move your fields around by clicking and dragging on the “Sort” button (1) below. You can also edit the field (2), or delete it (3). In the below example, I switched the position (4) of the “brand” field and the “customer_name” field using the sort button (1):
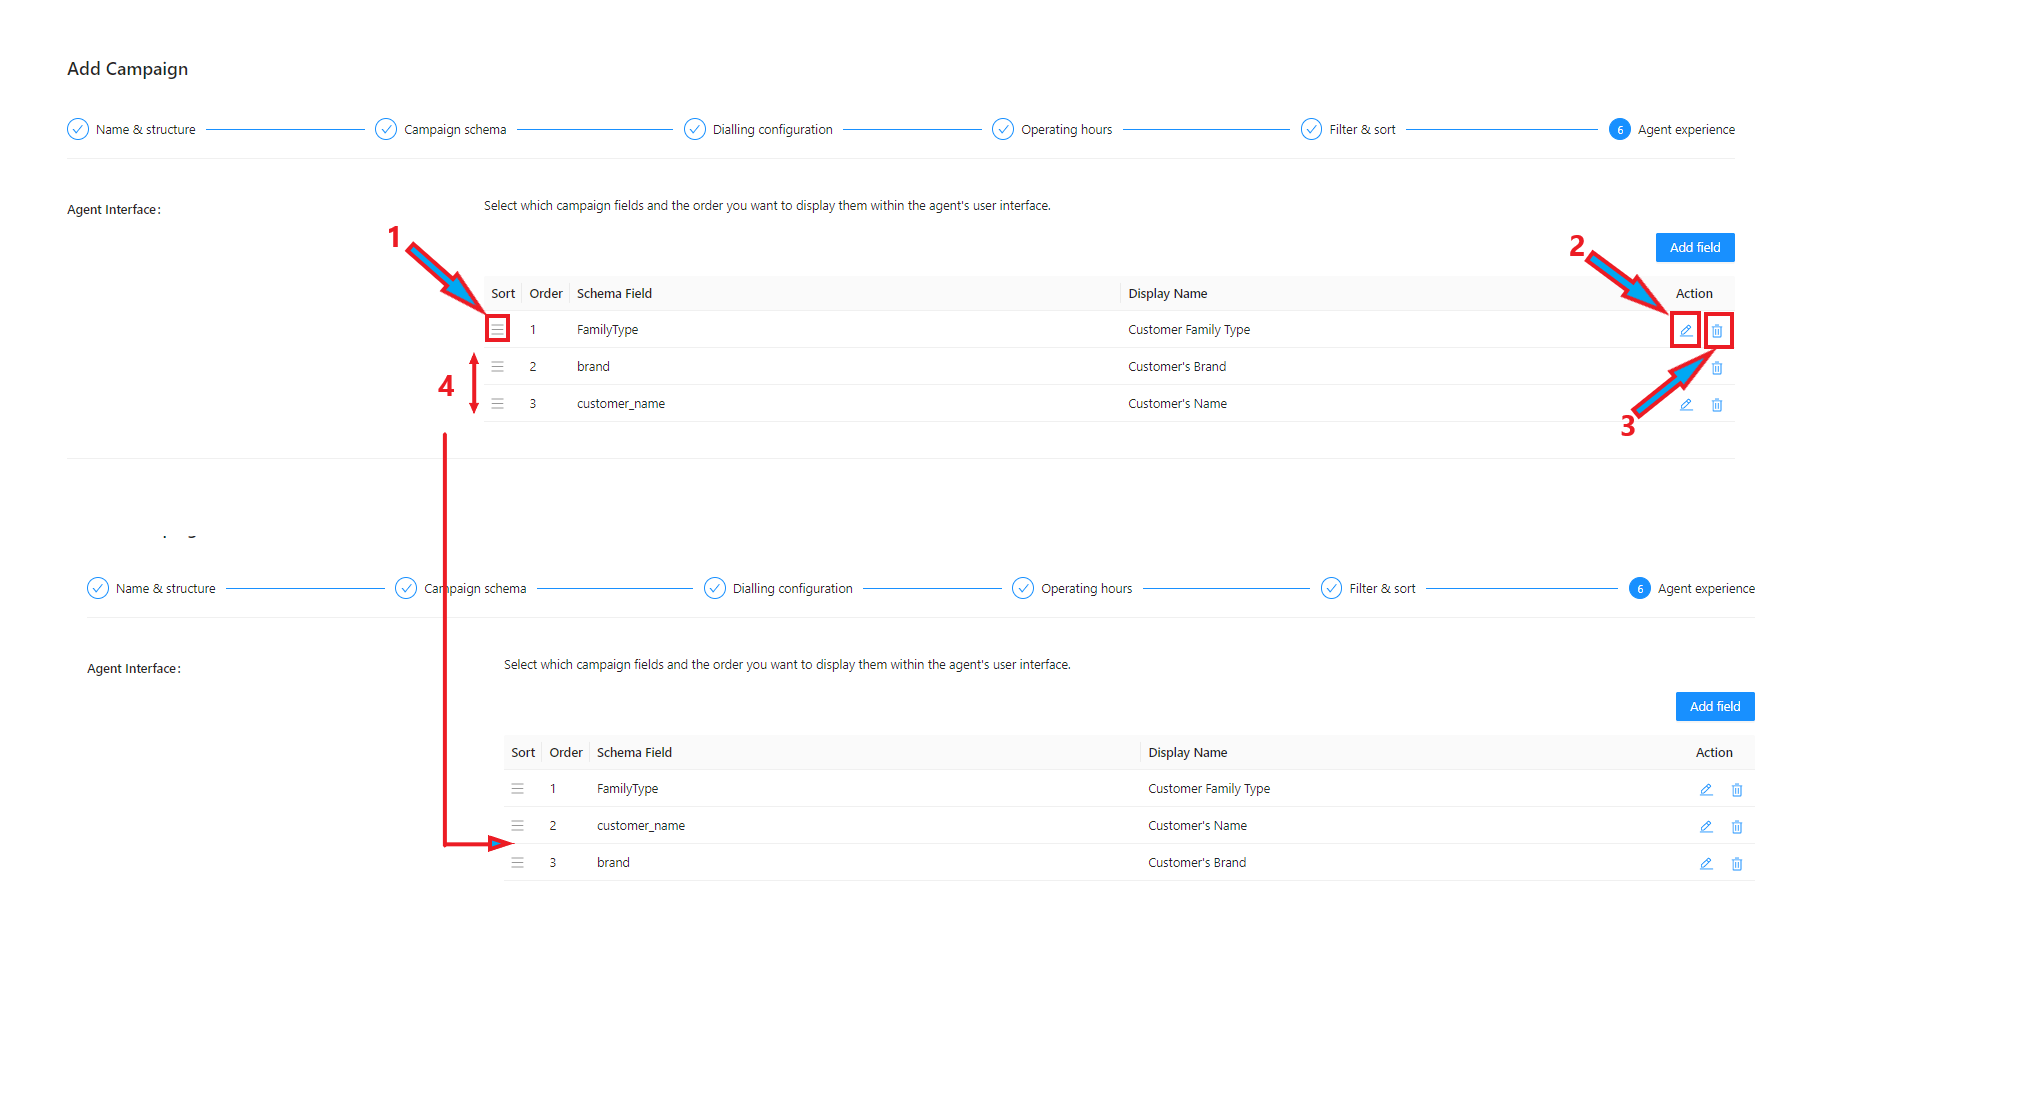
Once completed, click the “Save” button at the bottom right of your screen, and your campaign will be created!
Campaign Creation Conclusion
Now, to get the campaign started, we need to add records to the campaign, and we need to assign the campaign to a campaign group. Campaign groups will be covered in the next module, and records will be uploaded via API to your new dialler.
Running your campaigns
So, now you’ve created your campaign, and you’ve uploaded records to it. How do you get it to start dialling? What are the rules around the dialling of these campaigns? How do operating hours, blackout periods, and zone groups affect the dialling of your campaign? How does your campaign status fit into this?
What are the rules?
Once you have created your campaign, and uploaded records to it, the concept of “gates” now comes into play. Think of gates metaphorically - entering your house is akin to the actual dialling of a record, however your house has a gate on it… so does the act of dialling. Your actual house may only have 1 gate that a visitor needs to open to get to your house, but the dialler has multiple gates that need to be opened before it will start dialling, and then you have to get into the front door! Let’s visualise this metaphorically, using a series of gates leading to a house with a door:
.jpeg?inst-v=ff267536-0793-47b5-be49-0a77e65ce182)
As you can see from the above, the person at the start of the path needs to get through the:
Event Closures gate, to get to the
Operating Hours gate, to get to the
Zone Group Hours gate, to get to the
Filter Conditions gate, to get to the front door
Each gate must be opened before the visitor can reach your front door.
It is in this order that the gates in the dialler must be opened. The definition of open gates for these items are as follows:
There is no active event closure assigned to the campaign
The time right now must be within the operating hours of the campaign
The record zone must be enabled by the zone group hours assigned to the campaign
Your record must match the filter conditions applied to the campaign
Each gate must be opened in order - you can’t just jump over the first and second gates to get to the third. Each gate needs to be opened for your records to dial.
If all of your gates are opened, you will reach the front door. The front door can be open, or it can be locked unless you have the key, or it can be completely boarded up. Each of these conditions are set in the dialler by the “Status” of the campaign.
An open door means that all records can be dialled without any other restriction (except the gates) - the dialler status is ACTIVE
A locked door means that only Agent Callbacks can be dialled, as only Agent Callbacks have the key - all other visitors/record types will be blocked from entry - the dialler status is PAUSED
A boarded up door means that nobody can enter the house, whether they have a key or not - no records will be dialled - the dialler status is STOPPED
Lets now remove the metaphor, and explain this directly. A record will not dial if:
There is an active event closure against the record’s campaign
It is outside of the campaign operating hours
It is inside of the campaign’s operating hours, but outside of the record’s zone group dialling times
It is blocked by a filter
It is in a STOPPED state (no records will dial), or a PAUSED state (only agent and group callbacks will dial).
Editing Campaigns
Now that we understand how to create records, and how to get your campaigns running, lets talk about changing a campaign in flight.
Campaigns can be edited in the “Campaigns” screen at any time. Some edits will require the campaign to be stopped, and some will also validate against your existing records, but most edits can be done on the fly and in real time. Lets go through the edits, and how they can be done:
Real Time-Active Status Edits
You can edit configuration in real time at either the campaign level, or at a higher level of configuration, whilst the campaign is in an ACTIVE state:
Campaign Edits
By selecting your campaign, you can edit the following settings in Real Time:
Campaign Name
Campaign Description
Dial Mode
Outbound CLI
Max Attempts
Disposition Group assignment
Operating Hours group assignment
Zone group Group assignment
Filtering
Sorting
Agent Experience
Higher Level Edits
You can also change some of these items at the higher level (ie, you can change the Operating Hours assigned to a campaign, but you can also change the Operating Hours group itself at the higher level without changing the campaign). These items are as follows:
Disposition Group setting modification (including adding new dispositions to the group)
Operating Hours setting modification (including adding days, changing times)
Zones and Zone group modification (ie, adding new zones to Zones, changing a Zone group’s dialling hours in flight)
Edits requiring campaign stop and possible re-configuration
Some re-configuration will require your campaign to be stopped to perform, and if the configuration item you want to change applies across multiple campaigns, then you may need to stop multiple campaigns as well. There are also some instances where you will not be able to make a configuration change, even when a campaign is in a stopped state. Lets go through these now:
If I stop 1 campaign, I can…
Add a non-mandatory schema field to the campaign schema
Delete a higher level configuration item (ie, zone groups, operating hours) assigned to the campaign I have just stopped
I need to stop multiple campaigns to…
Delete a higher level configuration item (ie, zone group, operating hours) assigned to multiple campaigns
It gets more tricky when I…
Want to add a mandatory schema field to a campaign schema - to do this, you need to:
Stop your campaign first
Add the schema field to the higher level Schema section in the dialler
Ensure that all records in your existing campaign list have the new mandatory field
Update your Campaign Schema with the new field, making it mandatory
Save your campaign
Make your campaign Active again
Note: You will not be able to perform the above action unless the above conditions are also met
Remove a mandatory schema field from a campaign schema, when the schema field is being sorted by, filtered on, or is displayed to the agent - to do this, you need to:
Stop your campaign first
Remove the filter/sort/agent display dependency first
Remove the field from the Campaign Schema
Save your campaign
Make your campaign Active again
OCM will remind you of these validations, and will not let you proceed until you have completed the appropriate actions in the dialler UI.
